You can shoot while viewing a real-time image on the camera's LCD monitor or on a personal computer screen. This is called "Live View shooting."
- When using Live View shooting, using a hard disk-type CF card (such as MicroDrive) is not recommended. Use a memory card instead.
- If Live View shooting is done under direct sunlight or other high temperature environments, the < > icon (warning for high temperature in the camera) may appear on the screen. If Live View shooting continues with a high temperature, it may degrade image quality. You should therefore stop Live View shooting if the warning icon appears.
- With a hard disk-type CF card in the camera, if Live View shooting continues while the < > warning icon is displayed and the camera's temperature increases, the Live View shooting will stop automatically to protect the hard disk from the heat. Live View shooting will be disabled until the camera's temperature decreases.
|
About Remote Live View Shooting
With the provided software installed in the personal computer, you can connect the camera to the personal computer and shoot remotely while viewing the computer screen instead of the camera's viewfinder. For details, see the Software Instruction Manual in the CD-ROM.
|
Instead of looking through the viewfinder, you can look at a real-time image on the camera's LCD monitor while shooting. You can also magnify the real-time image on the LCD monitor by 5x or 10x so you can focus more precisely. Convenient when the camera is mounted on a tripod for shooting still lifes, for example.
Preparing for Live View Shooting
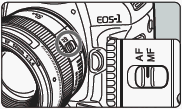 |
1. Set the lens focus mode switch to <MF>.
- During Live View shooting, autofocusing is not possible.
|
 |
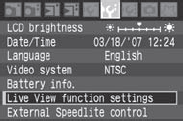
2. Select [Live View function settings].
- Under the [
 ] tab, select [Live View function settings], then press < ] tab, select [Live View function settings], then press < >. >.
|
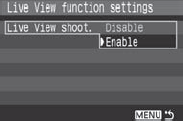
3. Select [Live View shoot.].
- Turn the <
 > dial to select [Live View shoot.], then press <>. > dial to select [Live View shoot.], then press <>.
|
4. Select [Enable].
- Turn the <> dial to select [Enable], then press <>.
|
| During Live View shooting, do not point the camera toward the sun. The sun's heat can damage the camera's components. |
| If you handhold the camera like a compact digital camera and shoot while viewing the LCD monitor, camera shake can cause blurred images. For Live View shooting, mounting the camera on a tripod is recommended. |
Displaying Live View Image on the LCD Monitor
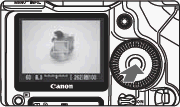 |
With the camera ready to shoot, press <>.
- The Live View image will appear on the LCD monitor in real-time with 100% field of view.
- With the video cable (provided) connecting the camera to a TV set, you can view images on the TV.
|
 During Live View image display, if you point the camera in a different direction, it might throw off the correct brightness momentarily and the image might not look right. Wait until the image stabilizes at the correct brightness before shooting. If you shoot while the image brightness is not yet stable, the resulting image might be overexposed or underexposed. During Live View image display, if you point the camera in a different direction, it might throw off the correct brightness momentarily and the image might not look right. Wait until the image stabilizes at the correct brightness before shooting. If you shoot while the image brightness is not yet stable, the resulting image might be overexposed or underexposed. |
 If the light source within the image changes, the screen might flicker. If this happens, press <> to end the shooting, then with the new light source in place, press <> again to resume shooting. If the light source within the image changes, the screen might flicker. If this happens, press <> to end the shooting, then with the new light source in place, press <> again to resume shooting. |
