Printing Vertical or Horizontal Banners (Large-Format Printing) Windows
You can create vertical or horizontal banners by printing originals that are in banner format on rolls.
Originals created in Microsoft Word or other applications in your preferred size can be enlarged to fill the width of roll paper by completing simple printer driver settings.
Fit Roll Width Size
You can easily create vertical or horizontal banners by automatically enlarging or reducing originals to fit the full width of rolls.
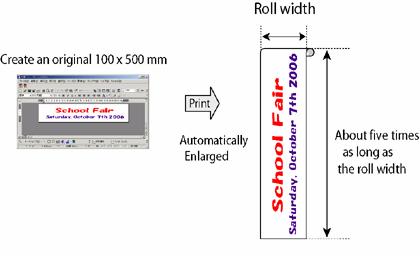
This topic describes how to print a banner about five times as long as the roll width based on the following example.
Document: A horizontal banner created in Microsoft Word
Page size: Non-standard (100x500 mm [3.9x19.7 in])
Paper: Roll
Paper type: Plain Paper
Roll paper width: 16 in (406.4 mm)
Follow the steps below to print a banner in either horizontal or vertical format.
- Register a Custom Media Size .
Banners tend to be in non-standard sizes, so register a Custom Media Size . In this example, 100x500 mm (3.9x19.7 in) is registered.
- In the application, create an original in the size you registered.
- Print the banner, using the settings that correspond to banners.
Registering a Custom Media Size
This example describes how to register a paper size that is horizontally elongated and suitable for banners in either horizontal or vertical format.
- Display the printer driver dialog box.
- Click the Page Setup tab to display the Page Setup sheet.

- Click Roll Paper in the "L":Media Source list.
- Click "O":Size Options to display the Media Size Options dialog box.
- Enter a desired paper name in Custom Media Size Name . "My Horizontal Banner" is used in this example.
- In Units , click mm .
- Under Media Size , enter "100" in Width and "500" in Height .
- Click Add to add the paper size of "My Horizontal Banner."
- Click OK to close the Media Size Options dialog box.
- Close the printer driver dialog box.
Creating the banner in the application
Follow the steps below to create the banner in Microsoft Word using the Custom Media Size you registered.
- Start Microsoft Word.
- Choose Page Setup from the File menu to display the Page Setup dialog box.
- Under Paper Size , click the Custom Media Size you registered—"My Horizontal Banner" in this example.
- Set the printing orientation to horizontal
- Create the banner.
Printing the banner
Follow the steps below to print the banner using the corresponding banner settings.
- Choose Print in the Microsoft Word menu.
- Select the printer in the dialog box, and then open the printer driver dialog box.
- Make sure the Main sheet is displayed.
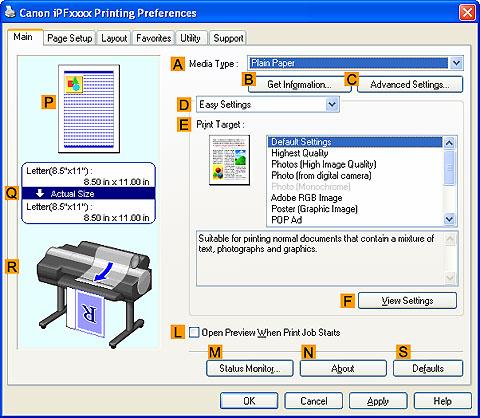
- In the "A":Media Type list, select the type of paper that is loaded. In this case, click Plain Paper .
- After confirming that "D":Easy Settings is selected, click POP Ad in the "E":Print Target list.
- Click the Page Setup tab to display the Page Setup sheet.
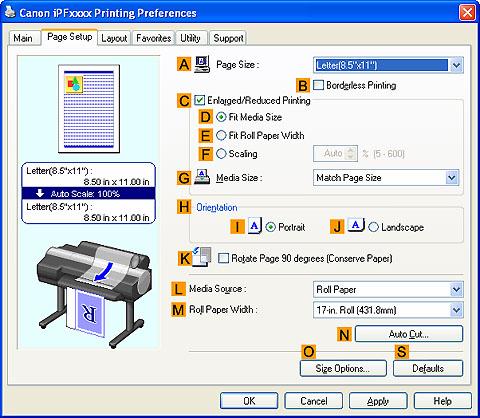
- In the "A":Page Size list, click the size you registered, "My Horizontal Banner."
- Select the "D":Enlarged/Reduced Printing check box.
- Click Roll Paper in the "L":Media Source list.
- After you click "E":Fit Roll Paper Width , the Information dialog box is displayed.
- Select the width of the loaded roll in the Roll Paper Width list. In this case, click 16-in. Roll (406.4mm) , and then click OK .
- Confirm the print settings and print as desired.
