Setting up the Toolbox MAIL button functions
| Article ID: ART124004 | | | Date published: 05/12/2015 | | | Date last updated: 08/17/2015 |
Description
Solution
How to Setup the Toolbox Mail Button Functions
Most of the Toolbox versions will have the same buttons and functions. However, some versions may have more functions than others.
Mail Button
| This function scans an item, starts your e-mail program and attaches the scanned image file to a new message. The attached file can be compressed to a size appropriate for sending. | ||
| To use this function, one of the following e-mail programs should be installed. | ||
 |
Microsoft Outlook Express, Microsoft Outlook, Eudora or Netscape Messenger. (Some mail programs are required to set the MAPI function on.) | |
 |
Mail, Eudora or MS Entourage. | |
Scan Mode
Click the down-arrow next to 'Scan Mode' to choose the appropriate scanning mode.
- Black & White
- Grayscale
- Color
- Color (Magazine)
- Color (Multi-Scan)
- Color (Auto crop)
Black and White Scans an item as a black and white image. Grayscale Scans an item as a grayscale image (similar to a monochrome picture). Color Scans an item as a color image with the Descreen function set to Off. Color (Magazine) Scans an item as a color image with the Descreen function set to On. Color (Multi-Scan) Scans items in color. If more than one item is placed on the document glass of the scanner, each one is automatically cut out, straightened, and placed in an individual file. Color (Auto crop) Scans items in color. Automatically detects item positions and scans the smallest possible area into which all items will fit.
* Moir é patterns may appear in images scanned from printed materials. The Descreen function limits this to the greatest possible extent. However, scanning takes longer when Descreen is set to On. * Multiple items will be printed when multiple items are scanned with the Color (Multi-Scan) mode.
Paper Size
Click the down-arrow next to 'Paper Size' to choose the appropriate paper size.
- A4
- Letter
- Business Card
- 4" x 6" Portrait
- 4" x 6" Landscape
- Custom (8.50x11.69 Inches)
Note: The above paper sizes may not appear or may appear differently in some Toolbox versions.
* The Paper Size cannot be selected when the Scan Mode is set to Color (Multi-Scan) or Color (Auto crop).
Upper Limit of Attached File
This category selects the approximate, maximum file size after compression for image attachments to e-mail messages.
Select 150 KB, 300 KB, 600 KB, or 900 KB. For general use, you are recommended to set it at 150 KB.
* The Image Quality setting will change to correspond with the "Upper Limit of Attached File" setting. * The "Upper Limit of Attached File" category is disabled if the Scan Mode is set to Black and White. * The "Upper Limit of Attached File" category is disabled if PDF, PDF (Multiple Pages) or PDF (Add Page) is the file type used in the "Save as Type" category. * The actual file size limit is approximate. Some image files may actually exceed the limit after compression. * If you scan with the Scan Mode set to Color (Multi-Scan) or Color (Auto Crop), the Image Quality setting will change to correspond to the "Upper Limit of Attached File" setting.
Image Quality
This category selects the scanning resolution (fineness).
The higher the resolution (the larger the value), the finer the resulting image. However, the file size also increases with the resolution. The available options will vary according to the options selected in the Scan Mode, Paper Size and Upper Limit of Attached File categories. If the Scan Mode is set to Color (Multi-Scan) or Color (Auto crop), the following Image Quality settings are available: 75 dpi, 150 dpi, 300 dpi, 600 dpi (300 dpi is the maximum resolution for Macintosh).
* If the file type in the "Save as Type" category is set to PDF, PDF (Multiple Pages) or PDF (Add Page), the maximum Image Quality setting is 400 dpi for Windows and 300 dpi for Macintosh. The highest Windows setting also becomes 300 dpi when the Scan Mode is set to Color (Auto crop) or Color (Multi-Scan).
Display the Scanner Driver
This category sets whether or not the scan settings are set with the ScanGear CS scanner driver.
If a check mark is placed in this category, the ScanGear CS window will open when you click the Scan button at the window's lower right corner, allowing you to adjust the scan settings in detail.
The Scanner settings in the Mail window, such as the Scan Mode and Paper Size, et cetera, are disabled. Set them in the ScanGear CS window instead.
* With Windows, when the file type in the "Save as Type" category is set to PDF, PDF (Multiple Pages) or PDF (Add Page) and you have selected Color/Full Platen and more than 400dpi in the ScanGear CS window, a warning message will display and you will not be able to proceed with the scan. Select a smaller Paper Size and lower resolution. * With a Macintosh, the "Display the Scanner Driver" category is disabled when the file type in the "Save as Type" category is set to PDF, PDF (Multiple Pages) or PDF (Add Page). * If Black and White has been selected in the ScanGear CS window and the file type in the "Save as Type" category has been set to JPEG/Exif, the image gets saved as a JPEG grayscale file. * If Multi-Scan is selected in the ScanGear CS window, the number of image files sent to the printer corresponds to the number of items on the document glass of the scanner.
File Name Input a file name here for the scanned image.
* When you use the default file name to scan two or more images (i.e. selecting Color (Multi-Scan) as the Scan Mode) and store the files in a folder, a sequential four-digit number such as "0001" is appended to the end of each file name starting from the first image (i.e. Mail0001, Mail0002, Mail0003...).
When you use a file name other than the default one, that name is used without modification for the first image, but subsequent images have a sequential four-digit number, such as "0001" appended (i.e. ABC, ABC0001, ABC0002...).* The file name extension is automatically added.
Save as Type This category selects the file format for saving the scanned image.
You can select from the JPEG/Exif, PDF, PDF (Multiple Pages) and PDF (Add Page) options.
Selecting PDF (Multiple Pages) inserts a multiple-page document into a single PDF file. A dialog box will be displayed between the scanning of each page.When the dialog box is displayed, to scan successive pages, place the next page on the document glass and then click [Next]. The next page is then scanned. When you have no more pages to scan, click [Finish] to cease scanning pages into the file.
Selecting PDF (Add Page) inserts pages into an existing PDF file, producing a single file.
Use the [Browse] button to set the [Add Scanned Image to] category. The "Save Scanned Image to" category will cease to display and the scanned images will be saved to the file specified in the "Add Scanned Image to" category.
The original file specified in "Add Scanned Image to" is kept as it is, and a new file with a new file name will be created to store the new pages.Multiple documents on the document glass are scanned into a single PDF file when the Scan Mode is set to Color (Multi-Scan).
* The JPEG format can only be selected for Grayscale or Color mode images. * Only the PDF option can be selected for Black and White images. * Only PDF files created with the Toolbox can be specified as Add Scanned Image to. PDF files created by other application programs cannot have pages appended to them even if they are selected. PDF files modified by other application programs cannot have pages appended to them even if they were created with CanoScan Toolbox. * You are recommended to limit the number of pages in any one multiple PDF file with PDF (Multiple Pages) or PDF (Add Page) to 20 or less if you are scanning a color document with the Image Quality set to 300 dpi and the size to a setting equivalent to Letter size. * To change the settings used to create PDF files, click the [PDF Settings] button.
PDF Settings button This button opens the settings window used for creating PDF files.
The PDF Settings window will open when you have selected PDF as the file type in the Save as Type category and click the PDF Settings button.
Save Scanned Image to This box displays the location to which the scanned image will be saved.
To change the folder in which it will be saved, for Windows, click the [Browse] button, select a folder and click the [OK] button.
For Macintosh, click the [Select] button, select a folder and click the [Choose] button.
* The following folder is specified as the default location for scanned images. My Pictures folder within the My Documents folder My Pictures folder within the Pictures folder, in the logged in user account folder in the Users folder
Save Pictures to a Subfolder with Current Date
This category sets whether or not a subfolder bearing the scanning date is created in the selected folder and the image files are saved to it.
If a check mark is placed in this category, a folder bearing the scanning date (such as "2004-01-15") is automatically created within the selected folder, and the images are saved to it with numerical file name suffixes assigned in the order in which they are saved. For example, if the "2004-01-15" folder contains a file named "Mail0001.JPG," and the next file is saved the next day in the "2004-01-16" folder, this image file will be named sequentially as "Mail0002.JPG."
If a check mark is placed in this category, a folder bearing the scanning date (such as "2004-01-15") is automatically created within the selected folder, and the images are saved to it with numerical file name suffixes assigned sequentially within each folder. For example, even if the "2004-01-15" folder contains a file named "Mail0001.JPG," the "2004-01-16" folder created the next day may also contain one named "Mail0001.JPG."
When Save as Type is set to PDF (Add Page), this function is disabled.
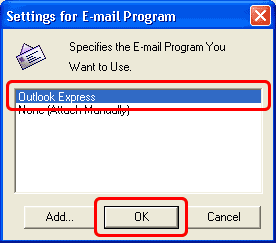
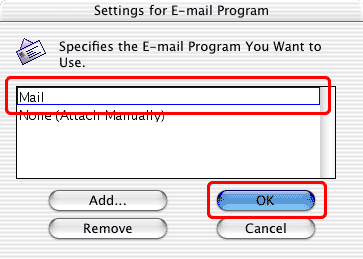
Mail Program This category sets the e-mail application program to which images are sent. The currently linked program is displayed in the box.
If no name displays in the box (default) or you wish to change the specified program, click the [Set...] button (Windows) or [Select] button (Macintosh), select the program you wish to use, and click the [OK] button.
If the application program you wish to use is not included in the list, select the [None (Attach Manually)] option. Please note that an e-mail program is not started with this option and that you will have to open a new message and perform the attachment procedures yourself. Please see below.
* To use this function, one of the following e-mail programs should be installed. Microsoft Outlook Express, Microsoft Outlook, Eudora or Netscape Messenger. (Some mail programs are required to set the MAPI function on.) Mail (Mac OS X 10.2 or later), Eudora or MS Entourage.
Confirmation of the Scanned Image and Exif Settings Place a check mark in this category to view scanned thumbnail images (small images) and set the location and file format for saving the image.
[Reset] Button
This button restores each setting in the window to its default setting (the original post-installation setting).
[Apply] Button
This button makes the selected settings take effect and display the next time the window is used.
Pressing the [Cancel] button instead of [Apply] will reset the changes to the previous state.
[Cancel] Button
This button cancels any settings that you have changed, closes the window that is currently open and displays the Toolbox's main window.
Changed settings will be cancelled unless you have pressed the [Apply] button.
[Scan] Button
This button initiates a scan of the item using the selected settings. When the scan is complete, it automatically opens the linked e-mail program and displays a new message with the image file attached.
* If the Scan Mode is set to Color (Multi-Scan) and multiple items are scanned, multiple images are attached to a single e-mail composition window or multiple images are individually attached to multiple e-mail composition windows. * If multiple e-mail composition windows are opened when the Scan Mode is set to Color (Multi-Scan) and multiple items are scanned, you can change the result by selecting [PDF (Multiple Pages)] in the "Save as Type" category.