 Scanning in ScanGear's Simple Mode
Use Simple Mode to scan easily by following the on-screen steps.
1. Place the documents face-down on the platen. Alternatively, load the documents face-up on the ADF (Auto Document Feeder), then start ScanGear.
2. Set Select Source according to the document placed on the platen.
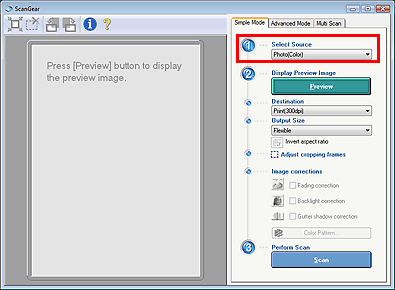
| Photo(Color) | Scan color photographs. |
| Magazine(Color) | Scan color magazines. |
| Newspaper(B&W) | Scan text and line drawings in black and white. |
| Document(Grayscale) | Scan photographs and documents in black and white.
Select this mode to produce gradations in gray. |
| Document(Color) ADF | Scan documents from the ADF (Auto Document Feeder) in color. |
| Document(Grayscale) ADF | Scan documents from the ADF (Auto Document Feeder) in black and white. |
 Important
 Some applications do not support continuous scanning from the ADF (Auto Document Feeder). For details, refer to the instruction manual of the application.
 Reference
To scan magazines containing many color photographs, scan in Advanced Mode with Color Mode set to Color and Descreen set to On.
3. Click Preview and check the document to be scanned.
Preview image appears in the preview area.

Important Preview button is not displayed when Document(Color) ADF or Document(Grayscale) ADF is selected for Select Source. Proceed on to step 4.
Reference If you scan without preview, colors are adjusted based on the document type selected in Select Source.
4. Set Destination.
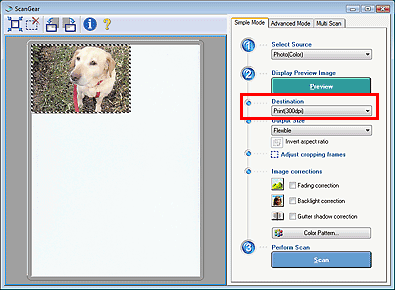
| Print(300dpi) | Select this to print the scanned image on a printer. |
| Image display(150dpi) | Select this to check the scanned image on the monitor. |
| OCR(300dpi) | Select this to convert the scanned image to text data with OCR software. OCR software is software that converts text scanned as an image into text data that can be edited in a word processor and other programs. |
Reference To scan at 301 dpi or higher, scan in Advanced Mode tab.
5. Set Output Size.
Output size options vary by the item selected in Select Source and Destination.
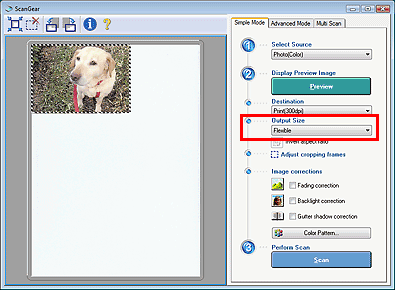
| Item selected in Destination | Output size options |
|---|
| Print(300dpi) | Flexible, L Landscape, L Portrait, 2L Landscape, 2L Portrait, 4x6in Landscape, 4x6in Portrait, Hagaki, A4, Letter, Add/Delete |
| Image display(150dpi) | Flexible, 640x480 pixels, 800x600 pixels, 1024x768 pixels, 1600x1200 pixels, 2048x1536 pixels, Add/Delete |
| OCR(300dpi) | Flexible |
Important Output Size is not displayed when Document(Color) ADF or Document(Grayscale) ADF is selected for Select Source.
Reference Select Add/Delete... to set custom size and save it as a new output size option.
6. Specify the scan area (cropping frame) as required.
Adjust the scan area (cropping frame size and position) of the preview image. You can also specify two or more cropping frames.
If an area is not specified, auto crop applies (document will be scanned at the document size). If an area is specified, only the portion in the specified area will be scanned.
Important Preview images and cropping frames are not displayed when Document(Color) ADF or Document(Grayscale) ADF is selected for Select Source.
7. Set Image correction as required.
| Fading correction | Corrects and scans photographs that have faded with time or have a colorcast. |
| Backlight correction | Corrects and scans photographs that have been shot against light. |
| Remove gutter shadow | Corrects shadows that appear between pages when scanning open booklets.
Important For precautions on using this function, see "Gutter Shadow Correction" in the Advanced Mode tab. |
 Color Pattern...
Click to open a dialog box to adjust the image's overall color. You can correct colors that have faded due to colorcast, etc. and reproduce natural colors.
Important Image corrections is not displayed when Document(Color) ADF or Document(Grayscale) ADF is selected for Select Source.
8. Click Scan.
Scanning starts.
Reference ScanGear's response after scanning can be specified in Status of ScanGear dialog after scanning on the Scan tab of the Preferences dialog box in Advanced Mode.
 TOP
TOP
