
Cover Sheet Editor-Creating an Original Cover Sheet-ICMF 3200
| Article ID: ART124894 | | | Date published: 05/12/2015 | | | Date last updated: 08/14/2015 |
Description
Solution
Creating an Original Cover Sheet
Inserting Text
Adjusting Text Properties
Specifying Fields
Creating Objects
Editing Objects
Specifying Object Properties
Arranging Objects
Specifying Grid Options
Printing a Cover Sheet
Registering an Original Cover Sheet as a Template
This section explains how to insert text, adjust text properties, specify fields, create objects, adjust objects, and specify grid options in order to create an original cover sheet.
Inserting Text |
You can insert text and numbers into the cover page. The properties of any text or the text box itself can also be changed. To edit the text, change to the edit mode by clicking anywhere inside of a text box, and then place the cursor on the text that you want to edit.
- Click [
 ] (Text Box) on the toolbar.
Alternatively, select [Text Box] from the [Insert] menu. - Drag the pointer on the area of the cover sheet to insert text.
A square or rectangular text box appears. - Click inside the text box.
The cursor for editing text appears. - Enter the desired text.
top
Adjusting Text Properties |
You can change text properties whenever you want. When you change text properties, all text inside the selected text box is affected.

Text properties for field settings inside a text box are also changed according to the text properties you specified.
top
 Font
Font
- Click inside the text box.
The text box is now ready for editing. - Select the desired font from the Font drop-down men on the toolbar.
top
Font Size
- Click inside the text box.
The text box is now ready for editing. - Select the desired font size from the Font Size drop-down men on the toolbar.
You can also specify the font size by directly entering it into Font Size and pressing [Enter] on the keyboard.
top
Font Color
- Click inside the text box.
The text box is now ready for editing. - Select the desired font color from the Font Color drop-down men on the toolbar.
top
Bold Formatting
- Click inside the text box.
The text box is now ready for editing. - Click [
 ] on the toolbar.
To undo the bold formatting, click [] (Bold) again.
top
Italic Formatting
- Click inside the text box.
The text box is now ready for editing. - Click [
 ] on the toolbar.
To undo the italic formatting, click [] (Italic) again.
top
Underlining
- Click inside the text box.
The text box is now ready for editing. - Click [
 ] on the toolbar.
To undo the underlining, click [] (Underline) again.
top
Aligning Text
- Click inside the text box.
The text box is now ready for editing. - Click [
 ] (Align Left), [
 ] (Align Center), or [
 ] (Align Right) on the toolbar.
top
Specifying Text Properties
You can specify all of the properties for text inside a text box simultaneously.
[Preview] inside the [Text Properties] dialog box displays a preview of how the text would appear with the currently selected settings. Use it as a guide if you are specifying settings.
- Click inside the text box.
The text box is now ready for editing. - Click [
 ] (Properties) on the toolbar.
Alternatively, select [Properties] from the [Edit] menu.
Alternatively, right-click inside the text box, then click [Properties].
The [Text Properties] dialog box appears. - Select [Font], [Font Style], and [Size] from the respective list boxes.

Alternatively, enter the desired font size directly into [Size]. - Select [Strikethrough] or [Underline] to draw a line through or to underline text.
- Select the desired text color from [Color].
- Specify [Alignment] for the next.
- Click [OK].
top
Specifying Text Box Properties
Follow the procedure below to specify the type of border, border color, and background color of the selected text box.
- Click anywhere on the border of the text box.
The border of the text box is selected. - Click [] (Properties) on the toolbar.
You can also select [Properties] from the [Edit] menu.
You can also display the [Text Box Properties] dialog box by double-clicking anywhere on the border of the text box.
The [Text Box Properties] dialog box opens.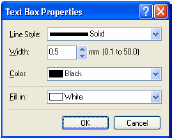
- Select the desired border type from [Line Style].
- Specify the [Width] setting to set the thickness of the border (0.1 to 50.0).

-The [Width] setting is available only if [Line Style] is set to 'Solid'.
-You can change the unit of measure for the width in the [Unit Setting] dialog box displayed by selecting [Unit] from the [View] menu. - Select the desired color of the border from [Color].
- Select the desired background color for the text box from [Fill in].
- Click [OK].
top
Specifying Fields |
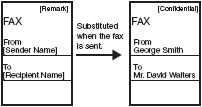
You can show sender or fax recipient information, such as the name, fax number, company name, and department/division name on the cover sheet using a feature called a "field."
Fields are objects in the cover sheet that you can replace with data when sending a fax. Actual sender and recipient information as specified in the fax driver is automatically inserted in the corresponding fields on the cover sheet during transmission.
Available fields:
- Sender information: Name, Fax Number, Company, Dept./Div.
- Recipient information: Name, Fax Number, Company, Dept.Div.
- Sheets to send
- Other information: Remark, Comment
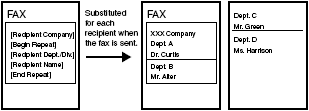
A recipient information field that contains multiple values is called a "repeating field". This feature is convenient for using the same cover sheet to send faxes to multiple recipients.
The repeating field is used to insert data for every recipient specified in the fax driver.
In addition to the [Sender Information] and [Recipient Information] fields, you can also insert [Sheets to Send], [Remark], and [Comment] fields on the cover sheet. When the fax is sent, the number of sheets to send as a fax specified in the fax driver is inserted in the [Sheets to Send] field, information specified in the fax driver such as [Urgent] or [Confidential] is inserted in the [Remark] field, and comments specified in the fax driver are entered in the [Comment] field.
top
Inserting Sender and Recipient Information Fields When Editing Text
-
Inside the text box, place the cursor to where you want to insert the field.
- Click the [Insert] menu, [Sender Information] or [Recipient Information], select the field (such as [Name], [Fax Number], [Company], and [Dept./Div.]) to insert.
The selected field is inserted.
If you select [Insert All], all of the available fields for sender or recipient information are inserted simultaneously. The fields are inserted in this order: [Name], [Fax Number], [Company], and [Dept./Div.]. You can change the position of the fields as needed.
Inserting Sender and Recipient Information Fields When Not Editing Text
- Click the [Insert] menu, [Sender Information] or [Recipient Information], select the field (such as [Name], [Fax Number], [Company], and [Dept./Div.]) to insert.
- Drag the pointer on the area of the cover sheet to where you want to insert the field.
A square or rectangular text book containing the selected field appears.
If you select [Insert All], all of the available fields for send or recipient information are inserted simultaneously. The fields are inserted in this order: [Name], [Fax Number], [Company], and [Dept./Div.]. You can change the position of the fields as needed.
Inserting Repeating Fields
Follow the procedure below to show information for multiple recipients on the cover sheet when sending a fax.
- Insert the desired recipient information field, such as [Name], [Fax Number], [Company], and [Dept./Div.].
- Inside the text box, place the cursor to the left of the field to repeat.
- Click the [Insert] menu, [Recipient Information], then [Begin Repeat].
The [Begin Repeat] field is inserted. - Inside the text box, place the cursor to the right of the field to repeat.
- Click the [Insert] menu, [Recipient Information], then [End Repeat].
The [End Repeat] field is inserted.
The field between the [Begin Repeat] and [End Repeat] fields is replaced with multiple recipient's information when sending a fax.
The text box may not be able to accommodate all of the actual data for a repeating field if a large number of recipients are specified for sending a fax. In this case, a new page is automatically created and data that does not fit into the text box displays from the top of the new page.
Inserting Borders Between Repeating Fields
When you specify a repeating field for recipient information, you can also select to insert borders between the values for easier reading.
- Click the [Insert] menu, [Recipient Information], then [Borders].
The [Border Settings] dialog box opens. - Select [Insert a Border Between Repeats] to insert borders between multiple values in a repeating recipient information field.
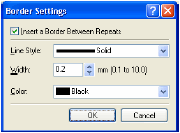
If you do not want to insert borders between the values, deselect this checkbox, then click [OK]. - Select the type of line to use as the border from [Line Style].
- Specify the [Width] setting to set the thickness of the borders (0.1 to 10.0].
-The [Width] setting is available only if [Line Style] is set to 'Solid'.
-You can change the unit of measure for the width in the [Unit Setting] dialog box displayed by selecting [Unit] from the [View] menu. - Select the desired color of the borders from [Color].
- Click [OK].
Inserting Sheets to Send Field When Editing Text
-
Inside the text box, place the cursor where you want to insert the field.
-
From the [Insert] menu, select [Sheets to Send].
The [Sheets to Send] field is inserted.
Insert Sheets to Send Field When Not Editing Text
- From the [Insert] menu, select [Sheets to Send].
- Drag the pointer on the area of the cover sheet to insert the field.
A square or rectangular text box containing the selected field appears.
Inserting Remark and Comment Fields When Editing Text
- Inside the text box, place the cursor to where you want to insert the field.
- From the [Insert] menu, select either [Remark] or [Comment].
The [Remark] field or the [Comment] field is inserted depending on your selection.
Inserting Remark and Comment Fields When Not Editing Text
- From the [Insert] menu, select either [Remark] or [Comment].
- Drag the pointer on the area of the cover sheet to insert the field.
A square or rectangular text box containing the selected field appears.
Creating Objects |
You can draw lines, rectangles, rounded rectangles, or ovals on the cover sheet. You can also change their properties once they are drawn.
Lines
- Click [
 ] (Line) on the toolbar.
You can also select [Line] from the [Drawing] menu. - Drag the pointer on the area of the cover sheet to draw the line.
To draw horizontal or vertical lines, or to draw lines angled at 45 degrees and 45/2 degrees, hold down [SHIFT] on the keyboard while dragging.
Rectangles
- Click [
 ] (Rectangle) on the toolbar.
You can also select [Rectangle] from the [Drawing] menu. - Drag the pointer on the area of the cover sheet to draw the rectangle.
To draw a square, hold down [SHIFT] on the keyboard while dragging.
Rounded Rectangles
- Click [
 ] (Rounded Rectangle) on the toolbar.
You can also select [Rounded Rectangle] from the [Drawing] menu. - Drag the pointer on the area of the cover sheet to draw the rounded rectangle.
To draw a rounded square, hold down [SHIFT] on the keyboard while dragging.
You can adjust the degree of the curve or the roundness of the corners of the rounded rectangle. To do so, click anywhere outside the newly created rounded rectangle, click the rounded rectangle again, then click and drag the inner handle in its upper right corner to change the degree of the curve.
Ovals
- Click [
 ] (Oval) on the toolbar.
You can also select [Oval] from the [Drawing] menu. - Drag the pointer on the area of the cover sheet to draw the oval.
To draw a circle, hold down [SHIFT] on the keyboard while dragging.
Inserting Images
- Click [
 ] (Image) on the toolbar.
You can also select [Image] from the [Insert] menu.
The [Open] dialog box appears. - Specify the file name of the bitmap file that you want to insert.
Clicking [Preview] opens the [Preview] dialog box, where an image of the highlighted bitmap file is displayed. - Click [Open].
Editing Objects |
You can copy, move, and delete objects such as lines, rectangles, rounded rectangles, ovals, images, and text boxes on the cover sheet.
Selecting an Object
- Click the object to select.
You can also drag the pointer completely over the object.
The object is selected.
You can also select multiple objects by holding down [SHIFT] on the keyboard and clicking each object that you want to select, or by dragging the pointer completely over the objects. If you want to deselect any of the objects you selected, hold down [SHIFT] on the keyboard, then click the objects that you want to deselect.
Moving an Object within the Same Cover Sheet
- Select the object to move.
You can select multiple objects and move them at the same time. -
Drag the selected object to the desired location.
Alternatively, use any of the four arrow keys to move the object in the desired direction in 0.1 mm increments.
- Hold down [SHIFT] on the keyboard while dragging to move the object horizontally or vertically only.
- Hold down [CTRL] on the keyboard while dragging to copy the selected object and drag the copy to the desired location.
- If [Snap to Grid] is specified, holding down [SHIFT] on the keyboard while pressing an arrow key moves the object in the direction of the arrow in half-grid space increments. If [Snap to Grid] is not specified, holding down [SHIFT] on the keyboard while pressing an arrow key moves the object in the direction of the arrow in 0.0787" (2.0 mm) increments.
Moving an Object to a Different Cover Sheet
- Select the object to move.
You can select multiple objects and move them at the same time. - Click [
 ] (Cut) on the toolbar.
Alternatively, select [Cut] from the [Edit] menu. - Display the second cover sheet.
If the second cover sheet is open, you can select it from the [Windows] menu. - Click [
 ] (Paste) on the toolbar.
Alternatively, select [Paste] from the [Edit] menu.
The selected object is moved to the active cover sheet.
Resizing an Object
- Select the object whose size you want to change.
You can select multiple objects and change all of their sizes at the same time. -
Drag any handle on the selected object to the change its size.
-
The shape of the pointer changes depending on which handle you place it over. - Dragging the handles on the top and bottom sides of the objects changes it height. - Dragging the handles on the left and right sides of the object changes its width. - Dragging the handles on the corners of the object changes its height and width.
Copying an Object by Dragging
- Select the object to copy.
You can select multiple objects and copy them at the same time. - Hold down [CTRL] on the keyboard, then drag the selected (copied) object to the desired location.
Dragging the selected object without holding down [CTRL] on the keyboard moves the object to the new location instead of copying it.
Copying an Object by Using Button or Menu Commands
You can use button and menu commands to copy an object such as a line, rectangle, rounded rectangle, oval, image, or text box on the same cover sheet or to another cover sheet.
- Select the object to copy.
You can select multiple objects and copy them at the same time. - Click [
 ] (Copy) on the toolbar.
You can also select [Copy] from the [Edit] menu. - If you want to copy the object to a different cover sheet, display the second cover sheet.
If the second cover sheet is open, you can select it from the [Windows] menu. -
Click [] (Paste) on the toolbar.
Alternatively, select [Paste] from the [Edit] menu. The selected object is copied.
- You cannot copy an object to a different cover sheet by dragging.
- To copy text, drag the pointer over the text to select it, click [] (Copy) or select the [Copy] command to copy it, then click [] (Paste) or select the [Paste] command. If you want to copy text within the same text box, hold down [CTRL] on the keyboard while dragging the text.
Duplicating an Object
Duplicating enables you to copy and paste an object in one operation.
- Select the object to duplicate.
You can select multiple objects and duplicate them at the same time. - Click [
 ] (Duplicate) on the toolbar.
Alternatively, select [Duplicate] from the [Edit] menu. The selected object is duplicated.
Deleting an Object
- Select the object to delete.
You can select multiple objects and delete them at the same time. - Click [
 ] (Delete) on the toolbar.
Alternatively, select [Delete] from the [Edit] menu or press [Delete] on the keyboard. The selected object is deleted.
Grouping Objects
You can edit or handle multiple objects that are grouped together as a single object. You can move, copy, or change the size of grouped objects in a single operation. You can also simultaneously modify the properties of all objects in the group.
- While holding down [SHIFT] on the keyboard, you can individually select multiple objects by left clicking on them with the mouse, or you can select all of the objects by running the mouse over them.
- Click [
 ] (Group) on the toolbar.
Alternatively, select [Group] from the [Layout] menu.|
You can ungroup objects by selecting the group of objects that you want to ungroup, and clicking [ ] (Ungroup) on the toolbar or selecting [Ungroup] from the [Layout] menu.
top
Specifying Object Properties |
Follow the procedure below to change the line style, line color, and background color objects such as lines, rectangles, rounded rectangles, ovals, and images.
- Select the object whose properties you want to change.
You can select multiple objects and change their properties at the same time. - Click [
 ] (Properties) on the toolbar.
Alternatively, select [Properties] from the [Edit] menu, or display the [Object Properties] dialog box by double-clicking the selected object. The [Object Properties] dialog box opens. - Select the desired line type for the object from [Line Style].
- Specify the [Width] setting to set the thickness of the line.
The [Width] setting is available only if [Line Style] is set to [Solid]. - Select the desired line color for the object from [Color].
- Select the desired background color for the object from [Fill in].
[Fill in] cannot be specified if the selected object is either a line or an image. - Click [OK].
top
Arranging Objects |
You can rearrange the order and appearance of objects such as lines, rectangles, rounded rectangles, ovals, images, and text boxes on the cover sheet.
Changing the Order of Display
If multiple objects overlap, you can specify the order in which they overlap. Use the following four commands to change the order of display of overlapping objects.
- [Bring to Front]: Moves the selected object to the front.
- [Send to Back]: Moves the selected object to the back.
- [Bring Forward]: Moves the selected object one level higher.
- [Send Backward]: Moves the selected object one level lower.
-
Select the object whose display order you want to change.
- You can select multiple objects and change the order of display for all of them at the same time.
- If the object you want to select lies behind other objects and thus is hidden from view, press [TAB] on the keyboard repeatedly until the object you want is selected. You can also select in reverse order by holding down [SHIFT] on the keyboard while pressing [TAB] on the keyboard.
- Click [
 ] (Bring to Front), [
 ] (Send to Back), [
 ] (Bring Forward), or [
 ] (Send Backward) on the toolbar.
Alternatively, select [Bring to Front], [Send to Back], [Bring Forward], or [Send Backward] from the [Layout] menu.
Aligning Multiple Objects
You can align multiple selected objects according to their left edge, right edge, top edge, bottom edge, or center in one operation. The position of the last selected object becomes the point of reference of alignment.
Use the following commands to change the alignment of the selected objects.
- [Align Left]: Aligns the left edge of all objects along the left edge of the last selected object.
- [Align Center]: Aligns the left-right center axis of all objects along the left-right center axis of the last selected object.
- [Align Right]: Aligns the right edge of all objects along the right edge of the last selected object.
- [Align Top]: Aligns the top edge of all objects along the top edge of the last selected object.
- [Align Middle]: Aligns the top-bottom center axis of all objects along the top-bottom center axis of the last selected object.
- [Align Bottom]: Aligns the bottom edge of all objects along the bottom edge of the last selected object.
- While holding down [SHIFT] on the keyboard, you can individually select multiple objects by left clicking on them with the mouse, or you can select all of the objects by running the mouse over them.
Select the object to be used as the point of reference last.
If you drag the pointer to select multiple objects, the object positioned in the front is used as the point of reference. If any of the selected objects are overlapped, the object positioned in the front is used as the point of reference. - Click [
 ] (Align Left), [
 ] (Align Center), [
 ] (Align Right), [
 ] (Align Top), [
 ] (Align Middle), or [
 ] (Align Bottom) on the toolbar.
Alternatively, click the [Layout] menu, point to [Distribute Horizontally] or [Distribute Vertically], then select the type of alignment you want.
top
Specifying Grid Objects |
The grid function is useful for arranging created objects.
Showing Grids
You can display the grid on the cover sheet to help you create and arrange objects.
On the toolbar, click [ ] (Show Grids) to activate the grid.
Alternatively, activate the command by clicking [Show Grids] from the [View] menu.
Hide the grid by clicking the activated [] (Show Grids) to deactivate it or by clicking [Show Grids] from the [View] menu.
Snapping Objects to Grid
If you activate the [Snap to Grid] setting for the cover sheet, objects are aligned along the grid when they are moved or resized on the cover sheet.
- On the toolbar, click [
 ] (Snap to Grid) to activate the grid.
Alternatively, activate the command by clicking [Snap to Grid] from the [View] menu.
Deactivate the [Snap to Grid] setting by clicking the activated [<snap grid>] (Snap to Grid) or by clicking [Snap to Grid] from the [View] menu.
[Snap to Grid] is available only after this setting is specified. It does not affect objects that are modified before this setting is specified.
Specifying Grid Properties
Follow the procedure below to specify the properties for the grid on the cover sheet, such as type, color, and spacing. You can also specify whether to display the grid and whether to snap objects to the grid.
- Select [Grid Properties] from the [View] menu.
The [Grid Properties] dialog box appears. - Select [Show Grids].

Deselect the check box if you do not want to display the grid.
Deselecting this check box disables the [Type] and [Color] settings. - Select [Dotted] or [Dashed].
- Click the button to the right of [Color].
The [Color Setting] dialog box appears. - Select a color to use as the grid's basic color from [Basic colors].
You can create your own color by clicking on a color that is the closest to the color you want, [Define Custom Colors], adjusting the color, then clicking [Add to Custom Colors]. - Click [OK] in the [Color Setting] dialog box.
- Specify the [Horizontal] and [Vertical] spacing for the grid.
You can change the unit of measure for the spacing in the [Unit Setting] dialog box displayed by selecting [Unit] from the [View] menu. - To align objects along the grid, select [Snap to Grid].
To deactivate [Snap to Grid], deselect the check box. - Click [OK].
Clicking [Restore Defaults] in the [Grid Properties] dialog box restores all [Grid Properties] settings for the cover sheet to their default values.
top
Printing a Cover Sheet
Follow the procedure below to print the cover sheet.
- Click [
 ] (Print) on the toolbar.
Alternatively, select [Print] from the [File] menu.
The [Print] dialog box appears. - Select the printer.
If necessary, click [Properties] to specify detailed print settings. - Specify the number of copies to print.
[All] is the only active selection for the [Print range] setting because the cover sheet consists of only one page. - Click [OK].
top
Registering an Original Cover Sheet as a Template
You can register the cover sheet created with the Canon Cover Sheet Editor with the fax driver for use as a template.
- Open the [Printers and Faxes] (Windows 98/Me/2000: [Printers]) folder.
Click [Start] on the Windows task bar, select [Printers and Faxes] (Windows 98/Me/2000: [Start], [Settings], [Printers]). - In the [Printers] folder, right click the printer icon for your fax, click [Printing Preferences] (Windows 98/Me: [Properties]).
- Click the [Register Cover Sheet] tab.

- Click [Register].
The [Register Cover Sheet] dialog box appears.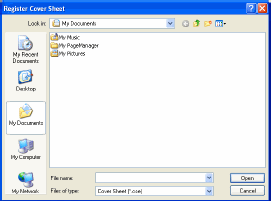
- Select the cover sheet template file, then click [Open].
The selected template is added to [Style] in the [Register Cover Sheet] sheet.
In addition to the default templates, you can add up to 30 templates to the fax driver.
top