WB: Setting the White Balance
When the white balance mode is set to match the light source, the camera can reproduce colors more accurately. Set the white balance mode to a natural or artificial light setting according to the circumstances.
|

|
Auto
|
The camera sets the white balance automatically according to shooting conditions. |
|

|
Daylight
|
Use when shooting outdoors in sunlight on a clear day. |
|

|
Cloudy
|
Use when shooting outdoors and the sunlight is not enough such as under cloudy skies, in shade or at dusk. |
|

|
Tungsten
|
For recording under tungsten and bulbtype 3-wavelength fluorescent lighting. |
|

|
Fluorescent
|
For recording under warm-white, coolwhite or warm-white (3-wavelength) fluorescent lighting. |
|

|
Fluorescent H
|
For recording under daylight fluorescent, or daylight fluorescent-type 3-wavelength fluorescent lighting. |
|

|
Underwater
(PowerShot A540 Only)
|
Appropriate for shooting images with the Waterproof Case WP-DC2 (sold separately). This mode yields image data in the optimal white balance to record images with natural hues by reducing the bluish tone. |
|

|
Custom
|
For setting a custom value with a white sheet of paper, etc., to obtain the optimal white balance for the conditions. |
- Press the <FUNC./SET> button.
- Select * (Auto) using the
 or
or  button.

* The current setting is displayed.
- Select the desired setting using the
 or
or  button.
- Please see below regarding the custom setting.
- You can shoot the image right after selecting settings by pressing the shutter button. This screen will appear again, once the image in shot.
- Press the <FUNC./SET> button.
- Shoot the image.
 The white balance cannot be adjusted when My Colors is set to
  (Sepia) or
  (B/W).
Setting a Custom White Balance
You can set a custom white balance to obtain the optimal setting for the shooting conditions by having the camera evaluate a subject such as a white piece of paper or cloth, or a photo-quality gray card.
- Press the <FUNC./SET> button.
- Select * (Auto) using the or button.
* The current setting is displayed.
- Select (Custom) using the or button.
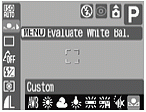
- Aim the camera at the white paper or cloth, or gray card and press the <MENU> button.
- Aim the camera so that the white paper or cloth, or gray card, completely fills the frame on the LCD monitor screen or the entire viewfinder before pressing the <MENU> button. When you press the <MENU> button, the camera reads the white balance data.
- You can shoot the image right after selecting settings by pressing the shutter button. This screen will appear again, once the image is shot.
- Press the <FUNC./SET> button.
- Shoot the image.

- To set and use a custom white balance setting, it is advisable to select the (P) Shooting mode and set the exposure compensation and flash exposure compensation to zero (+/- 0). The correct white balance may not be obtained when the exposure is incorrect (image is completely black or white).
- It is also advisable to use the LCD monitor to compose the shot and to zoom in to the telephoto end setting.
- Since the white balance data cannot be read in
 (Stitch Assist) mode, preset the white balance in another Shooting mode first before selecting mode.
- Set the flash on or off when setting a custom white balance. The white balance may not be accurate if the setting conditions and shooting conditions are not the same. If the flash fires when setting a custom white balance with the flash set to
 or
or  , ensure that you also use the flash when you go to shoot.
- The custom white balance setting is not cancelled even if settings are reset to default settings.
