Printer attempts to print but no ink is on the paper
Printer attempts to print but no ink is on the paper
If the print quality is poor or no ink is appearing on the page, it may be because of the following problems:
- The ink in the BJ tanks has run out.
- The print head nozzles may be clogged.
- The protective cap or tape may have been reattached to the BJ cartridge.
- The BJ cartridge may need to be replaced.
- You may be using the wrong side of the media.
To check the level of ink in the BJ tanks
Open the printer's front cover and visually check the level of the ink in all the BJ tanks. If a BJ tank is low or has run out of ink, replace it. Failure to do so may shorten the life of your BJ Cartridge
Check the status of the print heads by printing a Nozzle Check Pattern
The Nozzle Check Pattern confirms whether the inks are being correctly ejected from the print head nozzles and whether the print head is correctly aligned.
- On your printer, press and hold the Resume button until the printer light flashes two times.
-
When you release the button, the Nozzle Check Pattern will be printed.
You can also print the Nozzle Check Pattern by clicking on the Test Print button in the Maintenance tab of the printer properties dialog box.
- After the Nozzle Check Pattern is printed, check the results.
-
Look at the Nozzle Check Pattern for each BJ cartridge. If any colors are missing or if any horizontal lines are broken or missing, perform the print head cleaning procedure.

- In the alignment head pattern, if the lines are not perfectly overlapped, align the print heads.
To perform the print head cleaning procedure
- On your printer, press and hold the Resume button until the printer light flashes one time.
-
When you release the button, the print head will be cleaned.
You can also clean the print head by clicking the left Print Head Cleaning button in the Maintenance tab of the printer properties dialog box.
-
When the print head cleaning begins, the POWER light starts flashing. This will continue for about 30 seconds. Wait for the light to stop flashing before you resume normal operation.
- Perform the Nozzle Check Pattern test again.
- If the results are satisfactory, resume normal printing.
- If the results are not satisfactory, you may need to execute a print head deep cleaning.
To execute a print head deep cleaning
- Make sure paper is loaded in the sheet feeder and the printer is turned on.
- Display the printer properties dialog box and click the Maintenance tab.
- Click the right Print Head Cleaning button.
-
When the print head cleaning begins, the POWER light starts flashing. Wait for the light to stop flashing before you resume normal operation.
- Perform the Nozzle Check Pattern test again.
If the Nozzle Check Pattern is still unsatisfactory, you may need to execute a print head alignment.
To execute a print head alignment
- In Windows, display the Maintenance tab of the printer properties dialog box.
- Click the right Test Print button.
- Follow the instructions on the screens to perform an automatic print head alignment.
- A confirmation screen will ask you if you want to perform automatic print head alignment. Read the screen and click OK.
- Another screen warns you not to start any other operation until the alignment is complete. Again, click OK.
-
The BJ Printer Status Monitor displays the Printer Status. The driver will align the print heads then will print an alignment pattern.
- Perform the Nozzle Check Pattern test again.
If the Nozzle Check Pattern is still unsatisfactory, you may need to replace the BJ cartridge.
To replace a BJ Tank in a BJ Cartridge
Leave the BJ cartridge in the printer when replacing a BJ tank. Make sure the printer's power is on. Make sure you insert the BJ tank in the correct slot.
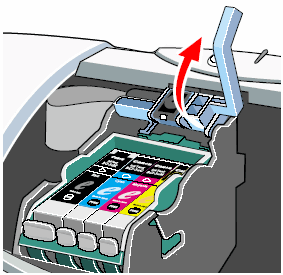
- Open the front cover.
-
The power light blinks while the cartridge holder is positioned to the center of the printer.
- Remove the empty BJ tank by pressing in on the release tab and then lifting the BJ tank up and out of its slot.
- Dispose of the tank properly, taking care to avoid spilling ink on your hands, floor, furniture, or clothing.
- Remove the new BJ tank from its package and pull the orange tape up and against the perforations to open the package film.
-
Be careful not to remove the label from the tank. You will need it to match the tank to the correct slot in the BJ cartridge.
- Twist the orange protective cap to remove it.
-
Do not attempt to reattach the protective cap; instead, discard it along with the protective tape.
- Insert the BJ tank by holding it at a slight angle, aligning it with the correct slot. Press down gently on the top of the tank until it locks into place.
- Lock the ink tank in place by pressing down on the circle mark on the top of the tank.
- Close the printer cover.
-
The printer will automatically start cleaning the print heads. When the print heads are clean, the POWER light will stay on, indicating that the printer is ready for operation.
- Perform another test print to make sure the new ink tanks are performing correctly.
To remove the protective cap and tape from the BJ cartridge
- Open the printer's front cover.
- Unlock the BJ cartridge by raising the cartridge lock lever. Make sure you raise it all the way up.
- Remove the BJ cartridge by holding it by the circles on the left and right sides.
- Make sure that the orange protective cap has been removed.
- Replace the BJ cartridge and move the blue cartridge lock lever until it locks in place.

To check the media:
- Make sure that you are printing to the correct side of the media that you are using.
- Be sure to read any instructions that come with your Canon specialty paper. These instructions provide important information regarding how to achieve the highest print quality with these papers.
