Setting up the wireless settings when making a one-to-one direct connection between the camera and the computer (Ad hoc mode)
Setting up the wireless network settings.
|
|
|
|
|
To select items from the camera's LCD monitor, press the camera's button (as shown in the picture below) to the left, right, top, or bottom.
|
|
|
|
|
|
|
|
[Camera Wireless Setup] from the supplied Solution Disk must be installed on your computer for setting up the wireless settings.
|
|
|
|
Please make sure that the computer's wireless networking function is working (for example, check whether it is turned on or whether wireless communication is working with other devices).
|
|
|
|
Some of the screenshots that appear on this page contain a specific camera model name, however the actual model name varies depending on the camera used.
|
1. Connect the camera's DIGITAL terminal and computer's USB port using the interface cable supplied with your camera.

DIGITAL terminal on the camera

Interface cable

USB port on the computer
2. Turn the camera's <Mode Switch> to

(Playback), and then turn the camera's power on.
3. The following window appears.
Select [Canon CameraWindow Download Images From Canon Camera].
Click [OK].
4. [CameraWindow] appears.
If [Displays this screen when the camera is connected] checkbox

is selected (the checkbox is selected by default), the previous screen will not appear during subsequent attempts.
5. Press the camera's

(MENU) button.
6. The following screen appears in the camera's LCD monitor.
Select [

(Wireless)] in the camera's LCD monitor.
Select [Reg. Target Device].
7. Press the camera's  (FUNC./SET) button.
8. The following screen appears in the camera's LCD monitor.
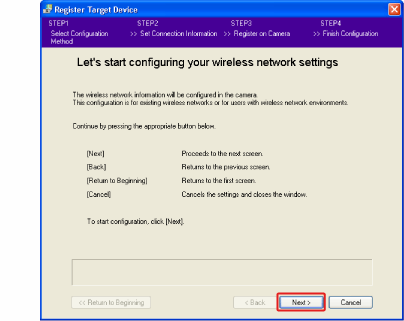
9. The computer displays [Let's start configuring your wireless network settings] in the window that appears.
Read the instructions, and then click [Next].
10. The [Please select the configuration method] screen appears.
Select [Simple Mode].
Click [Next].
11. The [Which wireless network environment do you want to connect the camera to?] screen appears.
Select [I do not have an access point, but my computer is compatible with wireless networks].
Click [Next].
12. The [Establishing a new connection between your camera and computer] screen appears.
The setting items will automatically appear in the window. These settings generally do not require adjustment.
Click [Next].
13. The [Registering on your camera] screen appears.
Enter a name for [Registration Name]. The name input here will be displayed in the camera's [Connected To] category.
Click [Next].
14. The [Printing your settings] screen appears.
Check the items that you set.
Make sure that the [Change computer settings as well] checkbox
is selected.
Click [Next].
15. If the following screen appears, please make sure that the same setting information as shown is configured on the computer.
Set up your computer with the information shown on the screen that appears.
Click [OK].
16. The [Settings Completed] screen appears.
17. The following screen appears on the camera's LCD monitor.
The name entered as [Registration Name] in Step 13 appears here.
The name entered as [Network Name (SSID)] in Step 12 appears here.
18. Press the camera's
(FUNC./SET) button.
19. Press the camera's
(MENU) button to return to the playback mode.
20. Turn the camera's power off, and then disconnect the interface cable.