Uninstalling the MP Drivers (Mac OS X)
Perform the following procedure to delete the MP drivers:
Note:
- When multiple Canon inkjet printer drivers or Canon scanner drivers such as ScanGear MP or ScanGear CS are installed in the computer, perform the following to delete them ALL. (You cannot choose which one to delete or which one to keep.) Install the printer driver with the CD-ROM prepackaged with the printer or download it from the Canon website to reinstall.
- Login with a user name with the Computer administrator account type to delete the MP drivers. Regarding Administrator users, please refer to the Mac OS X owner's manual.
-
Close all running applications - including antivirus software.
-
Disconnect the USB cable at the printer.
-
Open Applications, Utilities, and double-click the 'Printer Setup Utility' icon.
**Leopard (10.5.x) users click here.
Note: Printer Setup Utility varies depending on the Mac OS X version.
When your Mac OS X version is older than Ver. 10.3.x, double-click Print Center.
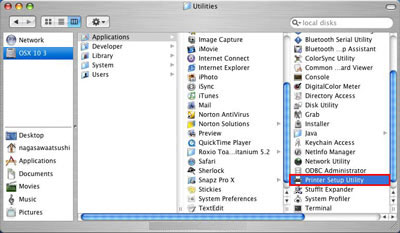
* The image is an example using Mac OS X Ver. 10.3.
-
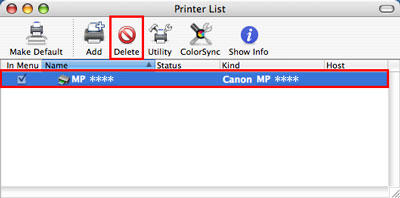
In the Printer List dialog, select all the printers added to the Printer List and then click 'Delete'.
Note: Select all the printers registered in the Printer List. Even if the specific model name is not deleted in this step, it will not be available in the next step.
-
Open Library, Printers, Canon, and BJPrinter.
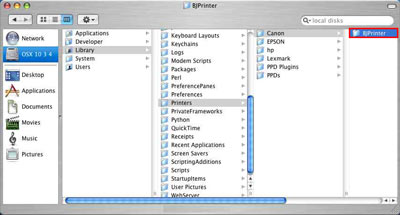
-
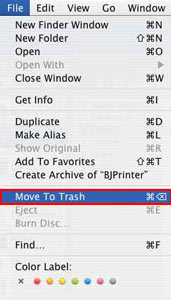
In the File menu, select 'Move To Trash'.
Note: All the other installed Canon printer drivers will be deleted.
- Open the Library folder, and the CFM Support folder and move "BJExtDDI.cfm" to the trash.
-
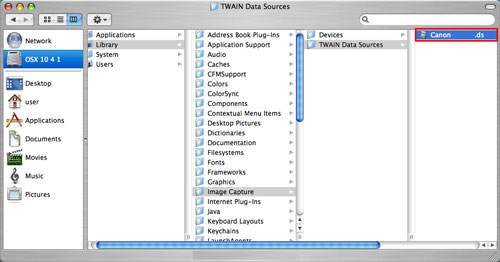
Similarly, open Library, Image Capture, and TWAIN Data Sources, and move Canon MPXXX.ds to the trash.
-
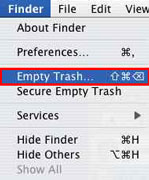
In the Finder menu, select 'Empty Trash' to delete them.
-
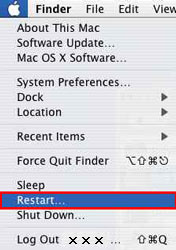
In the Apple menu, click 'Restart'.
Deleting the Printer from the Printer List (Mac OS X ver 10.5.x)
1.In the Apple menu, open System Preferences.
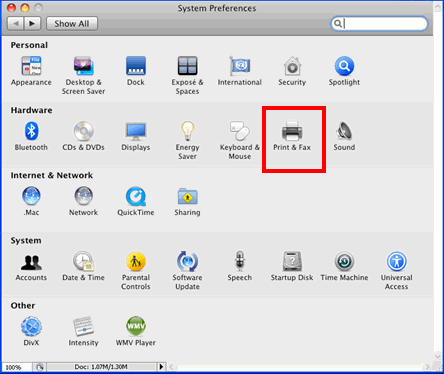
2. Open Print and Fax.
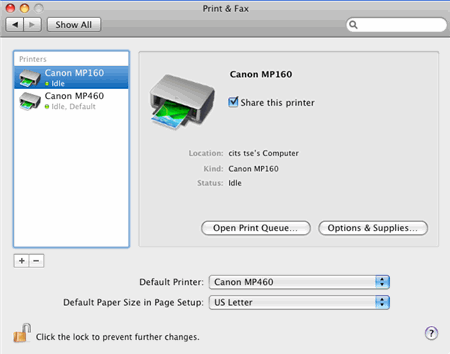
3. Be sure that the printer to be deleted is highlighted in the Printers section.
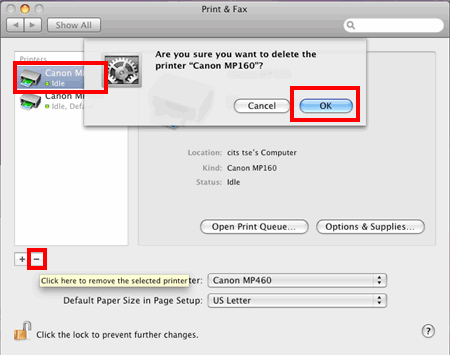
4. Click the Minus (-) sign, then click 'OK' on the confirmation message. The printer is deleted.
5. Return to Step 5 of uninstall instructions , above .
