
Setting up the Toolbox PRINT button functions
| Article ID: ART127493 | | | Date published: 05/12/2015 | | | Date last updated: 08/14/2015 |
Description
Solution
How to Setup the Toolbox Print Button Functions
Most of the Toolbox versions will have the same buttons and functions. However, some versions may have more functions than others.
Print Button
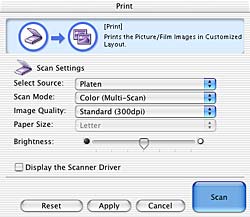
| This function scans an item, displays the Print Layout Window for changing paper size, print settings, size and position, and sends the image to the printer. | |
 |
To print the scanned image, the printer driver must be installed. You must also have the scanner and printer connected to the computer and ready to use. |
![]()

![]()
|
With Windows, a portion of the window's contents may be different when used with some printer models. |
After the Scan button is pressed, the scanner will start scanning the item, and the scanned image will appear in the Print Layout Window. Adjust print layout settings and edit the image as required, and click the [Print] button to initiate printing.
Click the down-arrow next to 'Select Source' to choose the appropriate scanning source
For scanner models that do not support film scanning, there will only be one option for 'Select Source'.
- Platen
For film supported scanner models there will usually be three options.
- Platen
- Film
- Auto mode
When the Auto mode is selected, the settings for the Scan Mode, Image Quality, Paper Size and Brightness categories cannot be selected. The following settings are used to scan. Scan Mode Image Quality Paper Size Platen Color (Multi-Scan) Standard (300 dpi) A4 (Letter) Film Scan all frames Standard (300 dpi) 35mm Film


Click the down-arrow next to 'Scan Mode' to choose the appropriate scanning mode.
Platen Selected
For scanner models that do not support film scanning, the Scan Mode choices will be:
- Black & White
- Grayscale
- Color
- Color (Magazine)
- Color (Multi-Scan)
- Color (Auto crop)
Black and White Scans an item as a black and white image. Grayscale Scans an item as a grayscale image (similar to a monochrome picture). Color Scans an item as a color image with the Descreen function set to Off. Color (Magazine) Scans an item as a color image with the Descreen function set to On. Color (Multi-Scan) Scans items in color. If more than one item is placed on the document glass of the scanner, each one is automatically cut out, straightened, and placed in an individual file. Color (Auto crop) Scans items in color. Automatically detects item positions and scans the smallest possible area into which all items will fit.
* Moir é patterns may appear in images scanned from printed materials. The Descreen function limits this to the greatest possible extent. However, scanning takes longer when Descreen is set to On. * Multiple items will be printed when multiple items are scanned with the Color (Multi-Scan) mode. Film Selected
Film supported scanner models will usually have three options.
- Scan all frames
- Display thumbnails
- Index scan
Click the down-arrow next to 'Image Quality' to choose the desired scan quality.
Platen Selected
- High Speed (150dpi)
- Standard (300dpi)
- High Quality (600dpi)
High Speed Scans with an Image Quality of 150 dpi. Standard Scans with an Image Quality of 300 dpi. High Quality Scans with an Image Quality of 600 dpi.
With the Macintosh version, the High Quality (600 dpi) option may not be selectable with certain Paper Sizes since images more than 4,096 pixels in width cannot be printed. Film Selected
Film supported scanner models will usually have three options.
- Scan all frames
- Display thumbnails
- Index scan
The Image Quality is automatically set to High Speed (150dpi) when the Scan Mode is set to Index scan.
Click the down-arrow next to 'Paper Size' to choose the appropriate paper size.
Platen Selected
For scanner models that do not support film scanning, the Scan Mode choices will be:
- A4
- Letter
- Business Card
- 4" x 6" Portrait
- 4" x 6" Landscape
- Stitch-assist (11" x 17")
- Stitch-assist (A3)
- Stitch-assist (Platen x2)
- Custom (8.50x11.69 Inches)
Note: The above paper sizes may not appear in all Toolbox versions.
If the Stitch-assist (11"x17"), Stitch-assist (A3) or Stitch-assist (Platen x2) option is selected, the program scans the left half and then the right half of the item, and merges halves into one image. If the Custom option is selected, the Paper Size Settings window opens. Select a [Unit] option, input [Width] and [Height] values, and click the [OK] button.
* The Paper Size cannot be selected when the Scan Mode is set to Color (Multi-Scan) or Color (Auto crop). Film Selected
Film supported scanner models will have the have the following option.
- 35mm Film
This category sets the brightness setting for the scan
Drag the slider left to darken the image or right to brighten it.
* The Brightness cannot be adjusted if the Scan Mode is set to Color (Multi-Scan) or Color (Auto crop). * The Brightness cannot be set when Film or Auto mode is chosen in the Select Source category. In the Black and White Scan Mode, you can use this category to set the threshold value between black and white.
This category sets whether or not the scan settings are set with the ScanGear CS scanner driver.
If a check mark is placed in this category, the ScanGear CS window will open when you click the Copy button at the window's lower right corner, allowing you to adjust the scan settings in detail.
The Scanner settings in the Copy window, including Select Source, Scan Mode, Image Quality, Paper Size and Brightness, are disabled. Set them in the ScanGear CS window instead.
* When you have selected Color/A4 and more than 1200 dpi in the ScanGear CS window, a warning message will display and you will not be able to proceed with the scan. Select a smaller Paper Size and lower resolution. * If Multi-Scan is selected in the ScanGear CS window, the number of image files sent to the printer corresponds to the number of items on the document glass of the scanner. * The "Easy Color Matching" option cannot be selected if a check mark is present in this category.
Printer Settings Printer (Windows Only)
This category selects the printer to use when multiple printers are connected.
Easy Color Matching (Windows Only)
This sets whether or not color settings are coordinated between the scanner and a printer.
This function will only be available with various Canon Bubble Jet printers.
* This category cannot be selected when the Color Mode is set to Black and White or Grayscale. * The "Display the Scanner Driver" option cannot be selected when a check mark is beside this category. In addition, the Vivid Photo option in the Print Layout window cannot be selected. * When an image is saved in the Print Layout Window, the saved image will have a color profile compatible with the Adobe RGB profile. * You are recommended to use Photo Paper Pro or Photo Paper Plus Glossy when using the Easy Color Matching function.
Open a File and Perform Color Matching (Windows Only)
This function is enabled when the "Easy Color Matching" option is checked.
This function opens a JPEG image file saved with AdobeRGB color profile, performs "Easy Color Matching", and sends the image to the "Print Layout" window.When this option is checked, the [Scan] button becomes the [Open] button.
Click the [Open] button to specify the JPEG image file saved with AdobeRGB color profile.
* This function does not perform any scanning. * You can create image files saved with AdobeRGB color profile with the [Save] and [Scan-1/-2] buttons. * Only one image file can be specified with this function.
[Reset] Button
This button restores each setting in the window to its default setting (the original post-installation setting).
[Apply] Button
This button makes the selected settings take effect and display the next time the window is used.
Pressing the [Cancel] button instead of [Apply] will reset the changes to the previous state.
[Cancel] Button
This button cancels any settings that you have changed, closes the window that is currently open and displays the Toolbox's main window.
Changed settings will be cancelled unless you have pressed the [Apply] button.
[Scan] Button
This button scans the item and displays the Print Layout Window.
If the "Display the Scanner Driver" option is checked, it opens the ScanGear CS window, and after the Scan button is pressed, the Print Layout Window will display.
* Multiple prints are loaded and printed if multiple items are scanned with the Scan Mode set to Color (Multi-Scan).
