You can trim a required portion of a recorded image and save it as a new image file.
Attention:
- As the actual locations of buttons / switches on cameras vary depending on the camera model, the illustrations that appear on this page may differ from your camera.
- Screens or menu listings may differ depending on the camera model being used.
- Images indicated by (
 ), ( ), ( ), ( ), ( ) and movies indicated by ( ) and movies indicated by ( ) cannot be trimmed. ) cannot be trimmed.
- The trimmed image is saved under a new file name. The original image before trimming is saved.
- If there is limited capacity on the memory card, trimming cannot be performed.
- Some images shot with another camera cannot be trimmed.
- The aspect ratio for images which can be trimmed will be fixed to 4:3 (or 3:4 if the image is vertically oriented).
- The resolution of a trimmed image will be less than before trimming.
|
1. Press the <Playback> ( ) button to turn on the camera.

2. Press the <MENU> ( ) button.

3. The following screen appears on the LCD monitor.
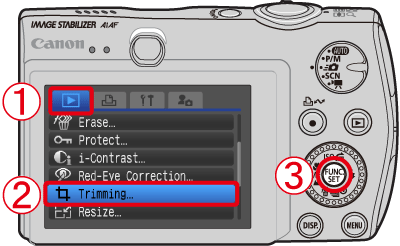
 Operate the <directional buttons> left or right to select the [Playback] (
 ) tab.
 Operate the <directional buttons> up or down to select [Trimming].
Press the <FUNC./SET> ( ) button.
4. The following screen appears.

Operate the <directional buttons> left or right to show the image you want to trim.
When the image you want to trim appears, press the <FUNC./SET> () button.
5. The following screen appears.
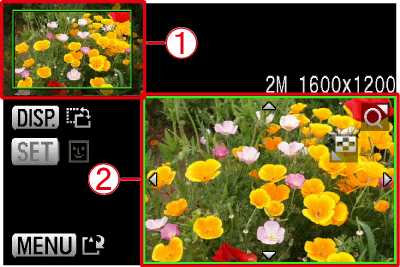
The original image appears with an green frame, which indicates the area to be trimmed.
The image after trimming appears.
6. Adjust the trimming area.
Turn the <Zoom Lever> to the right and left to adjust the trimming area.
The number of recorded pixels of the image after trimming appears.
(the number of recorded pixels differs depending on the size of the image trimmed)
7. Operate the <directional buttons> to change the position of the frame.

8. You can change the aspect ratio of the trimming frame by pressing the <DISP.> ( ) button.
Press the <MENU> () button after you finish making the trimming settings.
|
Note:
In an image with a detected face, a gray frame will appear in the upper-left corner of the screen. (Step 5 ) You can trim around the face indicated by the gray frame.
If more than one face is detected and multiple frames appear, you can switch between the frames by turning the <Control Dial>.
|
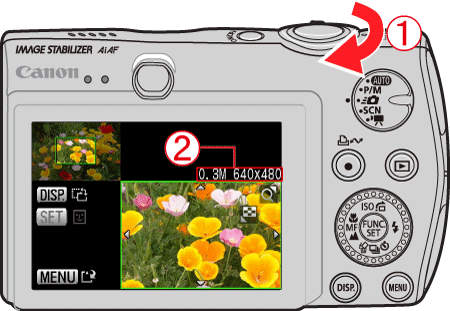
9. The following screen appears.
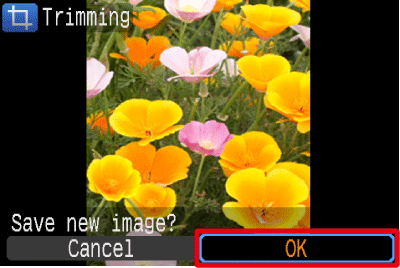
Select [OK], and then press the <FUNC./SET> () button.
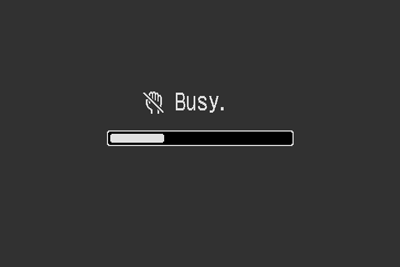
10. The following screen appears and the trimming operation will start.
11. When trimming is completed, the screen for selecting images will reappear.
If you wish to continue trimming of another image, repeat operations from Step 4.
12. Press the <MENU> () button to check the trimmed image.

Select [Yes], and then press the <FUNC./SET> () button.
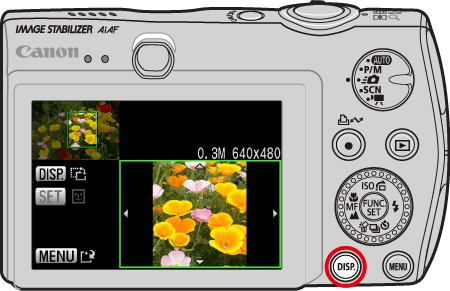
13. The following screen appears.

Confirm that the icon ( ) appears in the lower-left corner of the screen to indicate the resolution after trimming, and that the image has been edited.
If the icon does not appear, press the <DISP.> () button several times to display the icon.
