Cleaning the Machine
If the original is not copied clearly, clean the machine. For high-quality printouts, we recommend cleaning the machine once or twice a month.
attention:
- Use a soft cloth to avoid scratching the components.
- Do not use tissue paper, paper towels, or similar materials for cleaning; they can stick to the components or generate static charges.
- Never use volatile liquids such as thinner, benzene, acetone, or any other chemical cleaner to clean the machine. These can damage the machine components.
important:
- Before cleaning your machine, make sure no documents are stored in memory, then turn OFF the main power switch and disconnect the power cord.
note:
- When you turn OFF the main power switch, the data stored in memory will be retained for approximately 5 minutes.
Please choose an item below:
Clean the exterior of the machine.
1. Turn OFF the main power switch and disconnect the power cord.
2. Wipe the machine's exterior with a clean, soft, lint-free cloth dampened with water or diluted dishwashing detergent solution.
3. Wait for the machine to dry, then reconnect the power cord and turn ON the main power switch.
Top
The MF4370dn is used for illustration purposes in this section.
Clean the machine's print area periodically to prevent toner powder and paper dust from accumulating inside.
1. Turn OFF the main power switch and disconnect the power cord.
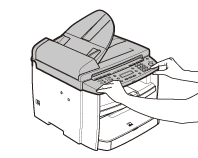
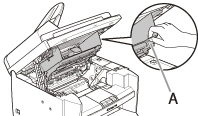
2. Hold the front side of the operation panel with your hands.
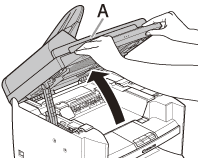
3. Lift the scanning platform (A) until it is locked. (You will hear an audible "click.")
4. Hold the grip (A) on the right front side of the toner cover.
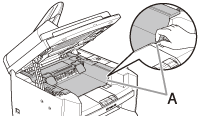
5. Open the toner cover.

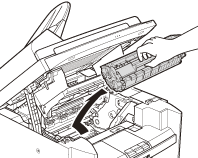
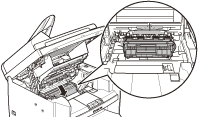
6. Remove the toner cartridge.
attention:
- Do not touch the rollers and parts which have labels such as, "CAUTION! Hot surface avoid contact". These areas become very hot during use.
- To avoid exposing the toner cartridge to light, place it in its protective bag or wrap it in a thick cloth.
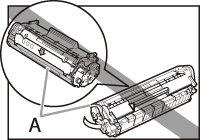
attention:
Do not open the drum protective shutter (A) on the toner cartridge. Print quality may deteriorate if the drum surface is exposed to light or is damaged.
note:
Always hold the toner cartridge by its handle.
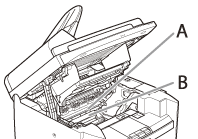
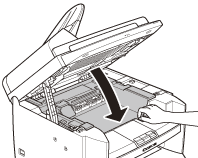
7. Use a clean, soft, dry, lint-free cloth to remove any toner or paper debris from the machine's interior.
attention:
- Do not touch the fixing assembly (A) as it becomes very hot during use.
- Do not touch the transfer roller (B) as this can damage the machine.
attention:
If loose toner comes into contact with your skin or clothing, wash with cold water. Warm water will set the toner.
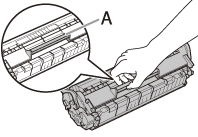
8. Hold the toner cartridge by its handle (A).
9. Insert the toner cartridge so that the protrusion (A) on the right side of the toner cartridge fits into the guide (B) located on the right side of the machine and slide it down parallel to the guide.

10. Push the toner cartridge to make sure it is properly set in the machine.
11. Hold the grip (A) on the right front side of the toner cover.
12. Close the toner cover.
13. Lower the scanning platform.
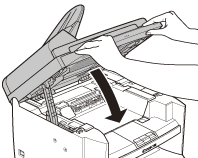
attention:
- Be careful not to get your fingers caught.
- If you cannot close the toner cover, do not force it to close. Open the cover and make sure the toner cartridge is properly set in the machine.
14. Reconnect the power cord and turn ON the main power switch.
Top
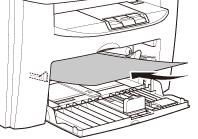
If black streaks appear with printing, the fuser roller in the main unit may be dirty. Should this occur, clean the fuser roller in the following procedure. The roller should also be cleaned each time the toner cartridge is replaced. Load a sheet of blank LTR paper into the multi-purpose tray and start cleaning.
note:
- Use standard paper as the cleaning paper.
- Cleaning the roller takes approximately 130 seconds.
- When some jobs are stored in memory, this function is not available.
1. Press  [Menu].
2. Press [  ] or [
  ] to select <ADJUST./CLEANING>, then press [OK].

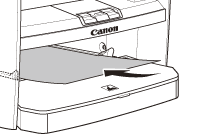
3. Load a sheet of blank LTR paper in the multi-purpose tray.
 For MF4370dn/D480
For MF4350d
4. Press [ ] or [ ] to select <FIX. UNIT CLEANING>, then press [OK].

Cleaning starts.
note:
Throw away the cleaning paper after use.
Top
The MF4370dn is used for illustration purposes in this section.
Clean the platen glass and the underside of the ADF by following the procedure below.
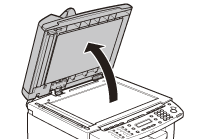
1. Open the ADF.
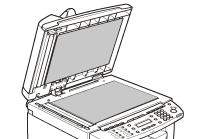
2. Clean the platen glass and the underside of the ADF with a cloth dampened with water. Then, wipe the area with a soft, dry cloth.
attention:
Do not dampen the cloth too much, as this may tear the document or damage the machine.
3. Close the ADF.

attention:
- Be careful not to get your fingers caught.
Top
The MF4370dn is used for illustration purposes in this section.
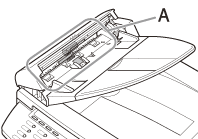
If your documents have black streaks or appear dirty after copying them using the ADF, this may be caused by pencil lead rubbing off the documents and onto the roller. Clean the ADF scanning area and roller.
1. Turn OFF the main power switch and disconnect the power cord.
2. Open the ADF cover.

3. Clean the rollers (A) inside the ADF with a cloth dampened with water. Then wipe the area with a soft, dry cloth.
attention:
Do not dampen the cloth too much, as this may tear the document or damage the machine.
4. Close the ADF cover.

attention:
Be careful not to get your fingers caught.
5. Reconnect the power cord and turn ON the main power switch.
Top
