If the CF card and SD card are inserted into the camera, you can set the recording method for the cards.
This section explains how to record a captured image to the CF and SD cards simultaneously with a different size selected for each.
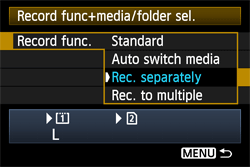
Recording Method with Two Cards Inserted (Set to [Rec. separately])
1. Set the power switch to < ON >.
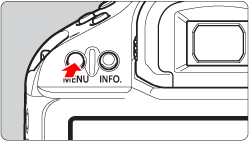
2. Press the < MENU > button to bring up the menu.
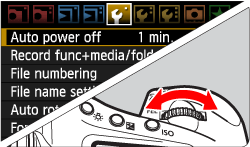
3. Turn the < Main Dial > to select [  ] .
] .
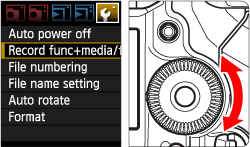
4. Turn the < Quick Control Dial > to select [Record func+media/folder sel.] then press < SET >.
5. Select [Record func.], then press < SET >.
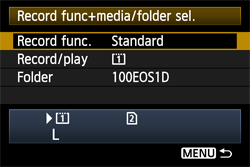
6. Select [Rec. separately], then press < SET >.
For details on how to record images for each of the items above, please refer to the camera's instruction manual.
Setting the image-recording quality for each card
Next, select the size (recorded pixels) and the type (JPEG or RAW) of the image you want to record to the card.
1. Press the < FUNC. > button.
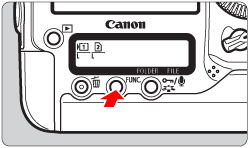
- Press the < FUNC. > button once or twice to display the image size on the left-hand side of the rear LCD panel.
- As you press the button, the display switches from Card/Image size to White balance and vice versa.

2. Turn the < Main Dial > to select the card for which you want to set the image-recording quality. The [  ] mark appears on the left-hand side of the selected card.
Turn the < Quick Control Dial > to select the image size.
3. Similarly, turn the < Main Dial > to select the other card.
Repeat Step 2 to select the image size.
note:
You can also make the same settings from the [  Image size] menu on the LCD monitor. Also, you can set the JPEG quality (compression rate) from the [ JPEG quality] menu.
For details, please refer to the camera's instruction manual.
