
Loading Paper Correctly - Pro9000 Mark II
| Article ID: ART129615 | | | Date published: 05/12/2015 | | | Date last updated: 09/19/2019 |
Description
Solution
Paper Source to Load Paper
The printer has two paper sources to feed paper, Rear Tray and Front Tray.
Select either one of the paper sources, depending on the size or type of paper to load.
- When loading two or more sheets of paper, align the edges of the sheets before loading.
- When loading two or more sheets of paper, make sure that the paper stack does not exceed the paper load limit.
However, proper feeding of paper may not be possible at this maximum capacity depending on the type of paper or environmental conditions (either very high or low temperature and humidity). In such cases, reduce the sheets of paper you load at a time to less than half of the paper load limit.
- Always load the paper in portrait orientation, either in the Rear Tray or the Front Tray, regardless of the printing orientation.
- When you load the paper on the Rear Tray, load the paper with the print side facing UP. Align the paper stack against the right side of the Rear Tray and slide the Paper Guide so that it just touches the left edge of the stack.
- When you load the paper on the Front Tray, load one sheet at a time with the print side facing UP. Insert the paper straight into the Front Tray so that the front edge of the paper aligns with the
 mark on the Front Tray, then align the right edge of the paper against the right side of the Front Tray.
Paper Source to Load Paper
The printer has two paper sources to feed paper, Rear Tray and Front Tray.
Select either one of the paper sources, depending on the size or type of paper to load.
You can load various sizes of paper, from 4" x 6" / 10 x 15 cm to A3+ (13" x 19") paper, in the Rear Tray.
Two or more sheets of the same size and type of paper can be loaded at a time so that you can print continuously. (Some sizes or types of paper can be loaded only one sheet at a time.)
Select Rear Tray in Paper Source in the printer driver setting when printing from the Rear Tray.
You can load large size paper such as 14" x 17" / 36 x 43 cm paper, or thick paper such as art paper and board paper, in the Front Tray.
Select Front Tray in Paper Source in the printer driver setting when printing from the Front Tray.

- If you cut plain paper into small size such as 4" x 6" / 10 x 15 cm, 4" x 8" / 101.6 x 203.2 mm, or 5" x 7" / 13 x 18 cm to perform trial print, it can cause paper jams.
- We recommend Canon genuine photo paper for printing photos.
- You can use general copy paper.
Loading Paper in the Rear Tray
You can load A3+ (13" x 19"), A3, B4, A4, B5, A5, Letter, Legal, 11" x 17" / 279.4 x 431.8 mm (Tabloid), Wide (4" x 7.1"), 4" x 6" / 10 x 15 cm, 4" x 8" / 101.6 x 203.2 mm, 5" x 7" / 13 x 18 cm, 8" x 10" / 20 x 25 cm, and 10" x 12" / 25 x 30 cm sizes of paper, and envelopes in the Rear Tray.
Printing cannot be done from the Rear Tray if the paper is too heavy. Check the paper's package for information on its weight. If it is more than 200 gsm (53 lb), load it in the Front Tray.
1. Prepare paper.
Align the edges of paper. If paper is curled, flatten it.

- Align the edges of paper neatly before loading. Loading paper without aligning the edges may cause paper jams.
- If paper is curled, hold the curled corners and gently bend them in the opposite direction until the paper becomes completely flat.
2. Load paper.
(1) Open the Paper Support.
(2) Gently press the upper center of the Front Tray to open it.
(3) Pull out the Front Tray Extension.
(4) Make sure that the Front Feed button is not lit.
If the Front Feed button is lit or flashing, set the Front Tray to its normal printing position. See Returning the Front Tray to Its Normal Printing Position.

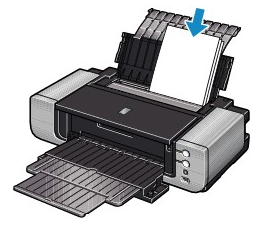
(5) Open the Feed Slot Cover.

(6) Load the paper in the Rear Tray WITH THE PRINT SIDE FACING YOU.
Align the paper stack with the right edge of the Rear Tray.
Always load paper in the portrait orientation (A). Loading paper in the landscape orientation (B) can cause paper jams.

(7) Slide the Paper Guide to align it with the left side of the paper stack.
Do not slide the Paper Guide too hard. The paper may not be fed properly.

Do not load sheets of paper higher than the Load Limit Mark (C).
(8) Close the Feed Slot Cover.
note:
After loading paper
Select the size and type of the loaded paper in Printer Paper Size (or Paper Size) and Media Type in the printer driver..
Loading Paper in the Front Tray
- When loading paper in the Front Tray, the paper will stick out from the back of the printer after the loading process has been completed. Keep a space of 15.7 inches / 40 cm for this purpose behind the printer.
- There are wheels on the back corners of the printer. Lift up the front of the printer to move it back and forth.
- You can load A3+ (13" x 19"), A3, B4, A4, B5, A5, Letter, Legal, 11" x 17" / 279.4 x 431.8 mm (Tabloid), Wide (4" x 7.1"), 4" x 6" / 10 x 15 cm, 4" x 8" / 101.6 x 203.2 mm, 5" x 7" / 13 x 18 cm, 8" x 10" / 20 x 25 cm, 10" x 12" / 25 x 30 cm, and 14" x 17" / 36 x 43 cm sizes of paper in the Front Tray.
- When printing on paper other than 14" x 17" / 36 x 43 cm size from a PictBridge compliant device, load paper in the Rear Tray.
1. Set the Front Tray in the front paper feeding position.
(1) Gently press the upper center of the Front Tray to open it.
(2) Tilt the Front Tray upward.
(3) Lift the Front Tray until it stops.
The Front Feed button lights.
(4) While keeping the Front Tray lifted, tilt the Front Tray forward to set it in the front paper feeding position.
(5) Make sure that the Front Feed button is lit.

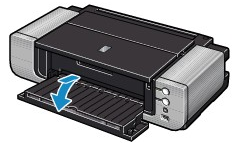
2. Press the Front Feed Support button to open the Front Feed Support.
3. Prepare for loading paper.
(1) Pull out the Front Tray Extension.
(2) Press the right corner of the Front Feed Support to open the V-shaped Support.
note:
When loading A4 or smaller size paper, this procedure is not necessary.
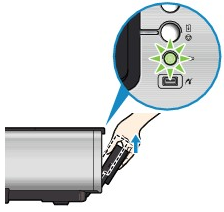
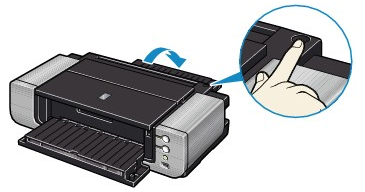
(3) Press the Front Feed button.
The printer starts making operating noise, then the Power lamp flashes for about 30 seconds.

Do not load paper when the Power lamp is flashing. Otherwise, the paper or the printer may be damaged.
4. Load paper.
(1) Make sure that the Power lamp is lit and the Front Feed button is flashing quickly.
If the Power lamp is flashing, wait until it stops flashing and stays lit.
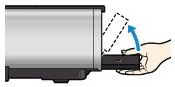
(2) Load the paper straight into the Front Tray WITH THE PRINT SIDE FACING UP.
Align the front edge of the paper with the mark  (Paper Alignment Mark) on the Front Tray.
Load only one sheet of paper in the Front Tray at a time.

- Align the right edge of the paper with the right side (A) of the Front Tray and load the paper straight into the Front Tray.
- If paper is curled, hold the curled corners and gently bend them in the opposite direction until the paper becomes completely flat.
If the printer is not used for about 5 minutes while it is as described in (1) in step 4 above, the Front Feed button stops flashing and stays lit, and you cannot load the paper in the Front Tray. In this case, return to (3) in step 3.
5. Press the Front Feed button to feed the paper from the Front Tray.
The paper feeds into the printer automatically and the Front Feed button flashes slowly.
The printer is ready to start printing.

- After loading paper
Select the size and type of the loaded paper in Printer Paper Size (or Paper Size) and Media Type in the printer driver.
.
- To print continuously
To print from the Front Tray again, return to (3) in step 3 and load paper in the Front Tray. Then start printing.
Returning the Front Tray to Its Normal Printing Position
When using the Rear Tray, set the Front Tray to its normal printing position.
- Be sure to follow the procedure below when returning the Front Tray to its normal printing position. Otherwise, the printer may be damaged.
- When the Front Tray is set to the front paper feeding position, printing by using the Rear Tray is not possible. Be sure to set it to its normal printing position.
1. Hold the Front Tray and slowly tilt it like you are closing it.
Tilting the Front Tray lowers it to its normal printing position.

2. Open the Front Tray.
(1) Open the Front Tray to return it to its normal printing position.
(2) Make sure that the Front Feed button is not lit.
