You can transfer recordings to a computer using the HDV/DV terminal.
Equipment and System Requirements
- A computer equipped with an IEEE1394 (DV) terminal or an IEEE1394 (DV) capture board
- A DV cable (commercially available)
- Video editing software
- The appropriate driver
The standard of the video transferred depends on the standard of the original recording and the compatibility of the video editing software.
When transferring a video originally recorded in HDV standard, if the editing software supports high-definition video, video output will be in HD standard. If the editing software does not support high-definition video, even if the original recording was made in HDV standard, video output will be in SD standard.
Change the following settings as necessary before making the connections.
- [PLAYBACK STD] and [DV OUTPUT] to select the standard of the output video. Note that the video standard of the transferred video depends also on the standards supported by the computer.
- [AV  DV] to select whether to transfer recordings from the tape in the camcorder (set to [
  OFF]) or video converted from an external analog source (set to [
  ON]).
ON]).
Connecting
- Start the computer.
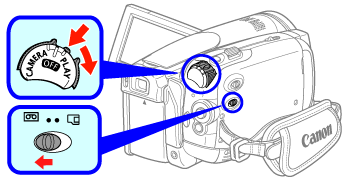
- Set the camcorder to <
 > mode.
-
Connect the camcorder to the computer using the digital connection shown in the previous section PC Connection Diagrams.
- When the connection is recognized "  HDV/DV " will be displayed.

-
Start the video editing software. Refer to the instruction manual of the editing software.
important:
-
The video transfer may not work correctly depending on the software and the specifications/settings of your computer.
-
If the computer freezes while the camcorder is connected to it, disconnect the DV cable and turn off the camcorder and the computer. After a short while, turn them on again, set the camcorder to < > mode and restore the connection.
-
Before connecting the camcorder to the computer using a DV cable, make sure that the camcorder and computer are not connected with a USB cable, and that no other IEEE1394 device is connected to the computer.
-
Depending on the video editing software, you may need to set the <  > switch of the camcorder to a mode other than PLAY. Refer to the instruction manual of the editing software.
note:
-
We recommend powering the camcorder using the compact power adapter.
-
Refer also to the instruction manual of the computer.
-
The programs ZoomBrowser EX and Image Browser included with the supplied CD-ROM can only be used to transfer still images recorded on the memory card. Video recordings on the tape cannot be transferred to the computer using the software included with the supplied CD-ROM.
