When to replace the Printhead
Replace the Printhead in the following situations.
- If the printing quality does not improve even after one or two cycles of Head Cleaning B from the printer menu
- If the Display Screen indicates "Open top cover and replace the printhead."
- If your Canon dealer has advised you to replace the Printhead
Precautions when handling the Printhead
Take the following precautions when handling the Printhead.
Attention:
- For safety, keep the Printhead out of the reach of children.
- If ink is accidentally ingested, contact a physician immediately.
- Do not touch the Printhead immediately after printing. The Printhead becomes extremely hot, and there is a risk of burns.
Important:
- There may be ink around the nozzles of the Printhead you remove. Handle the Printhead carefully during replacement. The ink may stain clothing.
- Do not open the Printhead pouch until immediately before installation. After removing the Printhead from the pouch, install it right away. If the Printhead is left after the pouch is opened, the nozzles may dry out, which may affect printing quality.
- If you need to put a Printhead somewhere temporarily before installation, do not keep the nozzles and metal contacts facing down. If the nozzles or metal contacts are damaged, it may affect the printing quality.
Replacing the Printhead attention:
- When replacing the Printhead immediately after printing, wait a few minutes before replacing it. The metal parts of the Printhead become hot during printing, and there is a risk of burns from touching these parts.
Note:
- Prepare a new Ink Tank when ink levels are low.
- Your hands may become dirty during Printhead replacement. Use the gloves provided with the new Printhead for replacement.
- Choose On in Auto Print to have the printer automatically adjust the Printhead alignment after replacement of the Printhead.
1. If the roll is not ejected because of the cutting method selected, cut it manually and remove it.
2. Clean inside the Top Cover.
3. Press the Menu button to display MAIN MENU.

4. Press  or
or  to select Maintenance, and then press the
  button.
5. Press  or
or  to select Replace P.head, and then press the
  button.
6. Press  or
or  to select Yes, and then press the OK button.
Ink is now filled.
After about two minutes, a message is shown on the Display Screen instructing you to open the Top Cover.
7. Open the Top Cover.
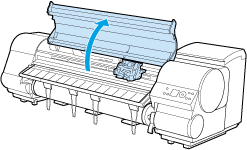
Instructions are now shown on the Display Screen regarding Printhead replacement.
8. If the Printhead Fixer Cover or Printhead Fixer Lever is dirty, use a damp cloth that you have wrung out completely to wipe it clean.

Important:
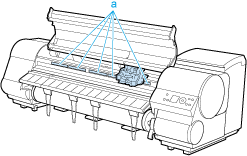
- Do not touch the Linear Scale (a), Carriage Shaft (b), or Ink Tube Stabilizer (c). Touching these parts may damage them.

- Never touch the metal contacts of the Carriage. This may damage the printer.
9. If the ventilation duct (a) is dirty, use a damp cloth that you have wrung out completely to wipe it clean. Move the Carriage out of the way manually if the Carriage is concealing the ventilation duct, and then clean the duct.
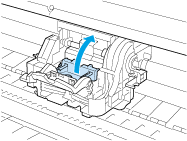
10. Pull the Printhead Fixer Lever forward all the way to open it completely.

11. Pull up the Printhead Fixer Cover to open it completely.
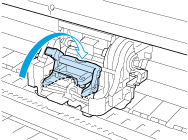
12. Remove the used Printhead.

Note:
- Dispose of the used Printhead in accordance with local regulations.
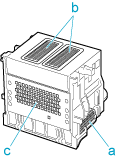
13. Holding the new Printhead by the grips (a), remove it from the case.
 Important:
- When handling the Printhead, always hold it by the grips (a). Never touch the nozzles (b) or metal contacts (c). This may damage the Printhead and affect printing quality.
14. While firmly holding the Printhead you have removed, use your other hand to remove the orange Safety Cap 1 (
a). Squeeze the grips (
c) of Safety Cap 2 (
b) and pull it down to remove it.
 Important:
- The inside surfaces of Safety Cap 1 (a) and Safety Cap 2 (b) are coated with ink to protect the nozzles. Be careful not to touch these surfaces when removing the caps.
- Never touch the ink supply section (d). This may cause printing problems.
- The Printhead contains ink to protect the nozzles. We recommend removing Safety Cap 2 (b) as you hold it over the Printhead package or safely out of the way to avoid spilling ink and staining your clothes or the surrounding area. If ink accidentally spills, wipe off the ink with a dry cloth.
- Do not reattach the Safety Cap or protective material. Dispose of these materials in accordance with local regulations.
15. With the nozzles facing down and the metal contacts toward the back, insert the Printhead into the Carriage. Carefully push the printhead firmly into the Carriage, ensuring that the nozzles and metal contacts do not touch the carriage.

16. Pull the Printhead Fixer Cover down toward the front to lock the Printhead in place.

17. Push the Printhead Fixer Lever toward the back of the printer until it clicks.
18. Close the Top Cover.

Ink now fills the system.
After about six minutes, the Printhead will be automatically aligned, and the printer will go online.
If no paper has been loaded, a message is displayed requesting you to load paper.
Important:
- Never remove an Ink Tank while the system is filling with ink.
- If Auto Print is Off in the printer menu, the Printhead alignment will not be adjusted. In this case, adjust the alignment after Printhead replacement by accessing Advanced Adj. in Auto Head Adj..
