Turn off Color Correction from the driver (Windows) Pro9000 Mark II / Pro9500 Mark II
| Article ID: ART129881 |
| |
Date published: 05/12/2015 |
| |
Date last updated: 08/17/2015 |
Solution
Manual Color Adjustment
When allowing an application to control the color management of the print, the printer's color correction must be disabled or the print results will be unpredictable. Follow the steps below to change the color correction method.
- Select the command you use to perform printing from the program you are using. (In general, select 'Print' on the File menu to open the Print dialog box.)
- Select your model name and click 'Preferences' (or 'Properties'). The printer driver setup window appears.
- On the Main tab, select 'Manual' for 'Color Adjustment,' and the click the 'Set' button.

- From the Matching tab, select the best 'Color Correction' setting for type of image you are printing. Select 'None' if you want the application to manage the color.
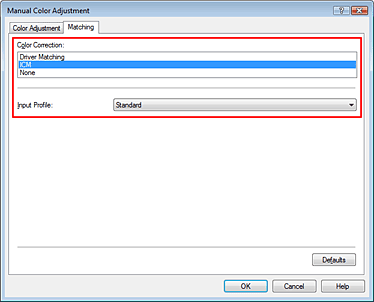
None
Does not correct colors. Use this when managing color from an application.
(Default setting: Driver Matching )
Driver Matching
Corrects colors inside the printer driver to colors most people prefer.
Use the 'Linear Tone' option for Color Mode to get the most accurate match for sRGB without using custom profiles.
ICM (Windows Image Color Management)
Corrects colors using the Windows color management.
