
Change the machine settings (MX860)
| Article ID: ART130235 | | | Date published: 05/12/2015 | | | Date last updated: 08/17/2015 |
Description
Solution
Changing the Machine Settings on the LCD
This section describes the procedure to change the settings in the Device settings screen, taking the steps to specify Extended copy amount as an example.
-
Make sure that the machine is turned on, then press the Menu button.
- Use the

 button to select
  Settings, then press the OK button.
 -
Use the button to select
 Device settings, then press the OK button.
The Device settings screen is displayed.
-
Use the

 button to select a menu, then press the OK button.

-
Use the button to select a menu, then press the OK button.
The setting screen for the selected item is displayed.
-
Use the button to select a setting item, then press the OK button.
Plain paper feed settings
Specifies the paper source for A4, Letter, A5, and B5 plain paper.
-
A4, Letter, A5, and B5 paper can be loaded in the Cassette. Load on the Rear Tray for the other sizes of paper.
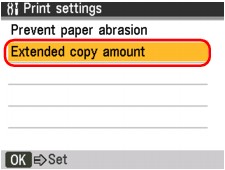
Print settings
-
Prevent paper abrasion
Use this setting only if the print surface becomes smudged.
 Important
- Be sure to set this back to OFF after printing since it may result in lower printing speed or lower print quality.
- Be sure to set this back to OFF after printing since it may result in lower printing speed or lower print quality.
-
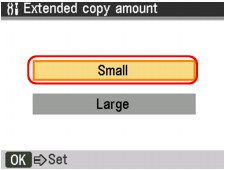
Extended copy amount
Selects the amount of image that extends off the paper when printing in Borderless (full).
 Note
Note
|If printouts contain margins even though you are printing in Borderless, specifying Large for this setting may help solve the problem.

LAN settings
-
Change WLAN/LAN
Activates wired or wireless LAN.
Note- When you change the connection method (wired or wireless), set up the machine according to the method you will use. For details, refer to your setup manual.
- When you change the connection method (wired or wireless), set up the machine according to the method you will use. For details, refer to your setup manual.
-
WLAN settings
Selects the setting method for wireless LAN connection.
-
WPS setting
Select when you perform settings for wireless LAN using Wi-Fi Protected Setup (WPS). Select Push button method or PIN code method according to the method your access point supports, then follow the on-screen instructions.
-
WCN setting
Select when you perform settings for wireless LAN using Windows Connect Now (WCN) feature. You need a USB flash drive on which settings for wireless LAN are saved.
-
-
WLAN setting list
The list of wireless LAN settings of this machine is displayed on the LCD.
The following setting items are displayed.
("X" represents an alphanumeric character ranging from 0 to 9 and A to F.)
-
LAN setting list
The list of wired LAN settings of this machine is displayed on the LCD.
The following setting items are displayed.
("X" represents an alphanumeric character ranging from 0 to 9 and A to F.)
-
IPv4/IPv6 setting
Selects the IP version (IPv4 or IPv6). It is recommended to use the machine with IPv4.
-
WSD setting
Activates/inactivates the WSD (one of the network protocols supported in Windows Vista) setting.
Note- When you set WSD setting to Enable, the printer icon is displayed on the Network Explorer in Windows Vista.
- When you set WSD setting to Enable, the printer icon is displayed on the Network Explorer in Windows Vista.
-
Print LAN details
You can print out the network settings of the machine such as its IP address and SSID.
Important
- This print out contains valuable information about your computer. Handle it with care.
- This print out contains valuable information about your computer. Handle it with care.
-
Reset LAN settings
Initializes the network settings on the machine.
Important- Note that initialization erases all connection settings with computers, and printing or scanning operation may become impossible. To use the machine over network, refer to your setup manual. Be careful when you initialize the network settings on the machine.
- Note that initialization erases all connection settings with computers, and printing or scanning operation may become impossible. To use the machine over network, refer to your setup manual. Be careful when you initialize the network settings on the machine.
Advanced settings
-
Read/write attribute
Selects whether to allow data to be written onto memory cards from a computer.
Important- Remove the memory card before changing this setting.
- If you set this setting to Writable from USB PC or Writable from LAN PC, card direct printing cannot be done. After you finish operation of the memory card dedicated drive, be sure to set it back to Not writable from PC. When you turn off the machine, Writable from USB PC or Writable from LAN PC will be canceled and the setting is returned to Not writable from PC when you turn on the machine next time.
- Remove the memory card before changing this setting.
-
Volume control
Selects the volume.
-
Country select
Selects the country where you are using the machine.
Note- This setting may not be available depending on the country or region of purchase.
- This setting may not be available depending on the country or region of purchase.
-
Quiet mode
Enables this function on the machine if you want to reduce the operating noise, such as when printing at night.Enabling this function reduces the noises generated in the following cases:
-
Copying
- Printing from a memory card
- Printing from a PictBridge compliant device
- Printing from a wireless communication device
- Receiving the fax
- Sending the fax
- Printing a template form
Important- Operating speed may be reduced compared to when this setting is set to OFF.
- This function may not be so effective depending on the machine's setting.
Furthermore, certain noise, such as when the machine is preparing for printing, is not reduced.
Note
-
-
Key repeat
Enables/Disables continuous input by pressing and holding down the
, , , or button when setting the number of copies, the zoom ratio, etc.
-
Two-sided output setting
Selects the paper output setting for double-sided documents.Documents are ejected from the ADF with the front and back pages of each sheet in the reverse order, to make the processing time shorter.
Mobilephone print setting
When printing from a mobile phone through Bluetooth communication, select the print settings such as page size, media type, layout, and so on.
-
This menu is displayed only when the optional Bluetooth Unit is attached.
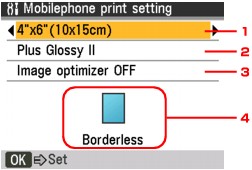
(1) Select the page size for printing photos saved on a mobile phone.
(2) Select the media type for printing photos saved on a mobile phone.
(3) Select Image optimizer ON to correct and smooth out the jagged contours when printing.
(4) Select the layout of the photos according to the paper for printing.
-
Mixed 1, Mixed 2, or Mixed 3 can be selected only when the page size is set to A4 or 8.5"x11"(LTR).
Bluetooth settings
You can change the device name of the machine, passkey, and so on in the Bluetooth settings.
-
Bluetooth settings is displayed only when the optional Bluetooth Unit is attached.
-
Device name
Specifies the name of this machine that is displayed on a Bluetooth-compatible device.
For example, if you set it to XXX-2, the machine will be displayed as "Canon XXX-2" on the Bluetooth device. The default value is XXX-1 (where "XXX" is your machine's name).
-
Access refusal
Selecting ON will disable searching of this machine by a Bluetooth-compatible device.
-
Security
When you select Enable, the passkey set on the Passkey screen becomes effective. Setting the passkey prevents unwanted access from other Bluetooth devices. You can choose either of the security modes below.-
Mode 3 (recommended)
This mode is activated on link level enforced security.
The passkey will be required when a Bluetooth device communicates with the machine.
Normally select this mode.
-
Mode 2
This mode is activated on service level enforced security.The passkey will be required when printing through Bluetooth communication.
After setting the security mode, we recommend making a trial print through Bluetooth communication.
If printing does not start, change the security mode and try again.
-
-
Passkey
Changes the passkey. The passkey is a four-digit number used to prevent unwanted access from other Bluetooth devices.The initial value is "0000".
After you change the passkey, you may be required to input the new passkey on a Bluetooth device, even though it had previous access to the machine. In this case, input the new passkey on the device.
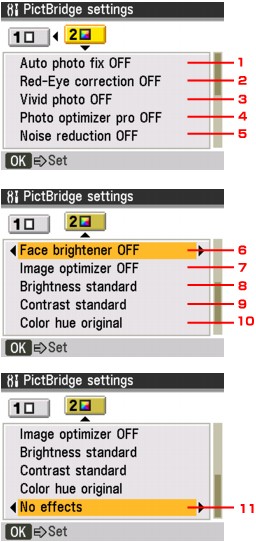
PictBridge settings
You can change the print settings when printing from a PictBridge compliant device.
Set the print settings to Default on the PictBridge compliant device when you want to print according to the settings on the machine.
-
Use the
button to select an item and use the button to specify the setting. To change the tab, use the button to return to the position of tab selection and use the button to select another tab.
Tab 1

-
Select the paper size when printing directly from a PictBridge compliant device.
When you perform PictBridge settings from the machine, set Paper size to Default on the PictBridge compliant device.
-
Select the media type when printing directly from a PictBridge compliant device.
When you perform PictBridge settings from the machine, set Paper type to Default on the PictBridge compliant device.
- Select the print quality when printing directly from a PictBridge compliant device.
-
Select bordered or borderless print.
When you perform PictBridge settings from the machine, set Layout to Default on the PictBridge compliant device.
Tab 2
-
Auto photo fix
When Auto photo fix ON is selected, the scene or person's face of a shot photo is recognized and the most suitable correction for each photo is made automatically. It makes a darkened face by backlight brighter to print. It also analyzes a scene such as scenery, night scene, person, etc. and corrects each scene with the most suitable color, brightness, or contrasts automatically to print.
Note- If the print result with Auto photo fix ON selected is not satisfactory, select Auto photo fix OFF, then specify each advanced setting item below.
- If the print result with Auto photo fix ON selected is not satisfactory, select Auto photo fix OFF, then specify each advanced setting item below.
-
Red-Eye correction
Corrects red eyes in portraits caused by flash photography.
Note- Even when Auto photo fix ON is selected, you can specify this setting.
- Even when Auto photo fix ON is selected, you can specify this setting.
-
Vivid photo
Makes green and blue more lively.
-
Photo optimizer pro
Automatically optimizes brightness and tone of a photo.
-
Noise reduction
Reduces the noise on blue areas like the sky as well as on black areas.
-
Face brightener
Brightens a darkened face on a photo taken against the light.
-
Image optimizer
Corrects and smoothes the jagged contours for printing.
-
Brightness
Adjust brightness.
-
Contrast
Adjust contrast.
-
Color hue
Adjust color hue. For example, you can increase red or yellow to adjust the skin tone.
-
Effects
Applies special effects to the photo, such as printing in sepia tones or with a sketch illustration like effect.
Language selection
Reset setting
Reverts all settings you made to the machine back to default. However, some data may not be changed, depending on the current usage state of your machine.