Replacing the Clear Ink Tank
When clear ink runs out while printing is in progress, the Alarm lamp will flash orange 4 times and the error message will appear on your computer screen.
When the clear ink tank runs out of ink, follow the procedure below to replace it.
important:
Handling Ink
- When clear ink has run out, you cannot print on plain paper.
- To maintain optimal printing quality, we recommend the use of specified Canon brand clear ink tanks. Refilling ink is not recommended.
- Once you remove a clear ink tank, replace it immediately. Do not leave the printer with the ink tank removed. The printer will not operate without the clear ink tank installed.
- Do not replace the clear ink tank until the message informing you that the ink has run out is displayed. If the clear ink tank is replaced before it runs out of ink, the printer will be unable to accurately inform you when it is time to replace the tank.
- Replace an empty tank with a new one. Inserting a partially used ink tank may cause a malfunction. Furthermore, with such a tank, the printer will not be able to inform you when to replace the tank properly.
- Once a clear ink tank has been installed, do not remove it from the printer and leave it out in the open. This will cause the ink tank to dry out, and the printer may not operate properly when it is reinstalled. To maintain optimal printing quality, use a clear ink tank within six months of first use.
note:
- It is possible to print on photo paper, or any type of paper other than plain paper, loaded in the Rear Tray, even if clear ink has run out.
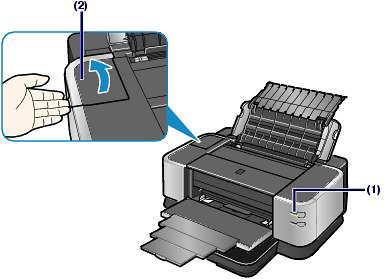
1. Open the Clear Ink Tank Cover.
(1) Make sure the printer is turned on.
important:
- When replacing the clear ink tank, make sure that the printer is turned on. If the ink tank is replaced when the printer is turned off, the detected ink level may not match the actual ink level.
(2) Open the Clear Ink Tank Cover.
2. Remove the clear ink tank.
(1) Push the tab and open the Clear Ink Tank Locking Cover.
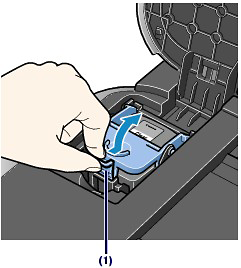
(2) Remove the clear ink tank.
important:
- Handle ink tanks carefully to avoid spilling ink or staining clothing or the surrounding area.
- Discard empty ink tanks according to the local laws and regulations regarding disposal of consumables.
3. Prepare the replacement tank.
Remove the orange tape in the direction of the arrow to peel off the protective film from the new clear ink tank.

important:
- Do not shake ink tanks as this may cause the ink to leak out and stain your hands or the surrounding area.
- Do not squeeze the side of the clear ink tank as this may cause the ink to leak out and stain your clothes and hands.
- Though the clear ink is clear liquid, be careful not to stain your clothes and hands with ink on the removed protective film.
- Do not touch the open ink port once the protective film is removed, as this may prevent the ink from being ejected properly.
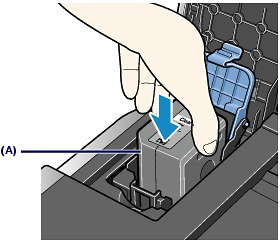
4. Install the clear ink tank.
(1) Be sure that the clear ink tank is properly aligned when inserting.
Be sure that the sharp corner of the ink tank (A) is closest to you and on your left.
(2) Close and press the round, indented portion on the Clear Ink Tank Locking Cover until it snaps firmly into place, locking the ink tank.

5. Gently close the Clear Ink Tank Cover.
Printing cannot be done until the printer is ready. This takes about 2 minutes.
