Wireless Flash
With multiple Canon Speedlites having the wireless flash feature, you can create various lighting effects with the same ease as using normal E-TTL II autoflash.
The settings you input with the sender unit attached to the camera are also automatically transmitted to the receiver units which are controlled by the sender unit via wireless. Therefore, you need not operate the receiver unit(s) at all during the shoot.
For details on wireless flash photography and operating the sender unit, see the sender unit's instruction manual. The procedure below applies to a sender unit attached to the camera and receiver unit(s) controlled by wireless.

|
Set the sender unit.
- Attach the sender unit Speedlite to the camera and set it as necessary.
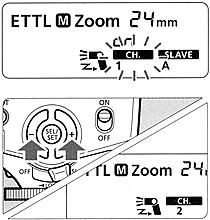
Set the 430EX II as the receiver unit.
- Press the
 button so that <CH> blinks button so that <CH> blinks
Check the communication channel.
- If the sender unit and receiver unit(s) are set to a different channel, set them all to the same channel
Set the receiver ID.
- Set the receiver ID when using two (A and B) or three (A, B, and C) receiver groups
Position the camera and Speedlites.
- Position the receiver unit(s) within the sender unit's wireless transmission range.
Set the sender unit's flash mode to <ETTL>
- For shooting, <ETTL> will also be set automatically for the receiver unit(s).
Check that the flash is ready.
- When the receiver unit (s) is ready to fire (fully charged), the AF-assist beam will blink at 1-sec intervals
Check the flash operation.
- Press the sender unit's test firing button
- The receiver unit will fire If the flash does not fire, adjust the receiver unit's angle toward the sender unit and distance from the sender unit
Set the camera and shoot.
- Set the camera in the same way as with normal flash shooting
|
Sample wireless flash setup
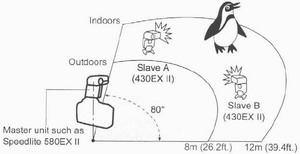
- Use the mini stand (tripod socket provided) to prop up the receiver unit.
- Use the bounce feature to swing the receiver unit's flash body so that the wireless sensor faces the sender unit.
- Indoors, the wireless signal can also bounce off the wall so there is more leeway in positioning the receiver unit(s).
- After positioning the receiver unit(s), be sure to test the wireless flash operation before shooting.
- Do not place any obstacles between the sender unit and receiver unit(s). Obstacles can block the transmission of wireless signals.
- Even with multiple receiver units, all of them will be controlled in the same way via wireless.
- The Speedlite's zoom setting will be set automatically to 24mm. It is possible to change the sender unit's zoom setting. However, note that the sender unit transmits wireless signals to the receiver unit(s) with the preflash. Therefore, the flash coverage must cover the receiver unit's position. If you change the sender unit's zoom setting, be sure to test the wireless flash operation before shooting.
- If the receiver unit's auto power off takes effect, press the sender unit's test firing button to turn on the receiver unit.
- If the 430EX II is set as a receiver unit and remains in auto power off mode for more than 8 hours, it will not turn on even if you try to fire a test flash with the sender unit. In this case, press the receiver unit's test firing button to turn it on.
- A test flash cannot be fired while the camera's operation self-timer is active.
