Setting the Paper Size and Type
For the Paper Cassette
1. Press [  ] (Select Paper/Settings).
2. Select <Paper Settings> with [  ] or [
  ], and then press [OK].

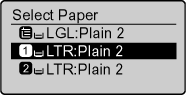
3. Select <Drawer 1> or <Drawer 2> with [ ] or [ ], and then press [OK].

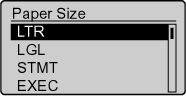
4. Select a paper size with [ ] or [ ], and then press [OK].
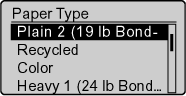
5. Select the paper type with [ ] or [ ], and then press [OK].
6. Press [  ] (Reset) to return to the standby mode.
For the Multi-Purpose Tray
When the paper is loaded in the multi-purpose tray, the following screen appears after registering the default paper settings for the multi-purpose tray (manual feed slot).
This is useful when registering the frequently used paper.
1. Press [ ] (Select Paper/Settings).
2. Select <Paper Settings> with [ ] or [ ], and then press [OK].

3. Select <Multi-Purpose Tray> with [ ] or [ ], and then press [OK].

4. Select <On> with [ ] or [ ], and then press [OK].

5. Select <Paper Settings> with [ ] or [ ], and then press [OK].

6. Select <Multi-Purpose Tray> with [ ] or [ ], and then press [OK].

7. Select <Settings> with [ ] or [ ], and then press [OK].

8. Select a paper size with [ ] or [ ], and then press [OK].

If you select <Custom Size>
Specifies the size of <X> direction and <Y> direction of the custom paper
(1) Select the direction with [ ] or [ ], and then press [OK].
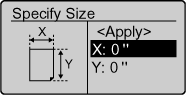
(2) Specify the size with [ ] or [ ], and then press [OK].
You can also enter values using the numeric keys.
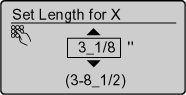
(3) Select <Apply> with [ ] or [ ], and then press [OK].

9. Select the paper type with [ ] or [ ], and then press [OK].

10. Press [  ] (Reset) to return to the standby mode.
