Correcting the Gradation
When printing or making a copy without special settings, you can adjust images properly if the gradation, density, or color of the printed paper is different from that of original documents.
There are the following three types of gradation correction.
Important:
- Load the test chart properly. If the test print is not scanned properly, correction cannot be performed properly.
- Check the temperature of the installation site. If the room temperature is low, correction may not be performed properly.
Note:
Count for the test chart
It is counted as color printing.
Full adjustment time
- MF8350Cdn: Approx. 220 seconds
- MF8050Cn: Approx. 325 seconds
Express adjustment time
- MF8350Cdn: Approx. 60 seconds
- MF8050Cn: Approx. 100 seconds
Copy image correction time
- MF8350Cdn: Approx. 165 seconds
- MF8050Cn: Approx. 255 seconds
Please choose an item below:
You can correct the image gradation automatically by repeating test print output and scanning operation twice. Full adjustment is more precise than express adjustment.
important:
The state where full adjustment can be performed:
- There is sufficient toner.
- There is no job which uses the scanner functions and printer functions.
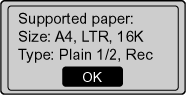
- The following paper is loaded in the paper cassette.
- Paper Size: A4, Letter, or 16K
- Paper Type: Plain paper 1, Plain paper 2, or Recycled paper
- Sheets of paper: 2 sheets or more
1. Press [  ] (Menu).
2. Press [  ] or [
  ] to select <Adjustment/Cleaning>, and then press [OK].

3. Select <Auto Gradation Adjustment> with [ ] or [ ], and then press [OK].

4. Select <Full Adjustment> with [ ] or [ ], and then press [OK].

5. Confirm that paper is loaded, and then press [OK].
Load paper of the type displayed on the screen.
6. Confirm the procedures for the auto gradation adjustment, and then press [OK].
To perform the auto gradation adjustment, follow the four procedures (print -> scan -> print -> scan) displayed in the screen.

* The test chart (adj. image 1) is printed.
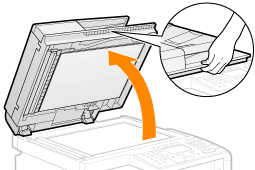
7. Open the feeder when the screen displayed during the printing disappears.

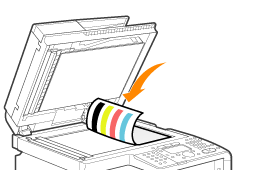
8. Place printed paper on the platen glass with the printing side face down.
Place the paper setting the direction of black streak to the back side of the platen glass.

9. Close the feeder cover gently.
10. Press [  ] (Start).
Starts scanning the test chart.
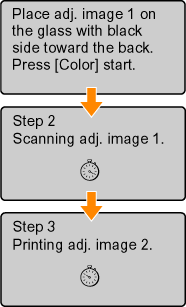
* The test chart (adj. image 2) is printed.
note:
Check the temperature of the installation site.If the room temperature is low, correction may not be performed properly.
If <Adjustment failed.> appears:
- Is the paper loaded correctly?
-> Load plain paper or recycled paper of A4/Letter size in the paper cassette.
- Is the test chart placed on the platen glass correctly?
-> Place the test chart with the printing side face down and the black streak toward the back of the machine.
- Has a paper jam occurred?
-> Remove the jammed paper.
11. Remove the test chart (adjusted image 1) placed on the platen glass in Step 8.
12. Place printed paper on the platen glass with the printing side face down.
Place the paper setting the direction of black streak to the back side of the platen glass.
13. Close the feeder cover gently.
14. Press [ ] (Start).
Starts scanning the test chart.
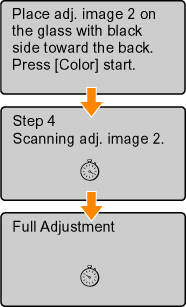
15. Initial screen appears, and initial setting is finished.
16. Remove the test chart (adjusted image 2) placed on the platen glass in Step 12.
17. When full adjustment is complete, the screen of Step 4 reappears. Press [ ] (Menu), and then close the menu screen.
Top
You can make a simple adjustment ly for the image gradation without outputting a test chart.
important:
The state where express adjustment can be performed:
- There is sufficient toner.
- There is no job which uses the printer functions.
1. Press [ ] (Menu).
2. Press [ ] or [ ] to select <Adjustment/Cleaning>, and then press [OK].

3. Select <Auto Gradation Adjustment> with [ ] or [ ], and then press [OK].

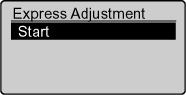
4. Select <Express Adjustment> with [ ] or [ ], and then press [OK].

5. Press [OK].
Express adjustment starts.
6. When the correction is complete, the screen of Step 4 reappears. Press [ ] (Menu), and then close the menu screen.
Top
important:
The state where copy image correction can be performed
- There is sufficient toner.
- There is no job which uses the scanner functions and printer functions.
- The following paper is loaded in the paper cassette.
- Paper size: A4, Letter or 16K
- Paper Type: Plain paper 1, Plain paper 2, or Recycled paper
- Sheets of paper: 1 sheet or more
1. Press [ ] (Menu).
2. Press [ ] or [ ] to select <Adjustment/Cleaning>, and then press [OK].

3. Select <Auto Gradation Adjustment> with [ ] or [ ], and then press [OK].

4. Select <Copy Image Adjustment> with [ ] or [ ], and then press [OK].

5. Confirm that paper is loaded, and then press [OK].
Load paper of the type displayed on the screen.

6. Confirm the procedures for the copy image adjustment, and then press [OK].
To perform the auto gradation adjustment, follow the two procedures (print -> scan) displayed in the screen.
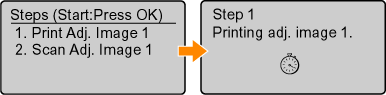
* The test chart (adj. image 1) is printed.
7. Open the feeder when the screen displayed during the printing disappears.
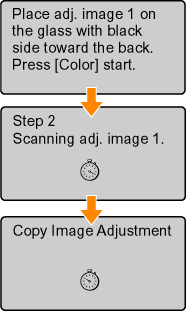
8. Place printed paper on the platen glass with the printing side face down.
Place the paper setting the direction of black streak to the back side of the platen glass.

9. Close the feeder cover gently.
10. Press [ ] (Start).
Starts scanning the test chart.
note:
Check the temperature of the installation site. If the room temperature is low, correction may not be performed properly.
If <Adjustment failed.> appears:
- Is the paper loaded correctly?
-> Load plain paper or recycled paper of A4/Letter size in the paper cassette.
- Is the test chart placed on the platen glass correctly?
-> Place the test chart with the printing side face down and the black streak toward the back of the machine.
- Has a paper jam occurred?
-> Remove the jammed paper.
11. When the correction is complete, the screen of Step 4 reappears. Press [ ] (Menu), and then close the menu screen.
12. Remove the test chart (adjusted image 1) placed on the platen glass in Step 8.
Top
