Install the Printer Driver Software
Before you can print, you need to install a printer driver. Follow the instructions below for adding the printer software to the computer from the Setup CD-ROM.
Click here for Windows instructions
Click her fore Mac OSX instruction
Windows
note:
If the Found New Hardware or Found New Hardware Wizard dialog box appears:
If you connect a USB cable to the printer before installation of the drivers, this screen appears.
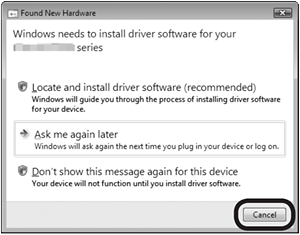
(1) Remove the USB cable connected to your computer. The dialog box may close. In this case, proceed from step 1.
(2) Click Cancel to quit the dialog box.
(3) Proceed from step 1.
note:
If you are using Internet Explorer 7 or later, you can use the Web print software Easy-WebPrint EX. An internet connection is required for installation. (It is also possible to install this software later.)
1. TURN OFF THE PRINTER.
note:
- It takes about 1 minute until the printer turns off.
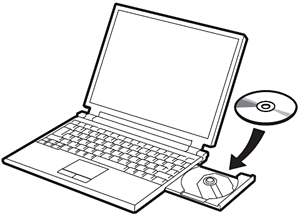
2. Turn on the computer, then insert the Setup CD-ROM into the CD-ROM drive. The setup program will start automatically.
note:
- If the program does not start automatically, double-click the CD-ROM icon in Computer or My Computer. When the CD-ROM contents appear, double-click MSETUP4.EXE.
3. Windows Vista
Windows XP/2000 -> 4
Click Run Msetup4.exe on the AutoPlay screen, then click Continue on the User Account Control dialog box.
If the User Account Control dialog box reappears in following steps, click Continue.

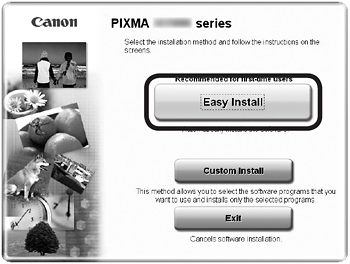
4. Click Easy Install.
The drivers, application software, and on-screen manuals are installed all together.
note:
- If you want to select particular items to install, click Custom Install.
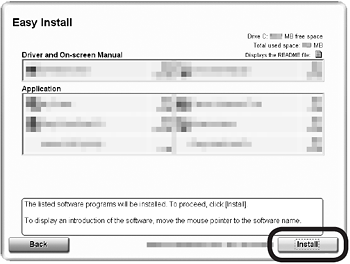
5. Click Install.
note:
- For Windows Vista/XP
- If you are using Internet Explorer 7 or later, you can use the Web print software Easy-WebPrint EX. An internet connection is required for installation. (It is also possible to install this software later.)
- Important Information for the Installation
- Print Head Alignment
Load two sheets of A4 or Letter-sized plain paper into the Cassette (B) then click Execute.
Do not open the Top Cover (C) while printing.
When the pattern (D) shown is printed, Print Head Alignment is complete.
In Windows, click Next on the Print Head Alignment screen.
Wait until the pattern printing ends (about 10 minutes).
important:
- If the Alarm lamp (orange) flashes, press the RESUME/CANCEL button on the printer to clear the error, then click Next.
note:
- Pull out the Front Tray Extension beforehand.
- The pattern is printed in black and blue.
- Necessary Information for the User Registration
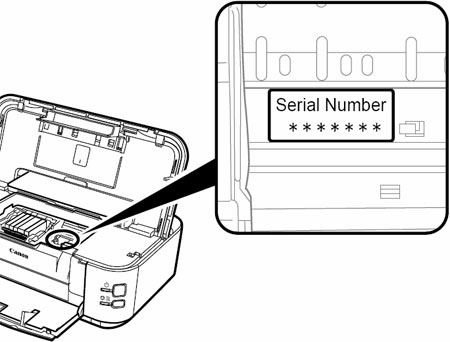
The product serial number is required when registering the product. The serial number is located inside the printer (as shown in the illustration).
important:
- When opening the Top Cover, the Print Head Holder moves automatically if the unit is powered on.
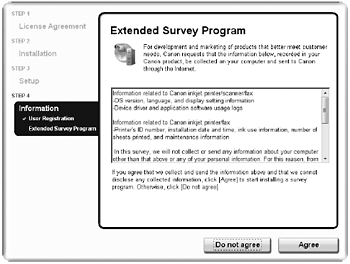
- About Extended Survey Program
If you can agree to Extended Survey Program, click Agree.
If you click Do not agree, the Extended Survey Program will not be installed.
(This has no effect on the printer's functionality.)
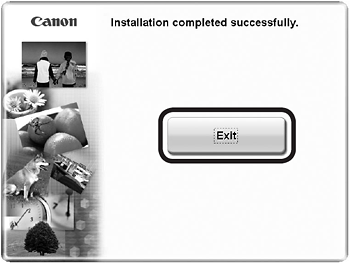
7. Click Exit to complete the installation.
If Restart is displayed, follow the instruction to restart the computer.
After restarting the computer, remove the Setup CD-ROM and keep it in a safe place.
Macintosh
Note: If you are using Mac OS X v10.6.x, the supported printer driver is not available on the included CD-ROM. Install the printer driver either from Apple Software Update or by downloading it from our Web site.
Important:
1. Connect the printer to the computer with a USB cable.
Make sure the printer is turned on.
note:
- The USB Port is located on the right side at the back of the printer. The lower port is for USB.
2. Turn on the computer, then insert the Setup CD-ROM into the CD-ROM drive.

3. Double-click the Setup icon of the CD-ROM folder to proceed to the following screen. Enter your administrator name and password, then click OK.
If you do not know your administrator name or password, click Help, then follow the on-screen instructions.

note:
- If the CD-ROM folder does not open automatically, double-click the CD-ROM icon on the desktop.
4. Click Easy Install.
The drivers, application software, and on-screen manuals are installed all together.

note:
- If you want to select particular items to install, click Custom Install.
5. Click Install.
Follow any on-screen instructions to proceed with the software installation.

6. When the Start Setup screen appears, click Execute.

- Important Information for the Installation
- Print Head Alignment
Load two sheets of A4 or Letter-sized plain paper into the Cassette then click Execute.
Do not open the Top Cover while printing.
When the pattern shown is printed, Print Head Alignment is complete.
In Windows, click Next on the Print Head Alignment screen.
Wait until the pattern printing ends (about 10 minutes).

important:
- If the Alarm lamp (orange) flashes, press the RESUME/CANCEL button on the printer to clear the error, then click Next. After the installation is complete, perform Print Head Alignment.
note:
- Pull out the Front Tray Extension beforehand.
- The pattern is printed in black and blue.
- Necessary Information for the User Registration
The product serial number is required when registering the product. The serial number is located inside the printer (as shown in the illustration).
important:
- When opening the Top Cover, the Print Head Holder moves automatically if the unit is powered on.
- About Extended Survey Program
If you can agree to Extended Survey Program, click Agree.
If you click Do not agree, the Extended Survey Program will not be installed.
(This has no effect on the printer's functionality.)
note:
- The screen does not appear on Mac OS X v.10.3.9.
7. Click Exit to complete the installation.
Canon IJ Network Tool starts automatically.
Remove the Setup CD-ROM and keep it in a safe place.

