Uninstall and Reinstall the Printer Driver (Windows)
Follow the steps below to uninstall the printer driver:
note:

If the installer was forced to be terminated due to a Windows error, the system may be in an unstable condition and you may not be able to install the driver. Restart your computer before reinstalling.
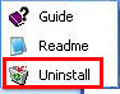
- Select 'Programs' or 'All Programs' from the Start menu.
- Select the Canon printer driver you want to uninstall, and then select 'Uninstall' from the menu that appears.
Note: Click here if your printer does not appear in the Windows 2000, Windows XP or Windows Vista Programs menu.
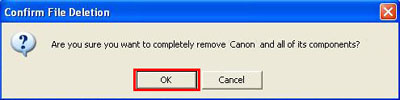
- When the confirmation message shown below is displayed, click 'OK'.
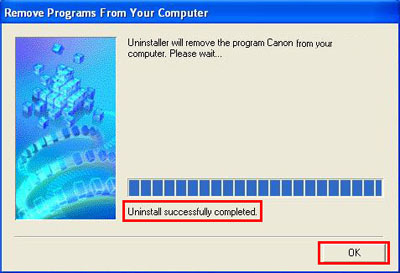
- A window showing the progress of the un-installation is displayed. Wait until the "Uninstall successfully completed" message is displayed, and then click 'OK'.
Note: If you use Add or Remove Programs to uninstall the printer driver, the printer model name will remain in the Start menu. To completely remove all files, including the printer model name from the Start menu, uninstall the printer driver using the procedure described in step 2.
In Windows Vista, Window XP or Windows 2000, use the steps below to uninstall the printer driver if your printer does not appear in the Programs menu.
Note: You will not be able to complete these steps, if User Access Control is enabled in Windows Vista. Click here for steps to temporarily disable User Account Control, so that the printer driver can be removed.
- Make sure your printer is connected and turned OFF (or the power cord is unplugged).
-
Turn on your computer and log on as Administrator.
-
Open the Printers window.
For Windows Vista
Click / Select 'Start' from the bottom left of the Windows screen, 'Control Panel', 'Hardware and Sound', and then click on 'Printers'. Note: If you are in 'Classic' view, Click 'Printers' directly from the 'Control Panel'.
For Windows XP Home Edition
Click / Select 'Start' from the bottom left of the Windows screen, 'Control Panel,' 'Printers and Other Hardware,' and 'Printers and Faxes.'
For Windows XP Professional Edition
Click 'Start' from the bottom left of the Windows screen, and 'Printers and Faxes.'
For Windows 2000/Me/98
Click / Select 'Start' from the bottom left of the Windows screen, and 'Settings,' then 'Printers.'
Right-click the Canon printer icon for your model printer and click Delete.
-
Click 'Yes' to proceed with the deleting process.
-
Click 'OK' to acknowledge you have deleted your default printer.
-
Click 'File' from the Printers window then click 'Server Properties'.
Note: For Windows Vista, click your right mouse button on any empty space within the window, and then select 'Server Properties' from the menu that appears.
-
Click the 'Drivers' tab. Select your Canon printer from the list and click 'Remove'.
-
Click 'Yes' to proceed with the deleting process.
Important (Vista Users): If you turned off 'User Account Control', go back to User Accounts and turn it back on.
Follow the steps below to reinstall the printer driver:
important:
- Quit all running applications before installation.
- You need to log on as the administrator (or a member of the Administrators group).
- Do not switch users during the installation process.
- It may be necessary to restart your computer during the installation process. Follow the on-screen instructions and do not remove the Setup CD-ROM during restarting. The installation resumes from where it left off when your computer has been restarted.
- Turn off the printer.
- Connect the printer cable to the printer and the computer.
- Turn on the computer, and start Windows.
- Insert the Canon Software Setup and User's Guide CD-ROM into the CD-ROM drive. Setup Starts automatically.
Note: If Setup does not start automatically, click 'Start' and then 'Run' from the taskbar. In the 'Open' box of Run window, type x:\msetup.exe (where x: is your CD-ROM drive letter). Then click 'OK'.
- When the Master Setup screen is displayed, click the 'Custom Install' button.

- Check (click on the check box) MP Drivers, and then click 'Next'.

*Example. Choices vary by model.
- When the License Agreement appears, click the 'Yes' button after reading the agreement, and then click 'Next'.

- File copying begins. After all files are copied, the Printer Port dialog box is displayed. When the dialog box is displayed, turn on the printer.
Note: If the port is not detected at this time, disconnect the cable from the printer and reconnect it.
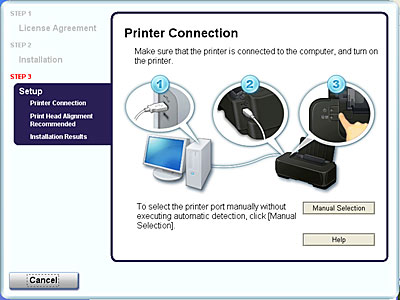
Note: If the printer is still not detected, follow the steps below.
1). Click Cancel on the Printer Connection screen.
2.) Click Start Over on the Installation Failure screen.
3.) Click Back on the screen that appears next.
4.) Click Exit on the PIXMA XXX screen, then remove the CD-ROM.
5.) Turn the printer off.
6.) Restart the computer.
7.) Make sure that you have no application software running.
8.) Follow the procedure described in your setup manual to reinstall the printer driver.
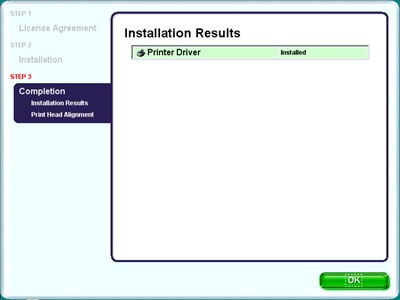
- Click 'OK' to end the printer driver installation.
Note: If you previously used a Canon printer that was connected with a USB cable, a message reporting that the USB driver will be updated may be displayed. Click the OK button to update the USB driver and restart Windows.
Temporarily disable User Account Control
Note: In Windows Vista, the 'Remove' button will not be accessible (grayed out) if 'User Account Control' is enabled.
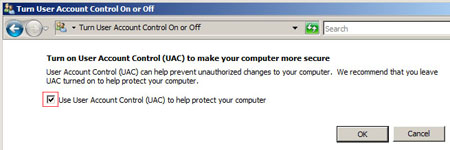
-To disable 'User Account Control' temporarily, open User Accounts from Control Panel.
-Click 'Turn User Account Control on or off'.

-Click the check box next to 'Use User Account Control (UAC)...' to remove the checkmark, and then click the 'OK' button at the bottom of the screen.
-Click 'Restart Now'

-Once the computer has restarted you will be able to remove the driver.
Back to instructions
