
What to do if the MP Drivers installation does not start or will not proceed past the Printer Connection screen - MP990
| Article ID: ART132405 | | | Date published: 05/12/2015 | | | Date last updated: 08/17/2015 |
Description
What to do if the MP Drivers installation does not start or will not proceed past the Printer Connection screen - MP990
Solution
| Cannot Install the MP Drivers | |
| Issue |
|
| Cause |
If the installation does not start even after the Setup CD-ROM is inserted into your computer's disc drive: |
| Summary |
 Start the installation following the procedure below.
1.Click Start then My Computer.
In Windows XP, click Start then My Computer.
In Windows 2000, double-click the
 My Computer icon on the desktop My Computer icon on the desktop2.Double-click the
 CD-ROM icon on the displayed window. CD-ROM icon on the displayed window.If the contents of the CD-ROM are displayed, double-click MSETUP4.EXE.
 Double-click the
CD-ROM icon on your desktop to start installation.If the contents of the CD-ROM are displayed, double-click Setup.
|
| Cause |
If you are unable to proceed beyond the Printer Connection screen: |
| Summary |
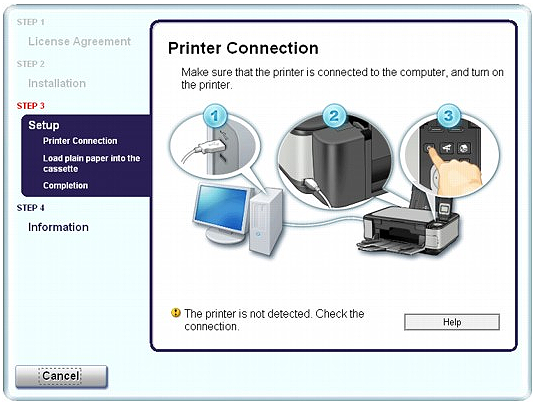 If you are unable to proceed beyond the Printer Connection screen, make sure that the USB cable is securely plugged into the USB port of the machine and is connected to the computer, and then follow the procedure below to reinstall the MP Drivers.
|
| Cause |
|
| Summary |
1. Click Cancel on the Printer Connection screen.
2. Click Start Over on the Installation Failure screen.
3. Click Back on the screen that appears next.
4. Click Exit on the PIXMA XXX screen, then remove the CD-ROM.
5. Turn the machine off.
6. Restart the computer.
7. Make sure that you have no application software running.
8. Insert the CD-ROM again, then perform Easy Install to install the MP Drivers.
|
| Cause |
In other cases: |
| Summary |
Follow the procedure described in your setup manual to reinstall the MP Drivers.
If the MP Drivers were not installed correctly, uninstall the MP Drivers, restart your computer, and then reinstall the MP Drivers.
If you reinstall the MP Drivers, perform Custom Install on the Setup CD-ROM, then select MP Drivers.

|
Deleting the Unnecessary MP Drivers |
|
| Solution |
Windows The MP Drivers you no longer use can be deleted.
When deleting the MP Drivers, first exit all programs that are running.
The procedure to delete the unnecessary MP Drivers is as follows:
1. Start the uninstaller
- In Windows Vista, select the Start menu -> All Programs -> "Your model name" -> MP Drivers Uninstaller.
- In Windows XP, select the start menu -> All Programs -> "Your model name" -> MP Drivers Uninstaller.
- In Windows 2000, select the Start menu -> Programs -> "Your model name" -> MP Drivers Uninstaller.
The MP Drivers Uninstaller dialog box is displayed.
2. Execute the uninstaller
Click Execute. When the confirmation message appears, click Yes.
When all the files have been deleted, click Complete.
The deletion of the MP Drivers is complete.
When there is no uninstaller in the Start menu of Windows Vista, follow these steps:
1. Select the printer to be deleted
Select the Start menu -> Control Panel -> Hardware and Sound -> Printers.
Click the model to delete, then press the Alt key on your keyboard. On the File menu, click Delete.
2. Delete the printer
When the User Account Control dialog box appears, click Continue. Then when the confirmation message appears, click Yes.
The icon is deleted.
3. Select the printer driver to be deleted
Press the Alt key. On the File menu, select Run as administrator, and then click Server Properties....
When the User Account Control dialog box appears, click Continue.
Click the Drivers tab. In the Installed printer drivers list, click the printer to delete.
4. Delete the printer driver
When you click Remove..., Remove Driver And Package dialog box is displayed.
Select Remove driver and driver package, and then click OK.
In the confirmation dialog box, click Yes.
When data collection is completed in the Remove Driver Package dialog box, click Delete.
5. Click OK
The deletion of the printer driver is complete.
Macintosh The printer driver you no longer use can be deleted. Before deleting a printer driver, disconnect the cable that connects the printer to the computer.
The procedure to delete the unnecessary printer driver is as follows:
Printer driver cannot be deleted unless you login as a user with the administrative right. On an administrative user, refer to the Macintosh manuals.
When you delete the printer driver in this way, all the printer drivers for Canon printers, which are installed on your computer, are deleted. You cannot select and delete the printer driver of a specific model.
1. Open System Preferences, and select Print & Fax
2. Delete the Canon IJ printer from the printer list
From the printer list, select all the registered Canon IJ printers and click -.
3. Delete the printer driver
One by one, double-click the volume icon, Library folder, Printers folder, and Canon folder to which you installed the printer driver, and place the BJPrinter folder into the Trash.
One by one, double-click the volume icon, Library folder, and CFMSupport folder to which you installed the printer driver, and place the "BJExtDDI.cfm" file into the Trash.
4. Restart the computer
Empty the Trash and restart your computer.
1. Launch the Printer Setup Utility
2. Delete the Canon IJ printer from the printer list
From the printer list, select all the registered Canon IJ printers and click icon
 Delete. Delete.
3. Delete the printer driver
One by one, double-click the volume icon, Library folder, Printers folder, and Canon folder to which you installed the printer driver, and place the BJPrinter folder into the Trash.
One by one, double-click the volume icon, Library folder, and CFMSupport folder to which you installed the printer driver, and place the "BJExtDDI.cfm" file into the Trash.
4. Restart the computer
Empty the Trash and restart your computer.
|
SIMS Doc Id
0