How to use the Front Feed
Preparation: Before you begin, be sure there are no obstructions in back of the printer to permit operation of the paper support tray and paper loading. During front loading, the paper temporarily moves toward the rear of the printer before printing starts.
1) Open the Front Tray and Rear Support
- Gently press and then release the front tray to allow it to open, and then extend the paper support (See figure 1a).
- Press the button on the top right side of the printer to open the rear paper support. (See figure 1b).
- If using paper larger than letter-size (8.5"x11"), extend the additional paper support by pressing the release lever located near he right corner of the rear paper support. The additional support opens. (See figure 1c)
Note: Be sure there are no obstructions behind the unit to allow for proper paper feeding.

2) Set Front Tray to Front Feed Position
- With the front tray open, lift and hold the tray until it is about halfway closed.
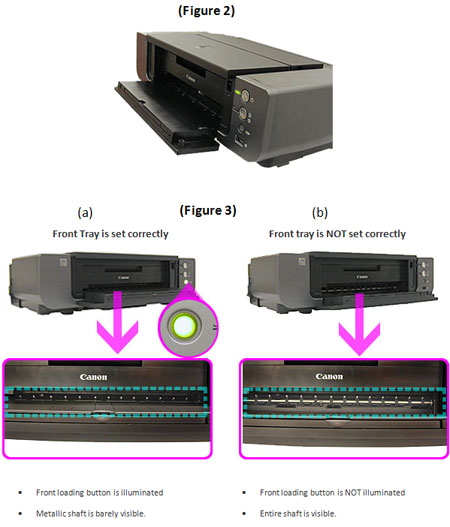
- While holding the tray halfway closed, gently lift the tray outwards and then lower the tray into the open position again. The tray changes to the raised (front feed) position. (See animation figure 2)
- If the front loading button is lit, the tray has been set to the front feed position. (See figure 3a) If not, the light will not be lit and the metallic shaft is visible (See figure 3b). In this case, repeat step 2 again.
3) Set the Printer to Front Loading Mode
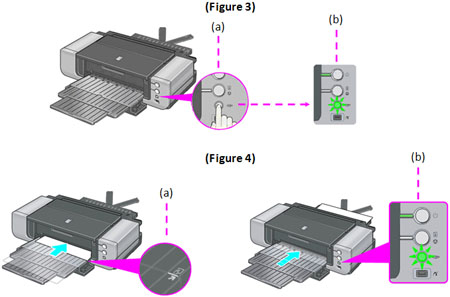
- Press the (illuminated) Front Loading button once (See figure 3a). The power light blinks while the unit prepares for paper loading. The unit is ready for paper loading when the Front Loading button is blinking (See figure 3b).
- Load one sheet of the desired paper onto the front feed tray as shown (print side face up). Insert the sheet of paper along the right edge of the support tray toward the rear of the unit, until the right, front corner of the paper is aligned with the white mark/arrow on the tray. (See figure 4a)
- Press the Front Loading Button to complete the loading process. The paper is automatically fed to the starting position and the Front Loading Button blinks. (See figure 4b)
- You are now ready to print using the front feed. To print consecutive pages, repeat step 3.
4) Select the Correct Paper Source (via the computer)
Windows
- Select the command you use to perform printing from the program you are using. (Typically, you will select 'Print' from the 'File' menu to open the 'Print' dialog box.)
- Select your printer and then click 'Preferences' (or 'Properties').

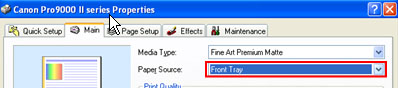
- From the 'Properties' window, click the 'Main' tab.
- Select 'Front Tray' from the Paper Source drop-down menu.
Macintosh
- Select the command you use to perform printing from the program you are using. (Typically, you will select 'Print' from the 'File' menu to open the 'Print' dialog box.)
- From the 'Printer' pop-up menu, select the printer you are using.
- In the third pop-up menu, select 'Quality & Media'.
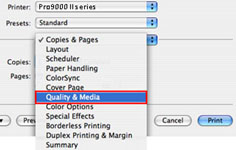
- Select 'Front Tray' from the 'Paper Source' pop-up menu.
Attention!
- Only one sheet of paper at a time can be fed from the front tray.
- Paper must be loaded within 5 minutes from the time paper loading mode has been set, and the front loading button starts blinking. If the button stops blinking and is lit steadily, push front loading button again to return to the loading position, and then load the paper.
- If the rear support tray is not opened, the error light blinks in 3 consecutive flashes. In this case, open the rear support tray as described in step 1, and then press the "Resume" button.
- Envelopes ,must be fed from the rear tray feed.
- To print from the rear feed, return the front tray to its original (lowered) position. (Reverse step 2b)
