
Changing the AF Mode to Use the Live View Function to Shoot Still Photos and Movies using the EOS-1D Mark IV.
| Article ID: ART132590 | | | Date published: 05/12/2015 | | | Date last updated: 08/17/2015 |
Solution
With your camera, you can shoot photos while viewing the image on the camera's LCD monitor. This is called "Live View shooting."
This page describes how to change the focus mode for Live View shooting. For details on how to perform easy Live View shooting in default settings, please refer to the related information.
Please note that some shooting procedures differ between still photos and movies. To shoot still photos, please refer to the instructions for still photos, and to shoot movies, please refer to the instructions for movies.
Part I. Preparing for Live View Shooting1. Turn the camera's power switch to <ON>.
2. Press the <MENU> button to display the menu.

3. Turn the <Main Dial> to select the [  ] tab.
You can use <  >(Multi-controller) to set menu options.

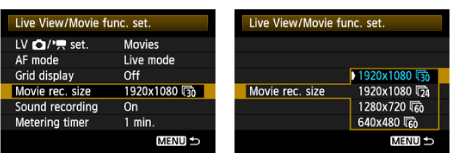
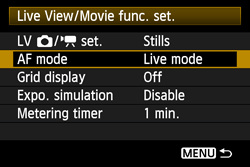
4. Turn the <Quick Control Dial> to select [Live View/Movie func. set.], and then press the <SET> button.

5. Select [LV  set.], then press <SET>.

6. Turn the <Quick Control Dial> to select [Stills] or [Movies], and then press the <SET> button.

To shoot movies, set movie rec. size.
7. Press the <MENU> button or press the shutter button halfway to turn off the menu screen.
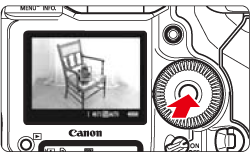
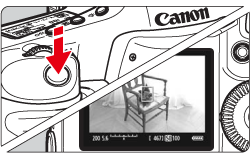
8. When you press the <SET> button, the Live View image will appear on the LCD monitor.
To use AF to focus, please proceed to Part II. To focus manually, please proceed to Part III.
Part II, and III describe common procedures for still photos and movies.
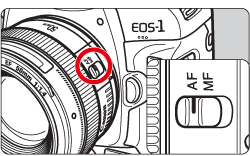
Part II. Selecting the AF Mode9. Set the lens focus mode switch to <AF>.
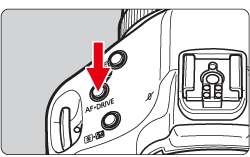
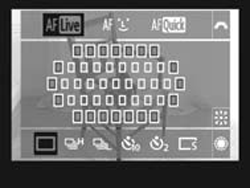
10. While the Live View image is displayed, press the <AF-DRIVE> button.
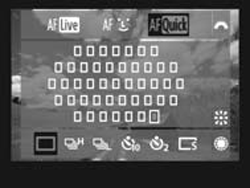
11. Turn the <Main Dial> to select the AF mode.
 : Live mode
 :
:  Live mode
 : Quick mode
|
Reference: This can also be set with the [AF mode] menu option. |
Please proceed to Part II 1, 2, or 3 depending on the AF mode setting.
Part III-1. Using AF (Live Mode) to FocusWhen [Live mode] ( ) is set:
The image sensor is used to focus. Although AF is possible with the Live View image displayed, the AF operation will take longer than with Quick mode. Also, achieving focus may be more difficult than with Quick mode.
[Live mode] is set by default.
12. The Live View image will appear on the LCD monitor with AF point.
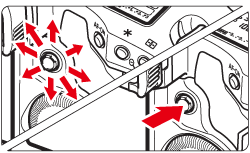
- You can use < > (Multi-controller) to move the AF point to where you want to focus (it cannot go to the edges of the picture).
- If you press < > straight down, the AF point will return to the image center.
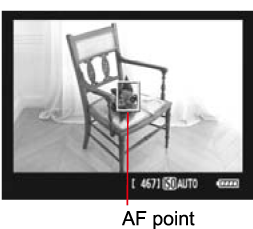
13. Aim the AF points over the subjects and press the shutter button halfway.
- When focus is achieved, the AF point will turn green and the beeper will sound.
- If focus is not achieved, the AF point will turn orange.
Please proceed to Part IV.
Part III-2. Using AF (Face detection Live Mode) to FocusWhen [ (Face Detection) Live mode] is set:
With the same AF method as the Live mode, human faces are detected and focused. Have the target person face the camera.
12. The Live View image will appear on the LCD monitor.
- When a face is detected, the [
 ] frame will appear over the face to be focused.
 - If multiple faces are detected, [
 ] will be displayed. Use the < > (Multi-controller) to move the [ ] frame over the target face.
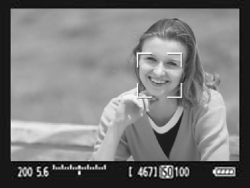
13. Press the shutter button halfway and the camera will focus the face covered by the [ ] frame.

- When focus is achieved, the AF point will turn green and the beeper will sound.
- If focus is not achieved, the AF point will turn orange.
- If a face cannot be detected, the AF point [
 ] will be displayed and the center AF point will be used for focusing.
|
Attention:
Notes when shooting in [
|
Please proceed to Part IV.
Part III-3. Using AF (Quick Mode) to FocusWhen [Quick mode] is set:
The dedicated AF sensor is used to focus in the same way as with viewfinder shooting. Although you can focus the desired area quickly, the Live View image will be interrupted momentarily during the AF operation.
12. Press the <AF.DRIVE> button, then use < > (Multi-controller) to select the AF point.
- Pressing < > straight down selects the center AF point. Pressing it straight down again sets it to automatic AF point selection.
- If all the peripheral AF points light up, automatic AF point selection will take effect.
- If you press the <AF-DRIVE> button or when the timer elapse, the AF point selected on the screen will be displayed. (If automatic AF point selection has been set, no AF point will be displayed.)
13. Aim the AF points over the subjects and press the shutter button halfway.(Keep the shutter pressed.)
14. The Live View image will turn off, the reflex mirror will go back down, and AF will be executed.
- When focus is achieved, the beeper will sound and the AF point will be displayed in red. (If automatic AF point selection has been set, the AF point which achieves focus will flash in red.)
- The Live View image will automatically reappear.
Please proceed to Part IV.
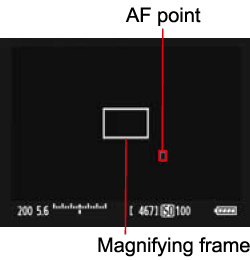
Part III. Focusing ManuallyYou can magnify the image and focus precisely manually.
9. Once you have proceeded up to Step 8 of Part I, set the lens focus mode switch to <MF>.
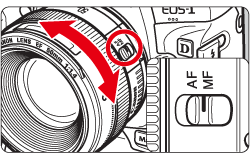
10. Turn the lens focusing ring to focus roughly.
11. Use < > (Multi-controller) to move the magnifying frame to the position where you want to focus.
If you press < > straight down, the AF point will return to the image center.
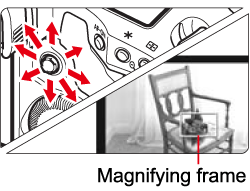
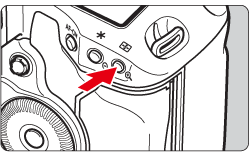
12. Press the <  > (Magnifying) button to magnify the area within the frame.
Each time you press the < > button, the display format will change as follows:
Normal view -> Approx. 5x -> Approx. 10x -> Normal view
13. While looking at the magnified image, turn the lens focusing ring to focus.
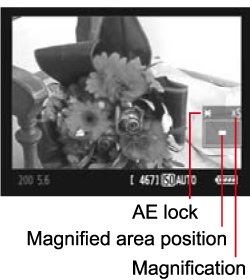
14. After achieving focus, press the < > (Magnifying) button to check the image composition in normal view.
Please proceed to Part IV.
Part IV. ShootingAfter focus is achieved by following the instructions in Part II and III, start shooting.
To shoot still photos, press the shutter button completely.
- The picture will be taken and the captured image is displayed on the LCD monitor.
- After the image review ends, the camera will return to Live View shooting automatically.
- Press <SET> to end the Live View shooting.

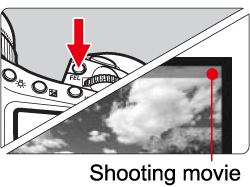
To shoot movies, press the <FEL> button.
- To stop shooting the movie, press the <FEL> button again.
- While the movie is being shot, the "
 " mark will be displayed on the upper right of the screen.
General Note for Live View Shooting
Please be aware of the following notes for Live View shooting.
|
Attention:
Notes About the Live View Image
About the [
Live Mode and
|
 ] icon