
Setting up the printer and computer for printing via Bluetooth - Windows - MP560
| Article ID: ART132605 | | | Date published: 05/12/2015 | | | Date last updated: 08/17/2015 |
Description
Solution
Printing Data via Bluetooth Communication (Windows)
Preparation |
 |
In order to print via Bluetooth communication with Windows, the following system requirements must be satisfied.
|
Computer |
A computer in which an Bluetooth module is installed or a computer to which an optional Bluetooth adapter (available from various manufacturers) is attached. |
|
OS |
Microsoft Windows Vista (Satisfying any one of the following conditions are needed)
Microsoft Windows XP (Satisfying any one of the following conditions are needed)
|
In order to connect the Bluetooth unit and print via Bluetooth communication, the following steps are required.
STEP 1
Check that the Bluetooth unit is properly attached to the printer.
See Attaching to and Removing from the Printer.
STEP 2
Install the MP Drivers.
See Installing the MP Drivers.
STEP 3
Check the device name of the printer using the LCD.
See Setting the Printer.
STEP 4
Register the printer as a Bluetooth device using Bluetooth Devices.
 When using Windows Vista, and Bluetooth Devices is displayed in Hardware and Sound under Control Panel
Authenticate the printer as a Bluetooth device on Bluetooth Devices in Hardware and Sound under Control Panel.
When using Windows XP SP2 or later, and Bluetooth Devices is displayed in Printers and Other Hardware under Control Panel
Authenticate the printer as a Bluetooth device on Bluetooth Devices in Printers and Other Hardware under Control Panel.
When using a Toshiba Windows Vista or Windows XP computer
Authenticate the printer as a Bluetooth device using Bluetooth Settings*.
* When the computer which builds in Bluetooth™ Stack for Windows© by Toshiba or the program attached to the Bluetooth adapter of the option manufactured by Toshiba is used, the computer can register a printer easily.
Bluetooth Settings can be started by clicking Start and selecting All Programs, TOSHIBA, Bluetooth, and Bluetooth Settings.
For details on Bluetooth Settings, refer to your computer's operation manual.
The operations may vary depending on your operating program. In this case, refer to your computer's operation manual.
Attaching the Bluetooth Unit to the Printer
Removing the Bluetooth Unit from the Printer
 Attaching the Bluetooth Unit to the Printer
Attach the Bluetooth unit to the direct print port of the printer in accordance with the following procedure.
The illustrations in this section refer to the MP620 series.
1. Check the status of the Power lamp on the printer.
Ensure that the Power lamp on the printer is lit.
2. Insert the Bluetooth unit to the direct print port of the printer.
Detach the cap from the Bluetooth unit. Store the cap in a safe location.

Note
When the Bluetooth unit is properly attached to the printer, the Power lamp on the printer flashes twice.
Removing the Bluetooth Unit from the Printer
Remove the Bluetooth unit from the direct print port of the printer in accordance with the following procedure.
1. Remove the Bluetooth unit from the direct print port of the printer.
Caution
Ensure that the lamp on the Bluetooth unit is neither lit nor flashing before you remove the Bluetooth unit.

Important
Store the Bluetooth unit with the cap attached.
Installing the MP Drivers
Before connecting the Bluetooth unit to the printer for wireless printing, first the USB cable must be connected between the printer and computer, and the MP Drivers must be installed using the Setup CD-ROM.
|
A USB cable is required to install the MP Drivers. |
If the MP Drivers have not been installed
Install the MP Drivers according to your setup guide.
If the MP Drivers have already been installed
Move to the next step.
See Setting the Printer.
Setting the Printer
This section describes the procedures for checking the settings of the Bluetooth unit on the LCD of the printer in preparation for Bluetooth printing.
The LCD screens in this section refer to the MP620 series.
1. Ensure that the Bluetooth unit is attached and the printer is turned on.
For information about how to attach the Bluetooth unit, see Attaching to and Removing from the Printer.
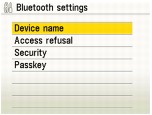
2. Display the Bluetooth settings screen on the LCD.
For information about how to display the Bluetooth settings screen, refer to your printer's manual.
If the Bluetooth settings screen does not appear on the LCD, the Bluetooth unit may not be attached correctly. Remove the Bluetooth unit from the printer and attach it once again.
For details, see Attaching to and Removing from the Printer.
If the Bluetooth settings screen still does not appear, the Bluetooth unit may be faulty. In this case, contact your Canon service representative.
3. Select Device name.
The Device name screen appears.
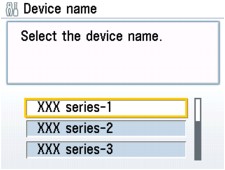
4. Check the device name.
The device name is necessary to register the printer as a Bluetooth device. Be sure to note the device name.
If multiple printer units with the same model name are connected to the system, assigning a different device name to each printer is recommended for easy identification of the printer you will use.
After checking the device name, press the OK button on the printer.
After checking the Bluetooth settings, register the printer on your computer.
Registering the Printer
Register the printer as a Bluetooth device using Bluetooth Devices on Windows Vista.
|
1. Click Start, Control Panel, then Printers under Hardware and Sound. When using non-Vista Windows, click Start, Control Panel, then Printers and Faxes under Printers and Other Hardware. 2. Click the icon of the printer used for printing via Bluetooth communication. 3. Select Delete from the Organize menu. When using non-Vista Windows, select Delete from the File menu. |
1. Log into a user account with the administrator privilege.
2. Click Control Panel, then Bluetooth Devices under Hardware and Sound.
In non-Vista Windows, click Control Panel, Printers and Other Hardware, then Bluetooth Devices.
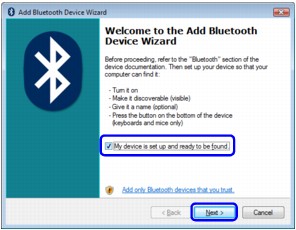
3. Click Add in the Devices page.

Add Bluetooth Device Wizard will start.
4. Ensure that the printer is turned on, check the My device is set up and ready to be found check box and then click Next.
5. Select the device name of the printer and click Next.
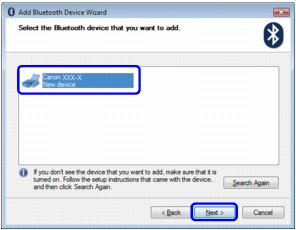
Select the same device name as that checked under Setting the Printer.
6. Select Don't use a passkey, and then Next.
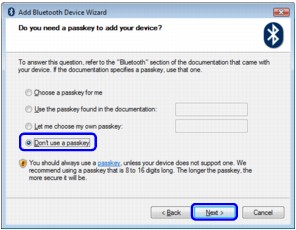
If you set a passkey in the printer, select Use the passkey found in the documentation and enter passkey then click Next.
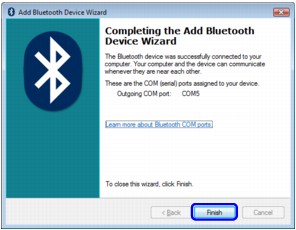
7. Click Finish.
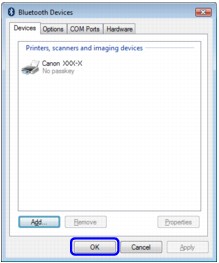
8. Check that the device name selected at step 5 is registered on the Devices page, and click OK.
Now, the settings for printing via Bluetooth communication are ready.
In Windows Vista, the Windows needs to install driver software for your Bluetooth Peripheral Device screen may appear automatically. In this case, click Don't show this message again for this device.