When all ink tanks are incorrectly inserted
[ With incorrectly inserted ink tanks ]
The top portion of all ink tanks is not in place. The top portion must go beneath the ink color name sticker.
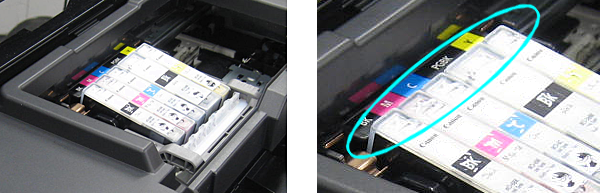
[ With properly inserted ink tanks ]
1. Unplug the power cord.
2. Open the top cover and move the print head holder to the center.
*The print head holder may be at the left side of the printer (the opposite side of the one shown above).
(Lifting the print head holder before sliding it to the center may help you do the operation.)
( The printer in the illustration below shows the iP4600 model. )

3. Remove the two most left ink tanks following the procedures below.
3-1. First, push down the upper part of the ink tank until it slides under the cover so that the ink tank fits into place.
3-2. Then, push the latch lever (A) in the direction of the arrow and pull out the ink tank.
Repeat above two steps for the 2nd ink tank.

4. Pull out the rest of ink tanks one by one:
While holding the upper part of the ink tank, remove the ink tank by gently twisting it.
Repeat above for the rest of them.
5. Turn ON the printer again.
6. When the Print Head Holder moves to the ink tank replacement position, insert the ink tanks properly.
Press the PUSH mark on the ink tank until it clicks into place.
Make sure the Ink lamp lights red.
*If you don't hear a click sound when the ink tank is inserted (when the ink tank does not remain locked in place), gently pull back the latch lever as shown below and try again.
* Do not hold the Print Head Holder while it is moving. Do not touch the Print Head Holder until it stops completely.
When a specific ink tank is incorrectly inserted
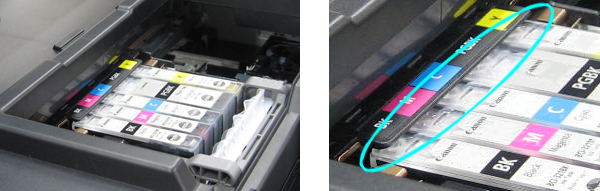
[ With incorrectly inserted ink tank ]
The top portion of an ink tank is not in place. The top portion must go beneath the ink color name sticker.

[ With properly inserted ink tank ]

1. Unplug the power cord.
2. Open the top cover and move the print head holder to the center.
*The print head holder may be at the left side of the printer (the opposite side of the one shown above).
(Lifting the print head holder before sliding it to the center may help you do the operation.)
( The printer in the illustration below shows the iP4600 model. )

3. Remove all ink tanks except the one mistakenly inserted.
(Push the latch lever (A) in the direction of the arrow and pull out a correctly inserted ink tank. Repeat above two steps until all correctly inserted ink tanks are removed.)
4. Pull the incorrectly inserted ink tank upward, then softly pull it out leftward with an angle.

5. Turn ON the printer again.
6. When the Print Head Holder moves to the ink tank replacement position, insert the ink tanks properly.
Press the PUSH mark on the ink tank until it clicks into place.
Make sure the Ink lamp lights red.
*If you don't hear a click sound when the ink tank is inserted (when the ink tank does not remain locked in place), gently pull back the latch lever as shown below and try again.
* Do not hold the Print Head Holder while it is moving. Do not touch the Print Head Holder until it stops completely.
