Scanning Fundamentals (Saving in a Computer)
note:
To scan in higher quality
The feeder may not be able to scan images clearly. It is recommended to place a document on the platen glass and scan it.
There are the following three scanning methods.
- Scanning with Keys on the Operation Panel:
Scanning is performed using keys on the operation panel. This allows you to scan easily using the existing settings.
- Scanning with the MF Toolbox:
Scanning is performed by operating the supplied software. This allows you to scan according to your purpose with the detailed settings.
- Scanning an Image from an Application:
Scanning is performed using your application. This allows you to open the scanned data as is in your application.
Please choose an option below:
System Requirements (Scan)
Hardware environment:
- IBM or IBM-compatible PC
- A computer connected to LAN or a computer which is equipped with a USB port and in which the USB class driver is installed
Supported Operating Systems:
- Windows 2000
- Windows XP
- Windows Vista
- Windows 7
To scan documents, perform the following preparations:
- Install the scanner driver.
- When the machine is connected to a network,register the scanner.
Top
You can scan a document using the keys on the operation panel.
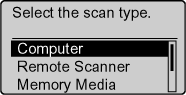
1. Place documents on the platen glass or load them in the feeder.
2. Press [  ].
].
3. Select <Computer> with [  ] or [
  ], and then press [OK].
note:
If you select <Fax (New)> in the above screen and press [OK], the fax sending screen appears. (This is the same state as where [FAX] on the operation panel is pressed.)
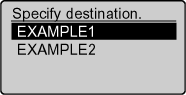
4. Specify a destination with [ ] or [ ], and then press [OK].
note:
- When multiple computers are connected, the computer connected by a USB cable is listed on the top.
- When a computer is connected by a USB cable, this screen is not displayed.
*You can change the names for the displayed computers.
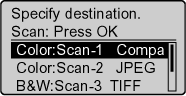
5. Specify the scanner settings (any one of <Scan-1> to <Scan-4>) with [ ] or [ ], and then press [OK].
The scanner settings are specified by default as follows.
| Scan Mode | Resolution | File Type | PDF Settings |
| Scan-1 | Color | 300 dpi | PDF | Searchable/High |
| Scan-2 | Color | 300 dpi | JPEG | - |
| Scan-3 | Black and White | 300 dpi | TIFF | - |
| Scan-4 | Color | 300 dpi | TIFF | Searchable/Standard |
Scanning operation starts, and then the scan mode screen reappears after saving the data.
note:
When the setting screen of the MF Toolbox is displayed, you cannot scan.
In this case, click [  ] to close the setting screen before scanning.

The location to save the scanned images:
The folder where the images are saved opens automatically after scanning.
By default, the folder of the date when you scanned the data is created in the [My Pictures] folder in [My Documents]. (For Windows Vista/7, the folder is created in the [Pictures] folder.)
To change the scanner settings:
You can change the settings for the location to save, the file format, or the resolution from a computer. For details on the setting procedure, see "Scanning with the MF Toolbox" in this content.
Top
1. Place documents on the platen glass or load them in the feeder.
2. Press [ ].
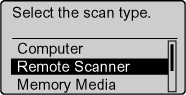
3. Select <Remote Scanner> with [ ] or [ ], and then press [OK].
The machine is now waiting for scanning.


note:
If you select <Fax (New)> in the above screen and press [OK], the fax sending screen appears. (This is the same state as where [FAX] on the operation panel is pressed.)
4. Double-click the [Canon MF Toolbox 4.9] icon on the desktop.
The MF Toolbox starts.
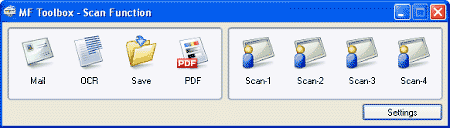
5. Click one of the MF Toolbox buttons according to your purpose.
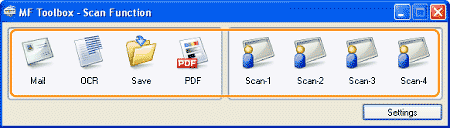
| [Mail] | The document will be scanned and attached to an e-mail message in your e-mail application. |
| [OCR] | The document will be scanned and read by the OCR software. |
| [Save] | The document will be scanned and saved. |
| PDF] | The document will be scanned and saved as a PDF file. |
[Scan-1]
[Scan-2]
[Scan-3]
[Scan-4] | The document will be scanned and displayed in the registered application.
You can change the button name by directly entering a new name.
Up to 8 characters can be entered. A dialog box appears for each of the buttons. |
note:
Applications that can be registered in the MF Toolbox buttons:
The following applications can be registered in the MF Toolbox buttons at the time of installation.
- [OCR]: Presto! PageManager
- [PDF]: Presto! PageManager
* The above applications do not support Windows XP (64-bit version).
6. Specify the scanner settings as needed.
Clicking [Apply] saves the settings.

7. Click [Start].
Scanning starts.
If you selected the [Display the Scanner Driver] check box in Step 6
The [ScanGear MF] dialog box will appear.

(1) Specify the settings as needed.
(2) Click [Scan].
Scanning starts.
Top
You can scan an image from a TWAIN- or WIA- (Windows XP/Vista/7 only) compliant application and use the image in that application. The procedure varies depending on the application. This section shows an example.
1. Place documents on the platen glass or load them in the feeder.
Important:
When scanning from the feeder using "Paint":
If you are using Windows XP, Windows Vista, or Windows 7, place only one document in the feeder.
If multiple documents are placed, the following problems occur.
- The second and subsequent sheets of document are not scanned.
- After all the documents are scanned, <Canceled.> appears in the display.
- The next scanning cannot be performed.
2. Press [ ].
3. Select <Remote Scanner> with [ ] or [ ], and then press [OK].
The machine is now waiting for scanning.

note:
If you select <Fax (New)> in the above screen and press [OK], the fax sending screen appears. (This is the same state as where [FAX] on the operation panel is pressed.)
4. Start the application to be used.
5. Select a scanning command.
6. Select a scanner driver.
The ScanGear MF or WIA driver can be used on Windows XP/Vista/7.
7. Specify the scanner settings as needed -> click [Scan].
Scanning starts.
Top
