Attach scanned documents to e-mails and send them to a specified destination.
This section describes the basic procedure.
1. Place documents.
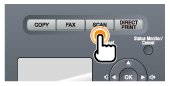
2. Press [ ].
].
3. Select <E-Mail> using [ ] or [
 ] and press [OK].

4. Specify the destination.
Specify destinations in the following ways.
- input directly
- by selecting a one-touch key
- by selecting a coded dial code
- from the Address book
- under sequential broadcasting
5. Specify the scan settings based on your purpose of the scan.
The following settings can be changed.
- Scan size
- Color Mode
- File Format
- Density
- Original Orientation
- Original Type
- 2-Sided Original
- Sharpness
- Data Size
The settings specified here are effective only for the current task.
6. Specify the e-mail settings as needed.
The following settings can be changed.
- Sunject/Body
- Reply-to
- Priority
The settings specified here are effective only for the current task.
7. Press [ ] (Start).
Scanning starts.
8. To continuously scan the document, press[ ] (Start).
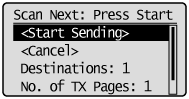
To Cancel the scan
- Select <Cancel> with [
 ] or [
 ] , and then press [OK].
- Select <Yes> with [
 ] or [
 ], and then press [OK].
To confirm the destination
- Select <Destinations> with [
 ] or [
 ], and the press [OK].
To confirm the number of transferred pages
- Select <No. of TX Pages> with [
 ] or [
 ], and then press [OK].
9. Select <Start Sending> with [ ] or [
 ], and then press [OK].

The E-mail is sent.
