Read Me First - Before performing the wireless setup Wireless Setup Using WPS (Wi-Fi Protected Setup) IMPORTANT - Quit all applications before installation.
- Internet connection may be required during the installation. Connection fees apply.
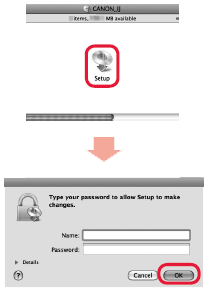
Screens are based on Mac OS X v.10.7. Actual screens may differ depending on the OS version. 1. Insert the CD-ROM into the computer. IMPORTANT If the USB cable is already connected, unplug it. If a message appears on the computer, click Cancel.
2. Double-click the Setup icon of the CD-ROM folder to proceed to the following screen. Enter your administrator name and password, then click OK. If the CD-ROM folder does not open automatically, double-click the CD-ROM icon on the desktop. If you do not know your administrator name or password, click the help button, then follow the on-screen instructions. REFERENCE If the CD-ROM does not autorun: Double-click the CD-ROM icon on the desktop.
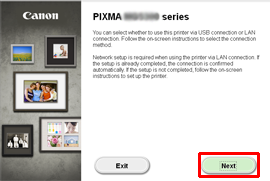
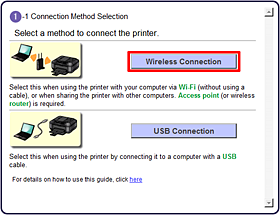
3. Click Next. 4. Click Wireless Connection. Follow the instruction and go to step 5. REFERENCE If an error message is displayed, see "Troubleshooting" at the right.
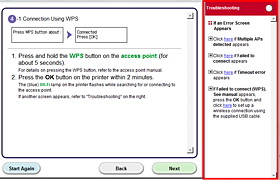
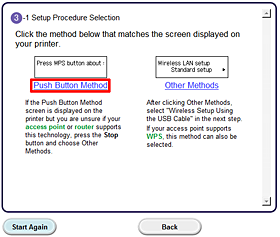
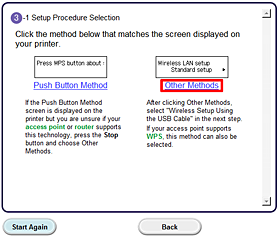
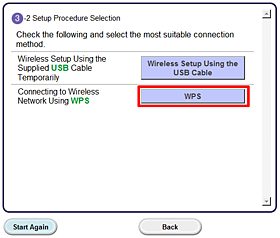
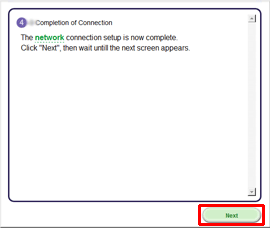
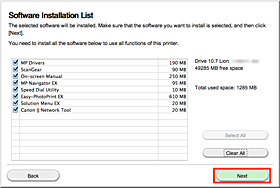
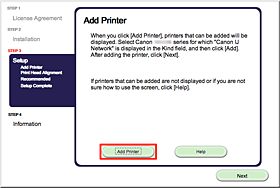
5. When the screen left above is displayed, go to the step 6. When the screen right above is displayed, go to the step 7. 6. Click Push Button Method. -> Go to 9. 7. Click Other Methods. 8. Click WPS. 9. Follow the instruction until the screen below is displayed. Network connection setting is complete. Click Next. Install the Software (Information) Let's perform the software installation. 1. Click Next. Follow any on-screen instructions to proceed with the software installation. 2. Click Add Printer. REFERENCE - The alphanumeric characters after Canon xxx series is the machine's Bonjour service name or MAC address.
- If the machine is not detected, make sure of the following.
- The machine is turned on. - The firewall function of any security software is turned off. - The computer is connected to the access point.
REFERENCE XXX: xxx refers to the model name you are using.
3. Select Canon xxx series Canon IJ Network and click Add. CAUTION If you will be installing the Canon printer driver on Mac OS X and using the printer through a network connection, you can select [Bonjour] or [Canon IJ Network] in the [Add Printer] dialog. If [Bonjour] is selected, remaining ink level messages may differ from those indicated by [Canon IJ Network]. Canon recommends you to use [Canon IJ Network] for printing.
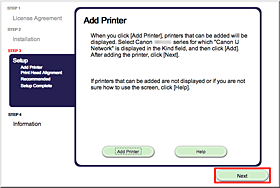
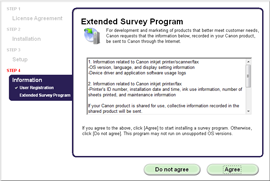
4. Click Next. 5. Click Next. - Important Information for the Installation - If the Extended Survey Program screen appears
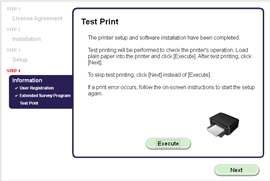
If you can agree to Extended Survey Program, click Agree. If you click Do not agree, the Extended Survey Program will not be installed. (This has no effect on the machine's functionality.) - When the [Test Print] window is displayed
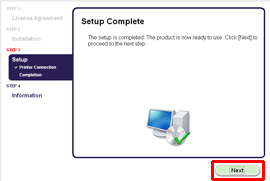
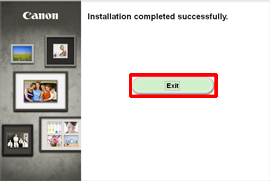
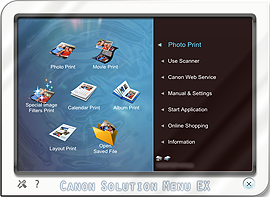
Test printing will be performed to check the printer's operation. Load plain paper into the printer and click [Execute]. After test printin, click [Next]. To skip test printing, click [Next] instead of [Execute]. 6. Click Exit to complete the installation. Remove the Setup CD-ROM and keep it in a safe place. 7. Solution Menu EX starts. The end of the procedure of the wireless LAN setup.
|