This page describes how to shoot movies with autoexposure in default settings. For details on changing settings, please see the Related Information section. For details on shooting movies by manual exposure, please refer to the instruction manuals that came with your camera. IMPORTANT - When shooting movies, use a large-capacity card with a fast writing/reading speed as shown below.
- [Compression method: IPB] CF Cards: 10 MB/sec. or faster; SD Cards: 6 MB/sec. or faster - [Compression method: ALL-I (I-only)] CF Cards: 30 MB/sec. or faster; SD Cards: 20 MB/sec. or faster - If you use a slow-writing card when shooting movies, the movie may not be recorded properly. Also, if you play back a movie on a card with a slow reading speed, the movie may not play back properly.
NOTE The camera cannot autofocus continuously like a camcorder.
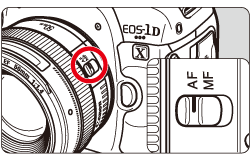
1. Set the power switch to ON. 2. Set the lens focus mode switch to AF.
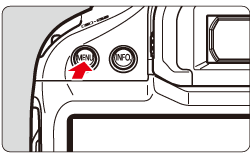
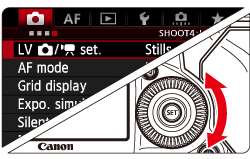
 3. Press the MENU button to display the menu screen.
 4. Press the  button to select [  ] tab.
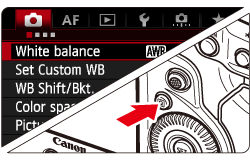 5. Turn the Main Dial to select [  ] tab. You can also use  (Multi-controller).
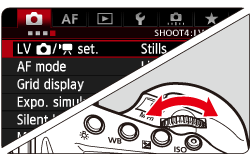 6. Turn the Quick Control Dial to select [LV  set.], then press the SET button.
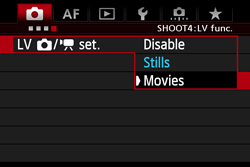
 7. Turn the Quick Control Dial to select [Movies], then press the SET button.
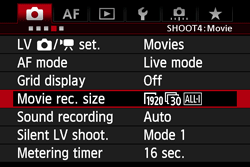
 8. Turn the Quick Control Dial to select [Movie rec. sixe], then press the SET button.
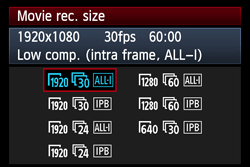
 9. Turn the Quick Control Dial to select select the recording size, then press the SET button. For more information about the recording size of movies, please refer to the instruction manuals that came with your camera.
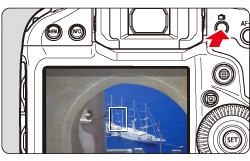
 10. Press the MENU button or press the shutter button halfway to turn off the menu screen. 11. When you press the  (Live View shooting) button, the Live View image will appear on the LCD monitor.
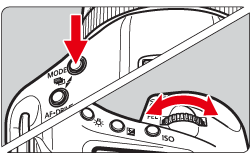
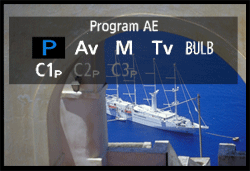
 12. Press the MODE button, then turn the Main Dial or Quick Control Dial to select P or BULB.
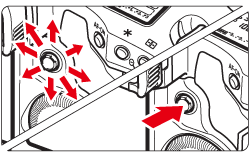
 13. The AF point will appear. You can use (Multi-controller) to move the AF point to where you want to focus. - It cannot go to the edges of the picture.
- Pressing straight down will return the AF point to the image center.
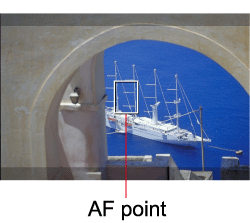 14. Aim the AF point over the subject and press the shutter button halfway. - When focus is achieved, the AF point will turn green and the beeper will sound.
- If focus is not achieved, the AF point will turn orange.
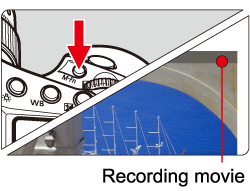
7. Press the M-fn button to start shooting a movie. To stop shooting the movie, press the M-fn button again. - While the movie is being shot, the "
 " mark will be displayed on the upper right of the screen. " mark will be displayed on the upper right of the screen.
 CAUTION During movie shooting, do not point the lens toward the sun. The sun's heat can damage the camera's components.
NOTE Recording and Image Quality - The movie file format will be MOV.
- Pressing the shutter button halfway displays the ISO speed and shutter speed at the screen bottom. This is the exposure setting for taking a still photo. The exposure setting for movie shooting is not displayed. Note that the exposure setting for movie shooting may differ from that for still photo shooting.
- A movie file is recorded each time you shoot a movie. If the file size exceeds 4 GB, a new file will be created.
- Monaural sound is recorded by the camera's built-in microphone.
- By connecting a stereo microphone (commercially available) equipped with a 3.5 mm mini plug to the cameras external microphone IN terminal, stereo sound recording is possible.
Playback and TV connection - If you connect the camera to a TV set and shoot a movie, the TV will not output any sound during the shooting. However, the sound will be properly recorded.
IMPORTANT
| 

 ] and Red [
  ] Temperature Warning Icons