
Making Copies MX432
| Article ID: ART135652 | | | Date published: 05/13/2015 | | | Date last updated: 05/16/2018 |
Description
Making Copies
Solution
This article also applies to the PIXMA MX439.
| Making Copies
ID : 8201355400 _ EN _ 1
|
|
| Solution |
Making Copies Load the original to copy.
This section describes the basic procedure to perform standard copying.
1. Make sure that the machine is turned on.
2. Load paper.
-> [ Loading Paper ]
3. Press the COPY button.
The Copy standby screen is displayed.
4. Load the original document on the platen glass or in the ADF.
5. Confirm the page size and magnification.
 (1) Magnification (2) Page size
6. Use the
 (-) (-)  (+) button or the Numeric buttons to specify the ->. (+) button or the Numeric buttons to specify the ->.
7. Press the Color button for color copying, or the Black button for black & white copying.
The machine starts copying.
Remove the original on the platen glass or from the document output slot after copying is complete.
Adding the Copying Job (Reserve copy)
If you load the original on the platen glass, you can add the copying job while printing (Reserve copy).
The screen below is displayed when you can reserve copy.
 Load the original on the platen glass and press the same button (the Color button or the Black button) as the one which you previously pushed.
Setting Items You can change the copy settings such as the page size, media type, and intensity.
Press the Menu button, use the
button to select a setting item, then press the OK button.Use the
button to adjust each setting item, then press the OK button. The next setting item is displayed.The LCD returns to the Copy standby screen when all the settings are complete.
Select the reduction/enlargement method.
Refer to [ Reducing or Enlarging a Copy ] within this webpage.
Ex:

Change the intensity.
Ex:

Select the page size of the loaded paper.
Ex:

Select the media type of the loaded paper.
Ex:

Select the image quality according to the original.
Ex:

You can specify the magnification optionally or select the preset-ratio copying or fit-to-page copying.
In the copy mode, press the Menu button, use the
button to select Enlarge/Reduce, then press the OK button.Use the
button to select the reduction/enlargement method, then press the OK button.Ex: 
You can select one of the preset ratios to reduce or enlarge copies.
 Use the
button to select a preset ratio to match the size of your original document and printing paper, then press the OK button.
You can specify the copy ratio as a percentage to reduce or enlarge copies.
 Use the
(-) (+) button or the Numeric buttons to specify the reduction or enlargement ratio (25 - 400%), then press the OK button.
The machine automatically reduces or enlarges the image to fit the page size.

About Special copy Menu The following menus are selectable in the Special copy menu.
When copying thick originals such as books, you can make a copy without black margins around the image and gutter shadows.
Refer to [ Copying Thick Originals Such as Books ] within this webpage.
You can copy images so that they fill the entire page without borders.
Refer to [ Copying without Borders ] within this webpage.
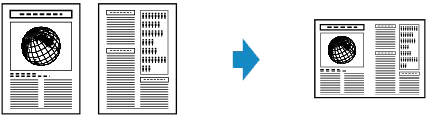
You can copy two original pages onto a single sheet of paper by reducing each image.
Refer to [ Copying Two Pages to Fit onto a Single Page ] within this webpage.
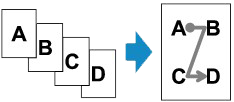
You can copy four original pages onto a single sheet of paper by reducing each image.
Refer to [ Copying Four Pages to Fit onto a Single Page ] within this webpage.
You can obtain sorted printouts when making multiple copies of a multi-paged original.
Refer to [ Making Multiple Copies of an Entire Document ] within this webpage.
Copying Two Pages to Fit onto a Single Page You can copy two original pages onto a single sheet of paper by reducing each image.
1. Make sure that the machine is turned on.
2. Load paper.
-> [ Loading Paper ]
3. Press the COPY button.
The Copy standby screen is displayed.
4. Press the Menu button.
The Copy menu screen is displayed.
5. Use the
button to select Special copy, then press the OK button.
6. Use the
button to select 2-on-1 copy, then press the OK button.If a page size setting or a media type setting that cannot be used in 2-on-1 copying is selected, the LCD displays the following message.
 (1) Use the
button to select the page size, then press the OK button.(2) Use the
button to select the media type, then press the OK button.
7. Load the original document on the platen glass or in the ADF.
8. Use the
(-) (+) button or the Numeric buttons to specify the ->.Change the print settings as necessary.
Refer to [ Setting Items ] within this webpage.
9. Press the Color button for color copying, or the Black button for black & white copying.
When the machine finishes scanning the first document, the message below is displayed.
 If you have the next sheet of document to scan, load it on the platen glass and press the OK button. The machine starts copying.
If you do not need more scanning, press the tone button to start copying. The machine starts copying.
The machine starts scanning the next sheet of document automatically after one sheet of document finishes being scanned.
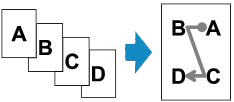
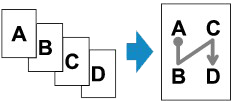
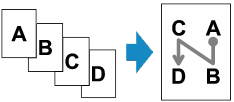
Copying Four Pages to Fit onto a Single Page You can copy four original pages onto a single sheet of paper by reducing each image. Four different layouts are available.
1. Make sure that the machine is turned on.
2. Load paper.
-> [ Loading Paper ]
3. Press the COPY button.
The Copy standby screen is displayed.
4. Press the Menu button.
The Copy menu screen is displayed.
5. Use the
button to select Special copy, then press the OK button.
6. Use the
button to select 4-on-1 copy, then press the OK button.If a page size setting or a media type setting that cannot be used in 4-on-1 copying is selected, the LCD displays the following message.
 (1) Use the
button to select the page size, then press the OK button.(2) Use the
button to select the media type, then press the OK button.
7. Specify the layout.
Follow the procedure below to select the layout.
(1) Press the Menu button.
The Copy menu screen is displayed.
(2) Use the
button to select 4-on-1 layout, then press the OK button.(3) Select the layout, then press the OK button.
Select the layout from Layout 1, Layout 2, Layout 3, or Layout 4.
8. Load the original document on the platen glass or in the ADF.
9. Use the
(-) (+) button or the Numeric buttons to specify the ->.Change the print settings as necessary.
Refer to [ Setting Items ] within this webpage.
10. Press the Color button for color copying, or the Black button for black & white copying.
When the machine finishes scanning each sheet from the first to the third document, the message below is displayed.
 If you have the next sheet of document to scan, load it on the platen glass and press the OK button. The machine starts copying.
If you do not need more scanning, press the tone button to start copying. The machine starts copying.
The machine starts scanning the next sheet of document automatically after one sheet of document finishes being scanned.
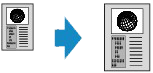
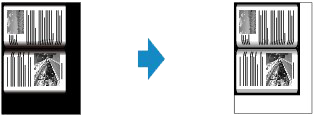
Copying Thick Originals Such as Books When copying thick originals such as books, you can make a copy without black margins around the image and gutter shadows. Using this function, you can reduce unnecessary ink consumption.
1. Make sure that the machine is turned on.
2. Load paper.
-> [ Loading Paper ]
3. Press the COPY button.
The Copy standby screen is displayed.
4. Press the Menu button.
The Copy menu screen is displayed.
5. Use the
button to select Special copy, then press the OK button.
6. Use the
button to select Frame erase copy, then press the OK button.
7. Load the original on the platen glass.
8. Use the
(-) (+) button or the Numeric buttons to specify the ->.Change the print settings as necessary.
Refer to [ Setting Items ] within this webpage.
9. Press the Color button for color copying, or the Black button for black & white copying.
The machine starts copying.
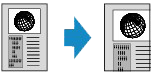
Copying without Borders You can copy images so that they fill the entire page without borders.

1. Make sure that the machine is turned on.
2. Load the photo paper.
-> [ Loading Paper ]
3. Press the COPY button.
The Copy standby screen is displayed.
4. Press the Menu button.
The Copy menu screen is displayed.
5. Use the
button to select Special copy, then press the OK button.
6. Use the
button to select Borderless copy, then press the OK button.If a page size setting or a media type setting that cannot be used in borderless copying is selected, the LCD displays the following message.
 (1) Use the
button to select the page size, then press the OK button.(2) Use the
button to select the media type, then press the OK button.
7. Load the original document on the platen glass.
8. Use the
(-) (+) button or the Numeric buttons to specify the ->.Change the print settings as necessary.
Refer to [ Setting Items ] within this webpage.
9. Press the Color button for color copying, or the Black button for black & white copying.
The machine starts borderless copying.
Making Multiple Copies of an Entire Document You can obtain sorted printouts when making multiple copies of a multi-paged original.
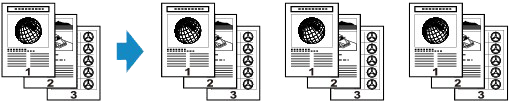

1. Make sure that the machine is turned on.
2. Load the paper.
-> [ Loading Paper ]
3. Press the COPY button.
The Copy standby screen is displayed.
4. Press the Menu button.
The Copy menu screen is displayed.
5. Use the
button to select Special copy, then press the OK button.
6. Use the
button to select Collated copy, then press the OK button.
7. Load the original in the ADF.
8. Use the
(-) (+) button or the Numeric buttons to specify the ->.Change the print settings as necessary.
Refer to [ Setting Items ] within this webpage.
9. Press the Color button for color copying, or the Black button for black & white copying.
The machine starts copying.
|
SIMS Doc Id
8201355400