| Solution |
You can shoot images preserving a wide tonal range where the highlight and shadow detail would otherwise be lost. HDR shooting is effective for landscape and still-life shots.
With HDR shooting, three images of different exposures (standard exposure, underexposure, and overexposure) are captured for each shot and then merged together automatically. The HDR image is recorded as a JPEG image.
IMPORTANT
- If you shoot a moving subject, the subjects movement will leave afterimages.
- The color gradation of the sky or white walls may not be reproduced correctly. Irregular colors or noise may appear.
- HDR shooting under fluorescent or LED lighting may result in unnatural color reproduction of the illuminated areas.
REFERENCE
- Only the merged HDR image will be saved. The three images used to produce the merged HDR image will not be saved.
- You cannot select RAW and RAW+JPEG. The HDR mode cannot be set if RAW or RAW+JPEG is set.
- If you set AEB, white balance bracketing, Multi Shot Noise Reduction, multiple shot exposures or if you shoot bulb exposures or a movie, HDR mode cannot be set.
- Flash will not fire during HDR shooting.
- HDR shooting is not possible with ISO expansion. (HDR shooting is possible within the range of ISO 100 - 25600.)
- Since HDR shooting merges the images, it will take a longer time to record the HDR image to the card than with normal shooting. During the processing of the images, "buSY" will be displayed in the viewfinder and on the LCD panel and you cannot take another picture until the processing is completed.
- In HDR mode, the options grayed out in the camera menu cannot be set. Note that when you set HDR mode, the Auto Lighting Optimizer, highlight tone priority, and exposure simulation will be set to [Disable] before shooting.
HDR shooting 1. Set the power switch to <ON>.
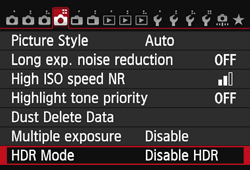
2. Press the <MENU> button.
3. Under the [
 ] tab, select [HDR Mode], then press <SET>.
4. The HDR mode screen will appear.
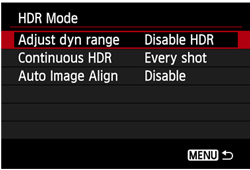
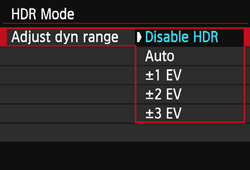
5. Set [Adjust dyn range].
Select the desired dynamic range setting, then press <SET>.
- Selecting [Auto] will have the dynamic range set automatically depending on the images overall tonal range.
- The higher the number, the wider the dynamic range will be.
- To exit HDR shooting, select [Disable HDR].
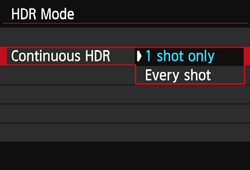
6. Set [Continuous HDR].
Select either [1 shot only] or [Every shot], then press <SET>.
- With [1 shot only], HDR shooting will be canceled automatically after the shooting ends.
- With [Every shot], HDR shooting continues until the setting in step 5 is set to [Disable HDR].
7. Set [Auto Image Align].
- For handheld shooting, select [Enable]. When using a tripod, select [Disable]. Then, press <SET>.

IMPORTANT
- When shooting HDR images with [Auto Image Align] set to [Enable], AF point display information and Dust Delete data will not be appended to the image.
- If [Auto Image Align] is set to [Enable] and the HDR picture is shot handheld, the edges of the photos will be cropped, lowering the resolution slightly. Also, if the images cannot be aligned properly due to camera shake, etc., auto image alignment may not take effect. Note that when shooting with excessively bright or dark exposure settings, auto image alignment may not work properly.
- If you perform handheld HDR shooting while [Auto Image Align] is set to [Disable], the 3 images may not be properly aligned and the HDR effect may be minimal. In such a case, using a tripod is recommended.
- Auto image alignment may not work properly with repetitive patterns (lattice, stripes, etc.) or flat, single-tone images.
8. Take the picture.
- HDR shooting is possible with viewfinder shooting and Live View shooting.
<HDR> will be displayed on the LCD panel.
- When you press the shutter button completely, three consecutive images will be captured, and the HDR image will be recorded to the card.
NOTE
- To prevent camera shake, the ISO speed may be set higher than usual.
|
