Click Auto Scan on the  (Scanning from a Computer) tab to display the Settings (Auto Scan) dialog box.
In the Settings (Auto Scan) dialog box, you can make advanced scan settings to scan by automatically detecting the item type.
 Note: Not all models will have the
  (scanning from the operation panel) tab.
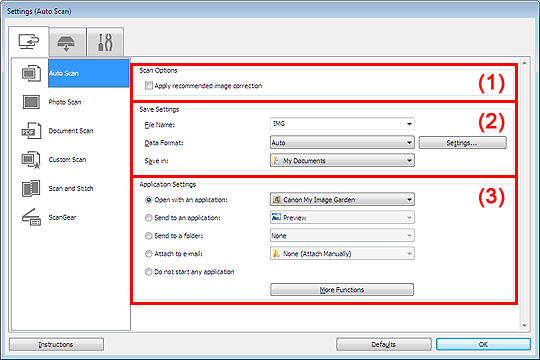
(1) Scan Options Area
(2) Save Settings Area
(3) Application Settings Area
 Important
Supported Items
Photos, postcards, business cards, magazines, newspapers, documents, and BD/DVD/CD.
Important To scan the following types of items, specify the item type and size in the Settings (Photo Scan) dialog box or Settings (Document Scan) dialog box, then click Photo or Document in the IJ Scan Utility main screen. You cannot scan correctly with Auto.
- A4 size photos
- Text documents smaller than 2L (5 inches x 7 inches) (127 mm x 178 mm), such as paperback pages with the spine cut off
- Items printed on thin white paper
- Long narrow items such as panoramic photos
Reflective disc labels may not be scanned as expected.
Place items to be scanned on the platen correctly. Otherwise, items may not be scanned as expected depending on the item type.
See "Placing Items (When Scanning from a Computer)" for details on how to place items.
Note
(1) Scan Options Area
(2) Save Settings Area
File Name
Enter the file name of the image to be saved. The date and 4 digits are appended to the set file name in the "_20XX0101_0001" format.
Data Format
Auto is selected. The following data formats are automatically applied according to the item type when saving.
- Photos, postcards, BD/DVD/CD, and business cards: JPEG
- Magazines, newspapers, and documents: PDF
Important Note Settings...
Click to display the Data Format Settings dialog box in which you can set the quality of the images to be saved, keyword search of PDF files and their compression type, and the data format in which to save images scanned with Auto Scan.
 Data Format Settings Dialog Box
Save in
Displays the folder in which to save the scanned images. To change the folder, specify the destination folder in the Select Destination Folder dialog box displayed by selecting Add... from the pull-down menu.
The default save folders are as follows.
Windows 7: My Documents folder
Windows Vista: Documents folder
Windows XP: My Documents folder
Important
(3) Application Settings Area
Open with an application
Select this when you want to enhance or correct the scanned images.
You can specify the application from the pull-down menu.
Send to an application
Select this when you want to use the scanned images as they are in an application that allows you to browse or organize images.
You can specify the application from the pull-down menu.
Send to a folder
Select this when you also want to save the scanned images to a folder other than the one specified in Save in.
You can specify the folder from the pull-down menu.
Attach to e-mail
Select this when you want to send e-mails with the scanned images attached.
You can specify the e-mail client you want to start from the pull-down menu.
Do not start any application
Saves to the folder specified in Save in.
Note
Instructions
Opens this guide.
