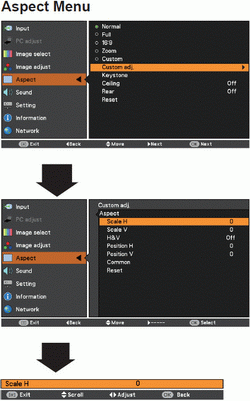
Press the MENU button to display the On-Screen Menu. Use the Point  buttons to select Aspect and then press the Point buttons to select Aspect and then press the Point  or the OK button. or the OK button.
Use the Point buttons select the desired item and then press the OK button.
Normal
Provide the image to fit the screen size while maintaining the aspect ratio of the input signal.
Full
Provide the full screen image.
16:9
Provide the image at the 16:9 wide screen ratio.
Zoom
Pan the horizontal direction of the image and cut the vertical direction of the image to fit the screen size (16:9). Only for 4:3 video aspect ratio signals.
Custom
Provide the last stored aspect screen image.
Custom adj.
Adjust the screen scale and position manually with this function.
Press the Point button at Custom adj. and the Custom adjustment menu is displayed on the screen, you can use the Point buttons to choose the item you want to adjust.
Scale H/V ....... Adjust the Horizontal/Vertical screen scale.
H&V ................ When set to On, the aspect ratio is fixed. The Scale V appears dimmed and becomes unavailable. Adjust Scale H, then the screen scale is automatically modified based on the aspect ratio.
Position H/V ... Adjust the Horizontal/Vertical screen position.
Common ........ Save the adjusted scale or position to all the inputs. Press the OK button at Common to display a confirmation box. To save the scale or position, press the OK button at Yes. When Custom is selected, the saved scale or position is used.
Reset .............. Reset the all adjusted values. Press the OK button at Reset to display a confirmation box. To reset, press the OK button at Yes.
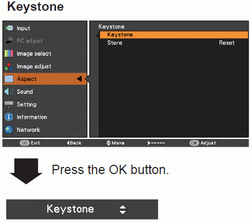
Keystone
This function is used to adjust keystone distortion of the projected image. Use the Point buttons to choose the item you want to adjust.
Keystone
To correct keystone distortion, press the OK button. Keystone appears on the screen. Use the Point buttons to correct keystone distortion
Store
To store or reset the keystone correction, press the Point button.
Keep the keystone correction even when the AC power cord is plugged out or turned off the projector.
Reset ........... Release the keystone correction when the AC power cord is plugged out.
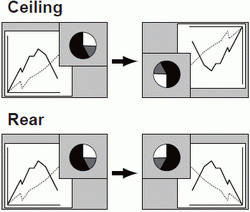
Ceiling
When this function is set to On, the picture will be top/bottom and left/right reversed. This function is used to project the image from a ceiling-mounted projector.
Rear
When this function is set to On, the picture will be left/right reversed. This function is used to project the image from rear of the screen.
Reset
To reset the adjusted data, select Reset and press the
OK button. A confirmation box appears and then select Yes. All adjustments will return to their previous figures.
|