|
The color matching These instructions explain how to adjust monitors and printers that are suitable for color matching and also explain the Digital Photo Professional settings to use to take advantage of the color matching setting.
The Color Matching Process
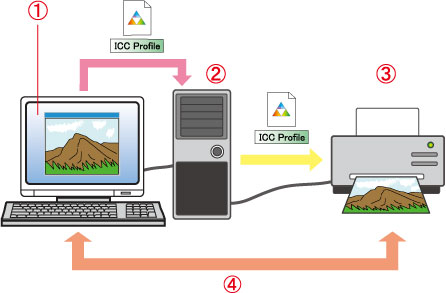
 Set the color display of the monitor. (STEP I)
 Set the application to reflect the monitor and printer settings. (STEP II)
 Start printing. (STEP III)
 As a result, you can adjust the colors of monitor display and printing results to get them closer together.
STEP I. Setting the monitor color White parts in images may appear reddish or bluish, depending on the monitor. This is because the setting value of monitor is not appropriate to display the colors of images. When performing color matching, the value must be adjusted to reproduce the colors of images accurately.
This value is called color temperature and it indicates light colors in units of temperature called Kelvin (K). The default color temperature setting for most monitors is often set at about 9300K; if the value is not changed, it displays overall blue-tinged images. To reproduce white colors accurately, set the color temperature value to "6500K" (if "6500K" cannot be set, select "sRGB").
For information on how to set the color temperature of the monitor, please refer to the instruction manuals for the monitor.
To adjust the colors of monitor more accurately, using a commercially available color-tuning tool for monitors called a "calibrator" is one way. If you use a calibrator, the colors displayed on the monitor are directly measured and you can create a monitor profile (an ICC profile for the monitor). The monitor profile stores the optimum settings for the monitor and automatically applies the to the monitor, which allows you to reproduce the colors in image data accurately.
Measuring monitor colors with a calibrator
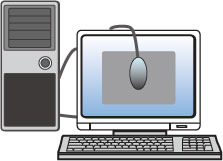
When using a calibrator, please note that the color temperature on the monitor must be set to 6500K (or sRGB) in advance. If you set it to another value, such as 9300K, it will not measure correctly.
STEP II. Setting the Software The following instructions explain the settings for the software that will handle the images.
1. Start Digital Photo Professional, select [Preferences] in the [Tool] menu.
The [Preferences] dialog box will appear. Select the [Color Management] tab.
2. Select the color space in the [Default settings of Work color space].
The color space is the color range (color gamut characteristics) that can be reproduced by the data. For Digital Single-Lens Reflex Cameras and Interchangeable-Lens Compact System Cameras, either sRGB or Adobe RGB can be selected as the color space for images being taken. In this section, select the same color space setting as your EOS DIGITAL camera. For information on how to set the color space on your EOS DIGITAL camera, please refer to the instruction manuals for your camera.
3. Next, select [Monitor profile] for [For display] in [Color matching setting].
4. Select the profile for the monitor you use, and then click [Open] on the dialog box that appears. The monitor profile differs depending on the monitor. For details, please see the instruction manual for your monitor. If you used a calibrator, select the profile you created.
5. Select the profile for the printer (ICC profile for the printer) to be used under [Printing profile] in [Color matching setting].
The printer profile is a file that stores the settings related to the printer model or printing and the characteristics of paper to be used; and it is typically installed along with the printer driver. If the printer profile is set, the printer performs printing at the optimum settings and provides printing results that reproduce colors of images accurately.
It may be necessary to manually install the printer profile, depending on the printer model or the paper. For details, please see the Web site of the printer and paper's manufacturer.
6. Select one of the color conversion methods from [Rendering intents], which is indicated on the right-hand side of the [Printing profile].
Here, to recreate image colors faithfully, select [Relative Colorimetric].
NOTE
The differences between [Perceptual] and [Relative Colorimetric]
- In the [Perceptual] setting, color balance is emphasized. Using this setting, you can include out-of-range colors that cannot be printed in the original data, and the in-range colors will also be adjusted along with them. The total color balance will be maintained, which results in a natural-looking image.
- In the [Relative Colorimetric] setting, color gradation is emphasized. The white color within the printable range in the original data is used for comparison, and out-of-range colors are adjusted to approximate colors that can be reproduced based on the value for white. Because the color gradation of the original data is reproduced to the extent possible, the colors come out similar to the original colors.
7. If you use Easy-PhotoPrint on a Canon printer, select [Relative Colorimetric] in [Rendering intents when using Easy-PhotoPrint].
8. Click [OK] to close the dialog box.
NOTE
If you use the Canon inkjet printers, it is not necessary to set [Printing profile]in Easy-Photo Print and Easy-Photo Print EX.
REFERENCE
Setting of CMYK simulation profile
- You can select the color when printing in the CMYK environment of a printing machine, etc. from four types of profiles and perform simulation on screen. For more information for profile, refer to the instruction manuals that came with your camera.
- When CMYK simulation has been set, [CMYK] appears in the bottom of the main window, edit window and edit image window, and colors can be checked.
- To temporarily cancel CMYK simulation, press the <Ctrl> + <Y> keys.
STEP III. Printing Start printing after the settings are complete in Digital Photo Professional.
If you have set it to adjust the colors of images by using the printer driver functions, disable that setting. The printer profile settings set in STEP II. will not be reflected in the printing results if that setting is enabled.
The color matching steps are complete at this point.
|
