Scanning Film in Advanced Mode
| Article ID: ART136443 |
| |
Date published: 05/13/2015 |
| |
Date last updated: 10/16/2017 |
Description
Scanning Film in Advanced Mode
Solution
| Scanning Film in Advanced Mode
ID : 8201717400 _ EN _ 1
|
| Solution |
Use the Advanced Mode tab to specify the color mode, output resolution, image brightness, color tone, etc. when scanning.
1. Place the film on the Platen, then start ScanGear (scanner driver).
IMPORTANT
- Some applications cannot receive images scanned in Color(48bit) or Grayscale(16bit), or may close when such images are received.
2. Click the Advanced Mode tab and select film for Select Source.

REFERENCE
Settings are not retained when you switch modes.
3. Set Input Settings according to the film or purpose.
4. Click Preview.
Preview images appear in the Preview area. Cropping frames (scan area) are specified automatically according to the film size.
Select the frames to scan.
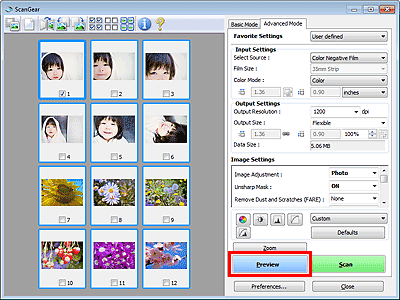
5. Set Output Settings.
REFERENCE
When the data size exceeds 1.8 GB, select the Enable large image scans checkbox in the Settings (ScanGear) dialog box of IJ Scan Utility. This will enable you to scan images up to 4.0 GB.
6. Adjust the cropping frame, correct image and adjust colors as required.
REFERENCE
You can correct each image separately. Select the frame you want to correct.
Note: If the Preview images do not appear to be correct, you may need to change to Whole Film Image view and manually adjust the cropping boxes. For more information, please click here.
7. Click Scan.
Scanning starts.
REFERENCE
- Click
 (Information) to open a dialog box in which you can check the current scan settings (document type, etc.). (Information) to open a dialog box in which you can check the current scan settings (document type, etc.).
- A response of ScanGear after scanning can be specified in Status of ScanGear dialog after scanning on the Scan tab of the Preferences dialog box.
|
