|
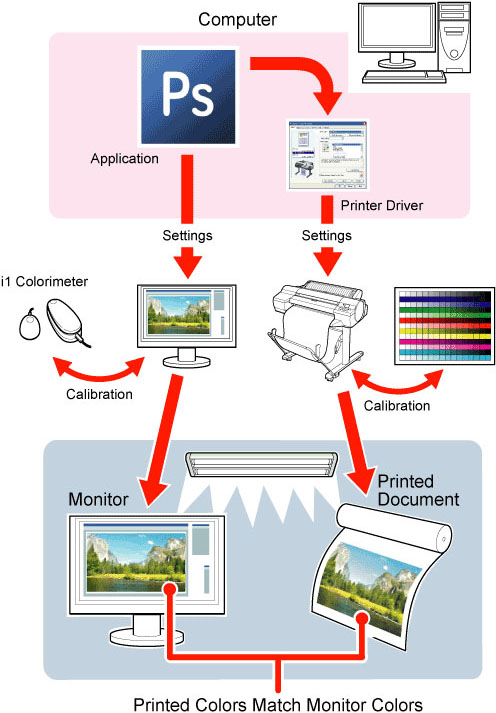
Printing Images to Match Monitor Colors
Adjusting the colors printed so that they more closely match the colors displayed on the monitor is called "monitor matching." Using this mode requires adjustment or configuration of the settings of your monitor, the source application, the file for printing, and the printer driver.
IMPORTANT
- Monitor matching may not be applied, or these settings may not be configurable or adjustable, depending on your monitor and the source application.
NOTE
- Printing in exactly the same colors as displayed on the monitor may not be possible due to differences in the monitor and printer color gamuts.
- Calibrating your monitor requires a measuring device.
- Because colors appear different under sunlight at different times of day, we recommend following this procedure in a room not exposed to sunlight.
Monitor Matching
The sequence in monitor matching is as follows.
1. Calibrate the printer.
Calibration improves color consistency by compensating for slight differences in how color appears due to individual variation among printheads or conditions in various printing environments.
2. Calibrate the monitor.
i1-Display and similar measurement devices are commonly used.
Set white point to 6500K or 5000K, Gamma to 2.2, and brightness to 120 cd.
The exact procedure varies depending on your monitor and measurement device.
3. Open the file to print and configure settings in the source application.
Display the file in the sRGB or Adobe RGB color space.
Configure settings to prevent color conversion by the application.
In Photoshop CS3, for example, select Color Management in the Print dialog box, and then select No Color Management in Color Handling.
4. Configure and adjust printer driver settings.
Select Monitor Matching using the Matching Method, and then select the Monitor White Point that you set up in monitor calibration.
In Color Space, select the color space used when displaying the file in the source application.
NOTE
- To print multiple times using the same value, we recommend opening the Printer Driver dialog box from the System menu and configuring the appropriate settings.
For instructions on configuring printer driver settings for monitor matching, refer to the following topic, as appropriate for your computer and operating system.
- Printing Images to Match Monitor Colors (Windows)
- Printing Images to Match Monitor Colors (Mac OS X)
Printing Images to Match Monitor Colors (Windows)
By calibrating your monitor and configuring settings in the source application in advance, you can complete settings to print in colors that are as close as possible to the colors displayed on the monitor.
IMPORTANT
- Before using this feature, you must calibrate the monitor and configure settings in the source application.
1. Choose Print in the application menu.
2. Select the printer in the dialog box, and then display the printer driver dialog box.
3. Make sure the Main sheet is displayed.
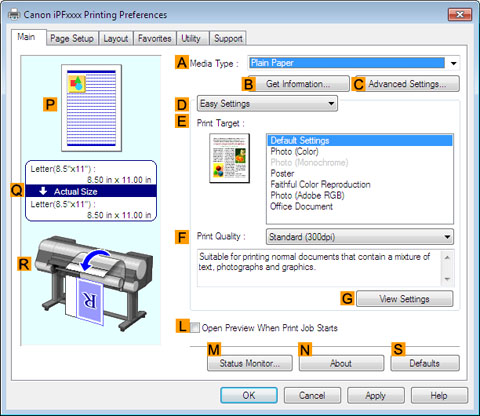
4. In the (A) Media Type list, select the type of paper that is loaded (for example, Canon Premium Glossy Paper 2 280).
5. Click (D) Advanced Settings to switch the print mode.

6. In (F) Print Quality, click High.
7. Click Color in the (G) Color Mode list.
8. Click (H) Color Settings to display the Color Settings dialog box.
9. Click the Matching tab to display the Matching sheet.

10. Make sure Driver Matching Mode is selected in (A) Matching Mode.
11. In (B) Matching Method, select Monitor Matching.
12. In (C) Color Space, select the color space used when displaying the file in the source application.
13. In (D) Monitor White Point, select the white point set on the monitor.
14. Click OK.
15. Confirm the print settings and print as desired.
Printing Images to Match Monitor Colors (Mac OS X)
By calibrating your monitor and configuring settings in the source application in advance, you can complete settings to print in colors that are as close as possible to the colors displayed on the monitor.
IMPORTANT
- Before using this feature, you must calibrate the monitor and configure settings in the source application.
1. Choose Print in the application menu.
2. Select the printer in the dialog box, and then display the printer driver dialog box.
3. Make sure the Main panel is displayed.

4. In the (A) Media Type list, select the type of paper that is loaded (for example, Canon Premium Glossy Paper 2 280).
5. Click (D) Advanced Settings to switch the print mode.

6. In (F) Print Quality, click High.
7. Click Color in the (H) Color Mode list.
8. Click (I) Set to display the Color Settings dialog box.
9. Click the Matching tab to display the Matching panel.

10. Make sure Driver Matching Mode is selected in (A) Matching Mode.
11. In (B) Matching Method, select Monitor Matching.
12. In (C) Color Space, select the color space used when displaying the file in the source application.
13. In (D) Monitor White Point, select the white point set on the monitor.
14. Click OK.
15. Confirm the print settings and print as desired.
|
