Direct Printing with DPOF

Article ID: ART136789 | Date published: 05/13/2015 | Date last updated: 10/22/2015
 

Description

Direct Printing with DPOF

Solution

Direct Printing with DPOF

With a PictBridge printer, you can easily print images with DPOF.

1 Prepare to print.

  • Follow the “Connecting the Camera to a Printer” procedure up to step 5.

2 Under the tab, select [Print order].
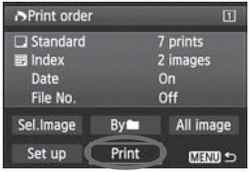
3 Select [Print].

  • [Print] will be displayed only if the camera is connected to a printer and printing is possible.

4 Set the [Paper settings]

  • Set the printing effects  if necessary.

5 Select [OK


  • Before printing, be sure to set the paper size.

  • Certain printers cannot imprint the file number.

  • If [Bordered] is set, certain printers may imprint the date on the border.

  • Depending on the printer, the date may appear faint if it is imprinted on a  bright background or on the border


  • Under [Adjust levels], [Manual] cannot be selected.

  • If you stopped the printing and want to resume printing the remaining images, select [Note that printing will not resume if you stop the printing and any of the following occurs:
    • Before resuming the printing, you changed the print order or deleted print-ordered images.

    • When you set the index, you changed the paper setting before resuming the printing.

  • When you paused the printing, the card’s remaining capacity was low.


Rate this Article
Was this article helpful?
Yes, This document is helpful
No, This document needs a clearer explanation
 
Please provide your comments