| Article ID: ART137004 |
| |
Date published: 05/13/2015 |
| |
Date last updated: 10/30/2015 |
Description
To add paper other than Canon genuine paper and feed confirmed paper to the printer control panel and printer driver, and export and import the media information file for that paper, click the Add and Edit Custom Paper button in the Media Configuration Tool main window.
Solution
To add paper other than Canon genuine paper and feed confirmed paper to the printer control panel and printer driver, and export and import the media information file for that paper, click the Add and Edit Custom Paper button in the Media Configuration Tool main window.
|
| Confirm the printer, where media type information is to be updated, to be displayed in Printer in the Select Printer dialog box, and then click the Next button.
Communication with the printer begins. The Add and Edit Custom Paper dialog box is displayed.
 | Note | • The printer cannot be changed after this.
• Custom paper is paper other than Canon genuine paper and feed confirmed paper (paper that is detailed in the Paper Reference Guide). |
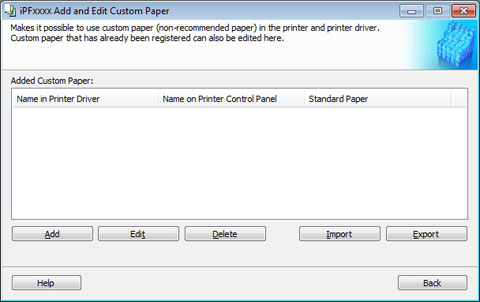
•Add Custom Paper
Added custom paper is displayed here.
• Name in Printer Driver
Added custom paper is displayed in the printer driver using this name.
• Name on Printer Control Panel
Added custom paper is displayed on the printer control panel using this name.
• Standard Paper
Displays the paper selected as the standard paper when the custom paper was added.
•Add Button
To add new custom paper to the printer control panel and printer driver, click this button.
•Edit Button
To change the settings of added custom paper, select the paper to edit and click this button.
•Delete Button
To delete added custom paper from the printer control panel and printer driver in your computer, select the paper to delete and click this button.
•Import Button
To add custom paper to the printer control panel and printer driver by importing a Custom Media Information File saved in a folder, click this button.
•Export Button
To export media information for added custom paper to a file, select the paper to export and click this button.
 | Important | • When adding or editing custom paper, make the same changes on all of the other PCs that use the target printer. The changes can be made easily by creating a Custom Media Information File (.am1 file) using the custom paper export function and importing the file on the other PCs.
• When deleting custom paper, make the same changes on all of the other PCs that use the target printer.
• When using custom paper in another printer, always add the custom paper to that printer before use. |
| Note | • Canon genuine paper and feed confirmed paper cannot be changed from this dialog box.
• Changing the display order of media types displayed in the printer control panel and printer driver is performed from the Edit Media Types dialog box regardless of whether it is Canon genuine paper or custom paper. |
|