Adjustment of Printing Effects
 | Select the printing effect. When the  icon is highlighted next to <zINFO>, you can press the <INFO> button. You can then adjust the printing effects. What can be adjusted or what is displayed will depend on the selection made in step icon is highlighted next to <zINFO>, you can press the <INFO> button. You can then adjust the printing effects. What can be adjusted or what is displayed will depend on the selection made in step |
The image brightness can be adjusted
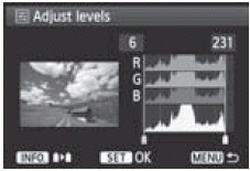
When you select [Manual], you can change the histogram’s distribution and adjust the image’s brightness and contrast. With the Adjust levels screen displayed, press the <INFO> button to change the position of the  . Turn the < . Turn the < > dial to freely adjust the shadow level (0 - 127) or highlight level (128 - 255). > dial to freely adjust the shadow level (0 - 127) or highlight level (128 - 255).
|  |
Effective in backlit conditions that can make the subject’s face look dark. When [On] is set, the face will be brightened for printing.
Effective in flash images where the subject has red eye. When [On] is set, the red eye will be corrected for printing
The  and [Red-eye corr.] effects will not show on the screen.
When [Detail set.] is selected, you can adjust the [Contrast], [Saturation], [Color tone], and [Color balance]. To adjust the [Color balance], use < >. B is for blue, A for amber, M for magenta, and G for green. The image’s color balance will be corrected towards the selected color.
If you select [Clear all], all the printing effect settings will be reverted to their defaults.
