|
|
MCT - Add Custom Paper (Windows)
| Article ID: ART137337 |
| |
Date published: 05/13/2015 |
| |
Date last updated: 10/30/2015 |
Description
In order to add new custom paper to the printer control panel and printer driver, first select the media type to use as the basis from among the Canon genuine paper and feed confirmed paper.
Solution
| In order to add new custom paper to the printer control panel and printer driver, first select the media type to use as the basis from among the Canon genuine paper and feed confirmed paper.. Add this as custom paper after making various changes to the standard paper as necessary.
|
|  | Important | • Canon offers absolutely no guarantees regarding the print quality or paper feed properties of customer paper.
• For Canon genuine paper and Canon feed confirmed paper, print using the media type as recommended in the Paper Reference Guide. The print quality and feed properties are not guaranteed if you use Add Custom Paper in the Media Configuration Tool.
• Do not execute printing on the target printer while adding custom paper.
• When adding custom paper, check the specifications of paper that can be added.
• Custom paper added using the add custom paper function can only be used by the printer driver. It cannot be used by other software. |
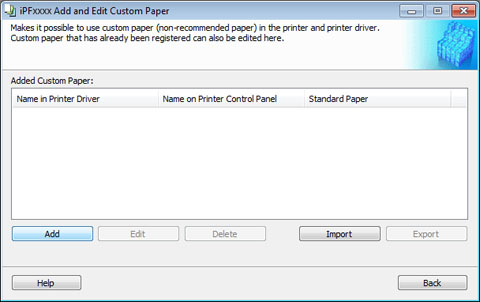
- Open the Add and Edit Custom Paper dialog box.
 | Note | | • For details on the procedure for opening the Add and Edit Custom Paper dialog box, see "Using Paper Other than Genuine Paper and Feed Confirmed Paper." |
- Click the Add button.
- The Step 1: Select the standard paper dialog box is displayed. In Paper Category, select the category of media type to use as the basis of the custom paper you are adding.
| Important | | • Select the category that you think is the closest to the custom paper you are adding. |
- The media type names of the Canon genuine paper and feed confirmed paper within the selected category are shown in Media Type Name. Select the media type to use as the basis of the custom paper, and click the Next button.
| Note | • If you do not know which media type to use as the basis of the custom paper, click the Assist button to open the Media Type Selection Assistance dialog box, and then set either the Weight (grammage) or the Thickness. The Media Configuration Tool automatically selects the appropriate paper from the selected paper category. Alternatively, select the media type called General from among the displayed Media Type Name.
• Depending on the selected category, there might not be a media type called General.
• Depending on the selected category, the Assist button may be disabled. |
- The Step 2: Set the custom paper name dialog box is displayed. Enter an arbitrary name to display in the printer control panel and printer driver, and then click the Next button.
| Note | • The characters that can be entered for Name in Printer Driver and Name on Control Panel are stated below. alphanumeric, space, "-", ".", "_", "()", "+", "%", ",", "/"
• For Name in Printer Driver up to 32 one Byte characters can be entered, and for Name on Control Panel up to 16 one Byte characters can be entered.
• Paper Name (English) is used in keeping track of the amount of roll paper left, in status print, etc. |
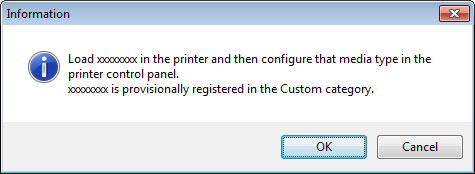
- Load the custom paper in the printer and then click the OK button.
| Important | | • Do not load paper that is curled or that has already been printed on. |
- The Step 3: Paper Source Settings dialog box is displayed. Select the paper source where the custom paper is loaded and then click the OK button.
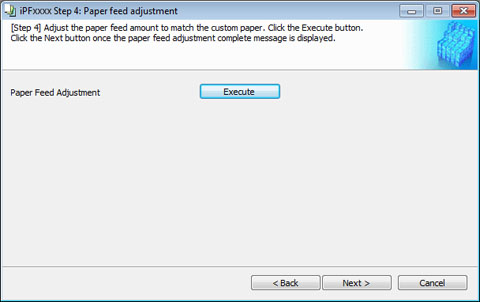
- The Step 4: Paper feed adjustment dialog box is displayed. Click the Execute button to execute paper feed adjustment. The adjustment pattern is printed, and the paper feed is automatically adjusted based on the printing result. Once the paper feed adjustment is complete, click the Next button.
| Important | • Check that there is no paper left on the ejection guide.
• If Paper Feed Adjustment is not executed, horizontal stripes with different color tones may appear in the printed material. Paper feed adjustment does not need to be executed more than once. Execute paper feed adjustment only once each time you add a custom paper. |
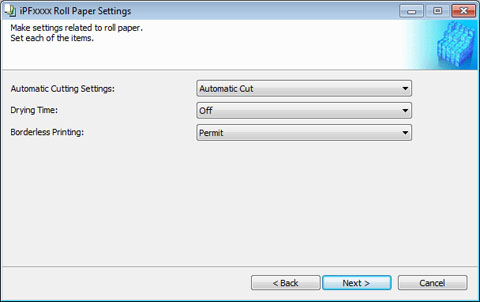
- The Roll Paper Settings dialog box is displayed.
| Note | | • If a paper source other than Roll Paper is selected in the Step 3: Paper Source Settings dialog box, this screen is not displayed. |
Configure the following settings as necessary, and then click the Next button. | Setting | Details | | Automatic Cutting Settings | Configures the method for cutting roll paper when it is ejected after printing.
• Automatic Cut :Roll paper is automatically cut by the cutter unit.
• Eject Cut :When the Cut key is pressed on the printer control panel, the roll paper is cut by the cutter unit. Select this if you do not want the printed material to drop immediately after printing, such as to wait for the ink to dry.
• User Cut :Cutting is not performed by the cutter unit. Cut the roll paper using scissors after each sheet. Select this for paper that cannot be cut by the cutter unit. | | Drying Time | Specify the time that the printer waits for ink to dry, as needed.
• Off :Ejects immediately after printing finishes.
• 30 sec./1 min./3 min./5 min./10 min./30 min./60 min. :Ejects after the specified time has elapsed after printing finishes. | | Borderless Printing | Configures whether or not to permit borderless printing.
• Permit : Borderless printing is permitted.
• Deny : Borderless printing is denied. |
| Important | • Depending on the paper, there are types that cannot be cut by the cutter unit, and types that speed deterioration of the blade and cause damage to the cutter. For thick paper, hard paper, etc. do not use the cutter unit, and instead cut the roll paper using scissors, etc. after printing. In this case, select User Cut as the Automatic Cutting Settings.
• If borderless printing is performed on paper where the ink drying is poor, the cutter unit may leave scratches where it touches the printed surface, or may not cut correctly. In this kind of situation, configure the amount of time to wait for the ink to dry after printing using Drying Time. Alternatively, if the paper cannot be cut well by the cutter, set the Automatic Cutting Settings to User Cut and cut the roll paper using scissors, etc.
• Paper where borderless printing can be performed is limited by the media type and roll paper width. • For custom paper where there is a need to set the Automatic Cutting Settings to User Cut, set the Borderless Printing to Deny. |
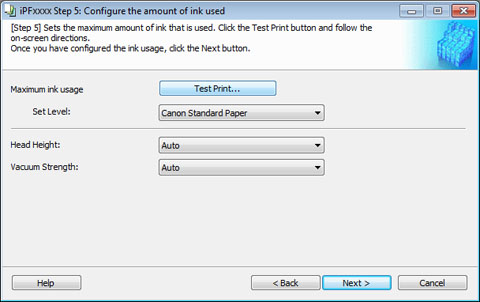
- The Step 5: Configure the amount of ink used dialog box is displayed. The upper limit on the amount of ink used to print to the custom paper is set on this screen by selecting from among several levels. First, click the Test Print button to perform a test print of each level.
| Note | | • If a standard paper that does not display the Name in Printer Driver is selected in the screen in Step 5, you cannot perform test prints or configure the maximum amount of ink to use. |
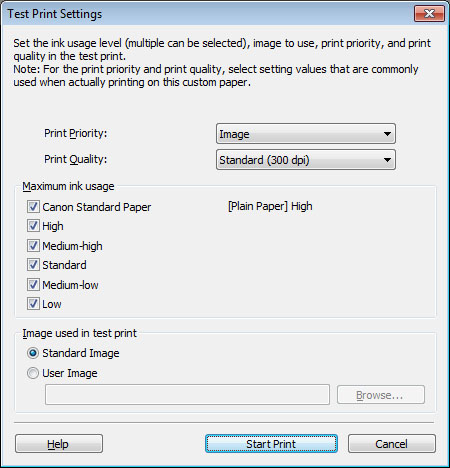
- The Test Print Settings dialog box is displayed. Select the print priority and print quality of the test print using Print Priority and Print Quality. Set the level to test print using Maximum ink usage and the image to use using Image used in test print, and then click the Start Print button.
- Determine and set the ink level that is thought to give the best visual test print results with no bleeding or scraping of ink.
 |
| Note | • Select the optimal ink level by referring to the help.
• If you cannot obtain sufficiently high quality printing no matter which maximum ink usage level you select, use the Step 1: Select the standard paper dialog box to change the paper that is the basis of the custom paper to another paper.
• Because this settings imposes an upper limit on the amount of ink used during printing, the printing result might not change even if the level is changed depending on the image.
• The color tone cannot be configured using the Media Configuration Tool. Although the color tone may change when the maximum ink usage is changed, at this point you should select the optimal level by only focusing on bleeding and scraping of ink. If the color tone needs to be adjusted, provide an ICC color profile that matches the paper you are using, and select that ICC color profile in your software. • Depending on the maximum ink usage setting, some of the print qualities in the printer driver may become unselectable. |
- Configure Head Height and Vacuum Strength as required and click the Next button. Usually, these do not need to be set.
| Important | • If you set the Head Height lower than the automatically set height in parentheses ( ), check that the printhead does not rub against the paper. (If the printhead rubs against the paper, there will be scratches in the printing results.) If the printhead rubs against the paper, this can cause damage to the printhead. • If you change the Vacuum Strength, check that the printhead is not rubbing against the paper. (If the printhead rubs against the paper, there will be scratches in the printing results.) If the printhead rubs against the paper, this can cause damage to the printhead.
• For details on the Head Height and Vacuum Strength, refer to the help. |
- The Step 6: Confirm the settings dialog box is displayed. Configure the settings of the custom paper, and then click the Next button.
The Confirm Update dialog box is displayed. Confirm the updates and then click the Execute button.
The custom paper is added to the control panel of the printer and to the printer driver of the PC you are using.
| Important | | • If you have added custom paper with the POP Board / Cardboard category as the Standard Paper, remove the loaded custom paper from the printer. |
| Note | | • When the custom paper is correctly added to the printer driver, the name of the added custom paper is displayed in the Edit Media Types dialog box that is opened by Add Genuine Paper in the Media Configuration Tool window. |
|
|