Understand setting options for scanning photos using your computer
Article ID: ART137519
|
Date published: 05/13/2015
|
Date last updated: 03/05/2019
Description
Learn about the setting options for creating the best photo scans using your computer.
Solution
Access the settings
Open the IJ Scan Utility.
Select Settings -> Photo Scan on the (Scanning from a Computer).
You can now make advanced scan settings.
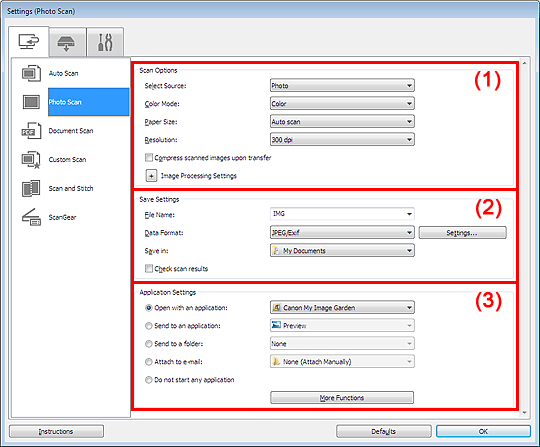
Scan options (1)
Select Source - Set to photo.
Color Mode - Select color or black and white. The Compress scanned images upon transfer checkbox must be uncheck for black and white. then set an option other than JPEG/Exif in Data Format of Save Settings.
Paper Size - Select the size of the item to be scanned. Select Custom to specify a specific size. Enter the width and height and select OK.
Resolution - Select the resolution. The higher the resolution, the more detail in the image and the larger the file size.
Compress scanned images upon transfer - This is useful when your scanner or printer and computer are connected with a slow interface such as USB1.1.
Image Processing Settings - Use sharpen outline to emphasize the outline of objects in the image.
Save Settings (2)
File Name - Enter the file name of the image to be saved. The date and four digits are appended to the name in the "_20XX0101_0001" format.
Data Format - Select the file format. Choose between JPEG/Exif, TIFF, or PNG.
Settings... - Select to display the Data Format Settings dialog box. Set image quality, PDF keyword search and compression, and the Auto Scan file format.
Save in - Choose the destination folder.To add a folder, selectAdd... from the pull-down menu, then click Add in the Select Destination Folder dialog and specify the destination folder.
Check scan results - This displays the Save Settings dialog box after scanning.
Application Settings Area (3)
Open with an application - Select this when you want to enhance or correct the scanned images. You can specify the application from the pull-down menu.
Send to an application - Select to open the scanned images in another application. Choose the application from the pull-down menu.
Send to a folder - Select to save the scanned images to a folder other than the one specified in Save in. You can specify the folder from the pull-down menu, or to add a new folder, selectAdd... from the pull-down menu, then click Add in the displayed Select Destination Folder dialog and browse to select and specify the destination folder..
Attach to e-mail - Select this when you want to automatically attach the scanned image to an email. Use the pull-down menu to choose the application.
Do not start any application - Select this to simply save the image to the folder specified in Save in.
Good to know
When the Settings dialog box is displayed from My Image Garden, the setting choices for Application Settings do not appear.

 (Scanning from a Computer).