To use the PIXMA MG5320 with a computer, the printer software will need to be installed on the computer.
Follow the steps below to set up your printer wirelessly.
Before you begin
-
Make sure your computer is connected to the router.
-
The configuration, router functions, setup procedures and security settings of the network device vary depending on your system environment.
- In an office setup, consult your network administrator
-
Log on as the administrator (or a member of the Administrators group).
-
Quit all running applications before installation.
-
Don't switch users during the installation process.
-
It may be necessary to restart your computer during the installation process. Follow the on-screen instructions and don't remove the Setup CD when you restart.
-
If the firewall function of your security software is turned on, a warning message may appear that Canon software is attempting to access the network. If this message appears, set the security software to always allow access.
Use the Setup CD to connect
-
Insert the Setup CD that came with your printer.
-
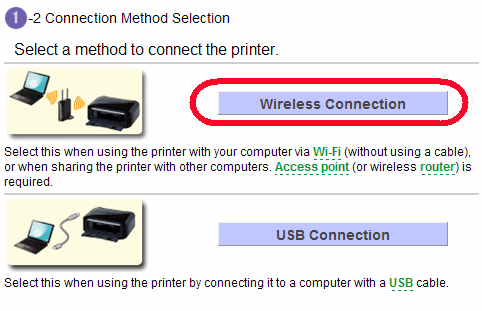
Follow the on-screen instructions until you get to screen 1-2 shown below, and select Wireless Connection.
- Continue to follow the on-screen instructions to complete the setup.
Download the Setup file to connect
If you don't have access to the Setup CD that came with your printer, follow these steps:
-
Go to the PIXMA MG5320 page.
-
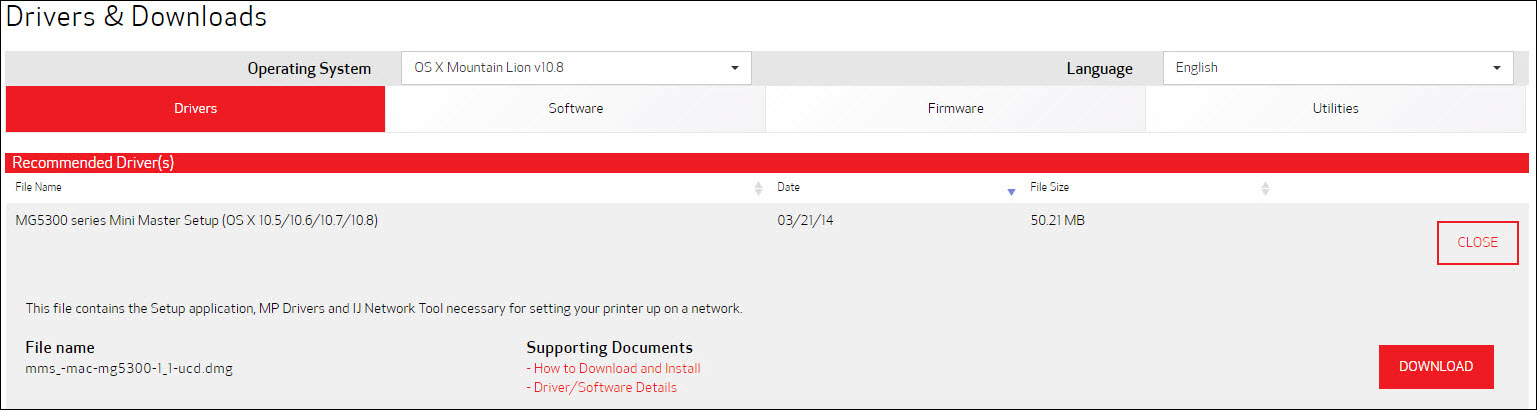
If your computer's operating system isn't automatically detected, select it from the drop-down menu.
-
From the Drivers tab, choose Select to the right of the listing for the Mini Master Setup.
-
Select the Download button to save the file to your computer.
- Once the download completes, double-click on the file from its download location to begin installation.
Windows 10 Users
If your computer is running Windows 10, the Setup CD and the Mini Master Setup file noted above does not contain the latest drivers for your printer. Follow these steps to set up your computer to use the printer wirelessly.
-
Use the printer's operation panel to connect the printer to the network via the Standard setup process.
-
Go to the PIXMA MG5320 page.
-
If your computer's operating system isn't automatically detected, select it from the drop-down menu.
-
From the Drivers tab, choose Select to the right of the listing for the MP Driver.

-
Select the Download button to save the file to your computer.
-
Once the download completes, double-click on the file from its download location to begin installation.
If the printer isn't detected during the installation
If your printer isn't detected during the installation process, check the following.
-
Make sure that your computer is connected to the same network that the printer is connected to.
-
If you have a firewall installed on your computer, temporarily disable it or allow exceptions to allow network communication.
-
If your computer is connected to a Virtual Private Network (VPN), disconnect from that network.
-
Turn off the printer and router (unplug the router if it doesn't have a power button). Wait 10 seconds, then turn the router on first, then the printer.
 If you turn off the printer and router when installing the drivers from the Setup CD or the Mini Master Setup, you may need to quit and relaunch the setup program.
