You can convert your high-definition scenes into standard-definition movies in the camcorder and then use the supplied PIXELAs software in order to upload them to your favorite video sharing Web site. This conversion can be completed in the camcorder itself or on a computer using the supplied software VideoBrowser. Photos can be uploaded using the supplied software ImageBrowser EX This section explains the details on how to convert uploaded video to standard-definition* (MPEG2 format). NOTE When being converted, video is copied from the built-in memory to the memory card slot B; or the memory card slot A to the memory card slot B. - When video is converted while being copied from the built-in memory to a memory card

- When video is converted while being copied from one memory card to another

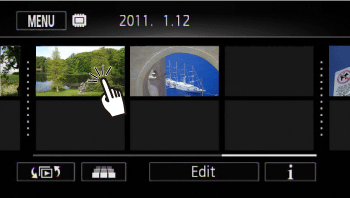
Down-converting selected scenes, scenes recorded on a specific date, and all of the scenes for video-sharing Web sites at once You can down-convert selected scenes, scenes recorded on a specific date, and all the scenes from the index screen at once. 1. Make sure there is a memory card in memory card slot  with sufficient available space. 2. Turn on the camcorder. 3. Press <  > to switch to movie playback mode. 4. Touch [Edit].
 NOTE - Drag your finger left/right until the date of the scenes you want to convert appears in the title bar. By pressing the <WEB> button, you can convert all the scenes recorded on a specific date.
5. Touch [Convert HD -> SD].

6. Select one of the options for converting multiple scenes.

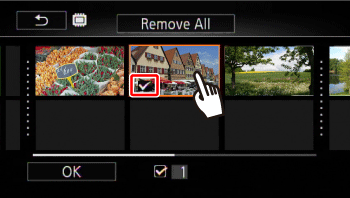
| Date | Converting scenes recorded on a specific date | | Select* | Converting selected scenes | | All Scenes | Converting all the scenes |
*Touch on the individual scenes you want to convert. A checkmark will appear on the scenes you touch. The total number of selected scenes will appear next to the [  ] icon. After selecting all the desired scenes, touch [OK].
NOTE - If a copyright notice appears, read it carefully and touch [OK] if you agree.
7. Review the conversion settings and touch [Next].
  Required memory capacity to convert to standard definition  Recording time  Number of scenes after conversion NOTE Before touching [Next], you can touch [  ] to change the conversion settings as described below. Using a higher bit rate will result in better video quality for the converted scenes, while a lower bit rate will result in smaller file sizes and faster uploads. Touch [ ] -> [Bit Rate (Quality)] to select either [3 Mbps] or [9 Mbps]. - To automatically divide scenes
If you are converting a long scene, you can have the camcorder divide it into 10-minute SD movies to make uploading easier. Touch [ ] -> [Auto Divide] to select [On].
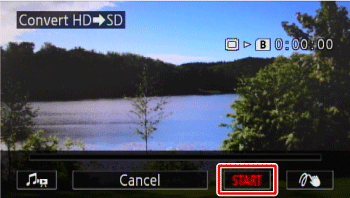
8. Touch [  ] to convert the scenes.
 NOTE Touch [  ]. For details on how to use the decoration tools, see Related information. - Adjusting the [Music Balance] or [Speaker Volume]
Touch [  ], and touch the left/right marks in the adjustment bar, or drag your finger left/right on the bar to make adjustments.
Touch [  ] to interrupt the operation while it is in progress.
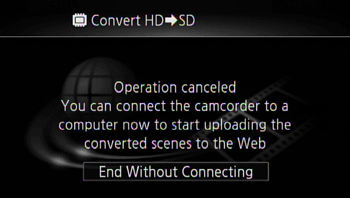
9. When the conversion is completed, the following screen appears.
 - When uploading directly from a computer
After the camcorder is connected to a computer via the supplied USB cable, the supplied PIXELAs software start screen appears, so upload the data. - When touching [End Without Connecting]
The screen switches to the built-in memory or memory card slot A from which the data is converted. When uploading data, make sure to switch from the video index screen first, and then connect it to a computer. For details on how to upload data, please see the supplied PIXELAs software Instruction Manual. REFERENCE You can play back and delete the converted SD movies from the [SD Movies] index screen on the memory card used for the conversion.
NOTE - The time required to convert scenes is approximately equal to the total playback time of the converted scenes. In most cases this is still faster than converting the scenes in the computer so we recommend you convert scenes in the camcorder.
- The maximum total playback time of the scenes to be converted to standard definition is 12 hours.
- Video snapshot scenes and photos cannot be captured from scenes converted to standard definition.
- Scenes cannot be converted to standard definition when memory card B already contains the maximum number of folders or scenes
Converting Scenes into Standard Definition from a Story by Rating From the gallery screen, the scenes from a story are converted to standard definition (an MPEG2 format) by rating. NOTE When converting scenes from a story - All the scenes are merged into one converted SD movie.
- If the converted SD movie is too large, it will be split into smaller 10-minute long movies when [Auto Divide] is set to [On].
- The maximum total playback time of the scenes to be converted is 2 hours and 30 minutes.
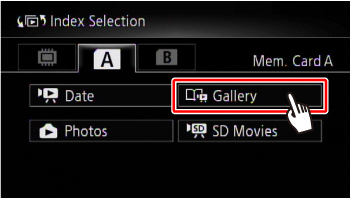
1. Make sure there is a memory card in memory card slot with sufficient available space. 2. Turn on the camcorder. 3. Press < > to switch to movie playback mode. 4. Open the gallery. Check that you have selected the  tab (built-in memory) or  tab (memory card A).
 5. Select the desired story. Bring the desired story to the front.
 6. Touch [Story Details].
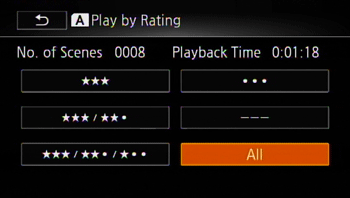
 7. Touch [Play by Rating].
 8. Touch the desired rating and then touch [  ].
 9. Press <WEB>.
 NOTE You can also convert scenes by touching [Edit] -> [Convert -> SD].
10. Review the conversion settings and touch [Next]. Proceed to Step 7 for "Down-converting selected scenes, scenes recorded on a specific date, and all of the scenes for video-sharing Web sites at once". Converting Only Part of a Scene or Story 1. Make sure there is a memory card in memory card slot with sufficient available space. 2. Turn on the camcorder. 3. Press < > to switch to movie playback mode. 3. Play back the scene or story that you want to partially convert. - When converting only part of a scene
Display the index screen for the built-in memory or memory card slot A, from which data is converted, and touch the scene. - When converting only part of a story.
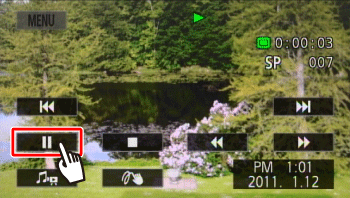
Display the gallery screen for the built-in memory or memory card slot A, from which data is converted, and touch the story. 4. Touch the screen to display the playback controls. 5. Touch [  ] where you want the converted SD movie to begin.
 6. Press <WEB> button.
7. Review the conversion settings and touch [Next]. Proceed to Step 7 for "Down-converting selected scenes, scenes recorded on a specific date, and all of the scenes for video-sharing Web sites at once". NOTE The video from the playback pause until the end of the scene/story (or up to a maximum of 10 minutes, in case of longer scenes/stories) will be converted to standard definition.
|