When scanning from the platen glass You can scan multiple documents only when - Selecting [PDF] or [PDF (Multiple Pages)] in [Save as Type]. - [Paper Size] in the step 6 is set to "Fit the image."
2. Press [].
3. Select <Remote Scanner> using [] or [] and press [OK]. The machine is now waiting to be scanned.
4. Double-click the [Canon MF Toolbox 4.9] icon on the desktop. The MF Toolbox starts.
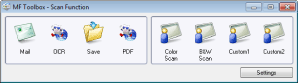
5. Click an applicable MF Toolbox button.
[Mail]
The document will be scanned and attached to an e-mail message in your e-mail application.
[OCR]
The document will be scanned and read by the OCR software.
[Save]
The document will be scanned and saved.
[PDF]
The document will be scanned and saved as a PDF file.
[Color Scan] [B&W Scan] [Custom 1] [Custom 2]
The document will be scanned and displayed in the registered application. A dialog box appears for each of the buttons.
NOTE
Applications that can be registered in the MF Toolbox buttons The following applications can be registered in the MF Toolbox buttons if they are installed. [OCR]: Presto! PageManager [PDF]: Presto! PageManager
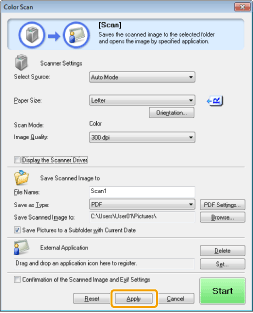
6. Specify the scanner settings as needed. Clicking [Apply] saves the settings. For details, see "Using the MF Toolbox."
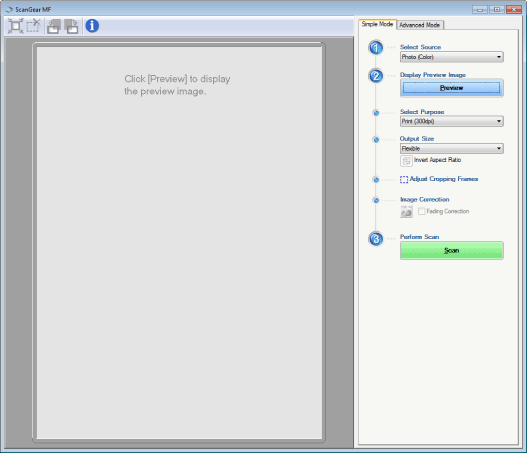
7. Click [Start]. Scanning starts. If you selected the [Display the Scanner Driver] check box in Step 6 The [ScanGear MF] dialog box will appear.
(1)
Specify the settings as needed. For details, see "Using the ScanGear MF."

 ].
]. 
 ] or [
 ] and press [OK].