Follow the steps below to change the size of a copy from the print settings of the PIXMA MG6220.
Resize a copy
-
Turn the printer ON.
-
Load paper into the printer.
-
Select  Copy on the Home screen.
-
Load the original on the glass surface.
-
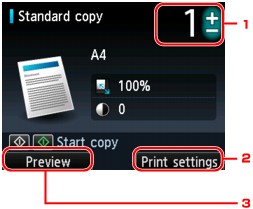
Press the right function button under Print settings (2) to select the page size, media type, and magnification setting.
-
After you make the changes, tap left function (3) to preview the print.
-
While in preview mode, you can tap the up or down arrow 
 to increase or decrease the output image size.
-
Tap Stop to reset the settings for magnification, intensity, and number of copies.
-
You can't change the size of the output image when the magnification is set to Fit to page.
-
Select the plus (+) or minus (+) (1) symbols to choose the number of copies.
-
Select Color for a color copy, or Black for a black & white.
-
Don't open the document cover or remove the original from the scanner glass until scanning completes.
-
Remove the original from the scanner glass after copying completes.
-
Tap Stop if you need to cancel the print.
Settings
This section describes the setting items in Standard copy.
-
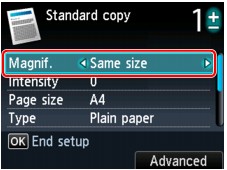
On the Copy standby screen, tap right Function to change the copy settings such as page size, media type, and print quality.
-
Use the up or down arrow to select the setting item, and the left or right arrow 
 to change the setting.
-
Tap OK to confirm the selection. The settings are retained even if the printer is turned off.
-
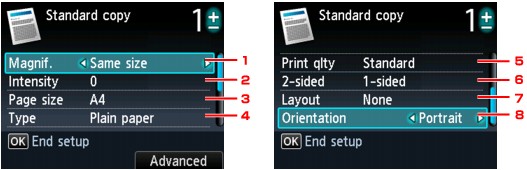
Magnif. (Magnification) (1) - Choose the reduction/enlargement method.
-
Intensity (2) - Choose the intensity. When Auto is selected, the intensity is adjusted automatically according to the originals loaded on the platen glass. Auto is displayed on the Copy standby screen.
-
Page size (3) - Select the page size of the loaded paper.
-
Type (Media type) (4) - Select the media type of the loaded paper.
-
Print qlty (Print quality) (5) - Adjust print quality according to the original.
-
2-sided (6) - Two sided or one sided copying.
-
Layout (7).
-
Orientation (8) - Portrait or Landscape.
 Please note:
-
Some setting items can't be selected and are grayed out because of the copy menu type.
-
An error may display on the screen if you try to combine different settings. Press the left Function button to confirm the error message, then adjust the settings to correct the error.
-
.You will get the specified function is not available with current settings message if you try to copy with a setting that isn't available. Follow the on-screen instructions to change the setting.
-
Select High for Print qlty to copy in grayscale. Grayscale produces tones in a range of grays instead of black or white.
-
If you use Fast for Print qlty with Type set to Plain paper and the quality isn't as good as expected, select Standard or High for Print qlty and try to copy again.
Reduce or enlarge a copy
The screen below displays when you select the right Function button on the Copy standby screen. Select the reduction or enlargement method from the Magnif. setting.
You can select ratio specified, preset-ratio, or fit-to-page.
Based on the copy menu, some of the reduction or enlargement methods may not be available.
Ratio specified:

-
You can specify the copy ratio as a percentage to reduce or enlarge copies.
-
Use the up or down arrow button to specify the magnification ratio.
-
400% MAX (maximum copy ratio) and 25% MIN (minimum copy ratio) are available.
Preset ratio:

Fit to page:

-
The printer automatically reduces or enlarges the image to fit the page size.
-
When you select Fit to page, the page size may not be correctly detected. Please switch to a different setting.
If your product issue was not resolved after following the steps above, or if you require additional help, please create or log in to your Canon Account to see your technical support options.
Or if you still need help, visit our Canon Community by clicking the button below to get answers:

____________________________________________________________________________________________
