Confirm the correct scanner is selected in Preferences (Windows) - MX360
| Article ID: ART140715 |
| |
Date published: 05/13/2015 |
| |
Date last updated: 08/17/2015 |
Description
On General tab of Preferences window, select the appropriate scanner.
Solution
Preferences
Prior to scanning using MP Navigator EX, confirm the appropriate scanner is selected in the Product Name drop-down of MP Navigator's Preferences window.
On the Windows desktop, double-click the MP Navigator EX icon  to open MP Navigator EX.
Alternatively, on the Windows taskbar, click 'Start', point to (All) Programs, Canon Utilities, then MP Navigator EX.
Then click 'MP Navigator EX'.
MP Navigator EX opens.
Click Preferences.
The Preferences dialog box opens.
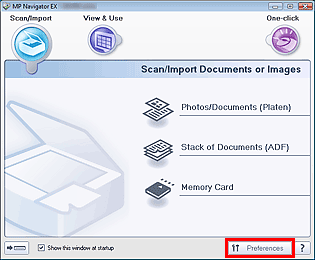
The above screen will vary based on model.
In the Preferences dialog box, click the 'Product Name' drop-down arrow and select the scanner name that matches your model.
Note: For USB connection, select (model name) series for Product Name.
Click OK.
The Preferences dialog box closes. You can now scan via a network connection.
Go to the Main Menu to check whether network scanning is enabled.

The above screen will vary based on model.
